
Price Spectre Tutorial
Welcome to Price Spectre, the automated repricing tool for eBay sellers. This tutorial walks you through everything you need to know — from creating your account to setting up your first listing for automated repricing and mastering every tool available to you.
Whether you sell a handful of items or manage a large eBay store, Price Spectre helps you stay competitive by automatically adjusting your prices based on real-time competitor data.
Table of Contents
- Getting Started
- Key Concepts
- Setting Up a Listing for Repricing
- Tools Reference
- Managing Your Account
- Tips for Success
- Frequently Asked Questions
Getting Started
Creating Your Account
There are two ways to create a Price Spectre account. Choose whichever is most convenient for you.
Option A: Sign Up with eBay (Recommended)
This is the fastest way to get started because it creates your Price Spectre account and links your eBay account in a single step.
- On the Price Spectre home page, click Register.
- On the registration page, click the eBay logo button.
- You will be redirected to eBay's authorization page. Sign in to your eBay account and grant Price Spectre permission to view and manage your listings.
- After authorizing, you will be redirected back to Price Spectre with your account created automatically.
After completing the eBay sign-up flow, you will see a confirmation screen with options to Set Up Billing or Start Using Price Spectre. Your eBay listings will begin downloading automatically in the background.
Tip: If you already have a Price Spectre account, signing in with eBay will log you into your existing account rather than creating a new one.
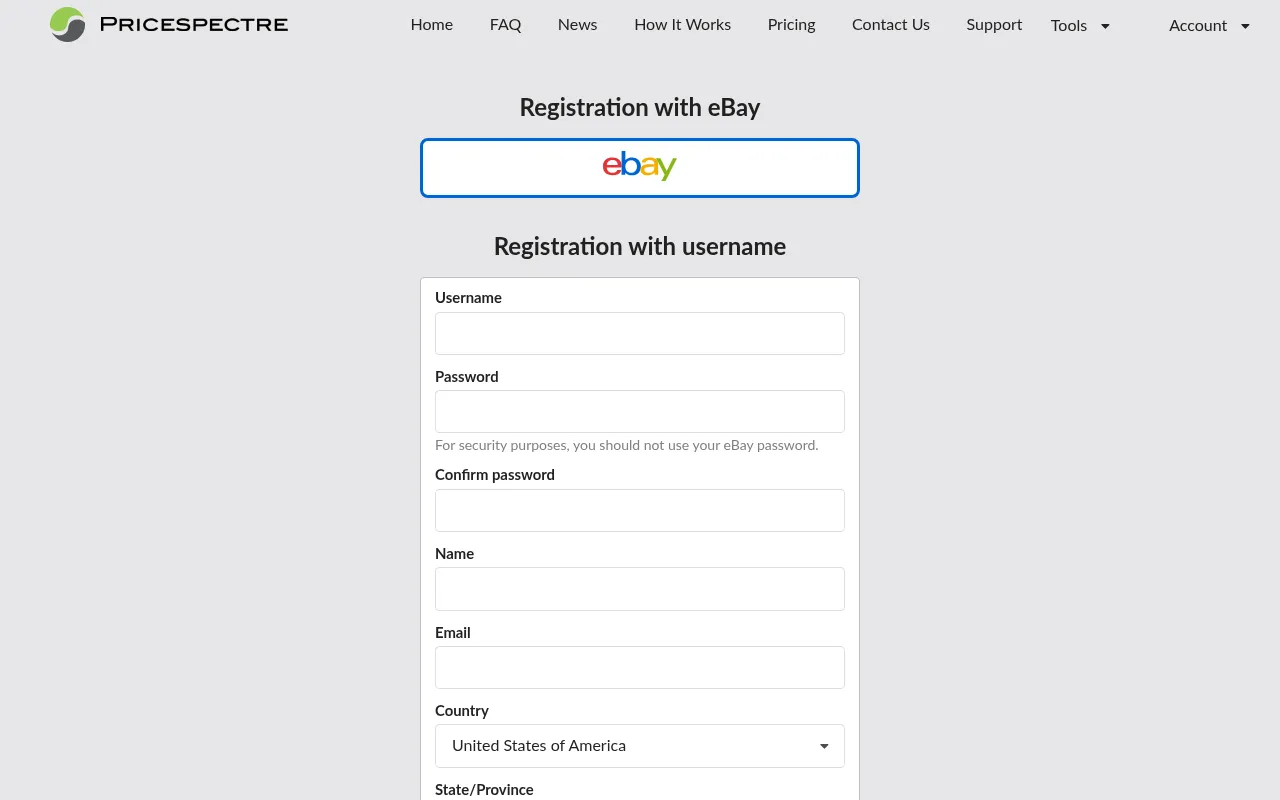
Option B: Sign Up with Email
If you prefer to create a traditional account first and link your eBay account later:
- On the Price Spectre home page, click Register.
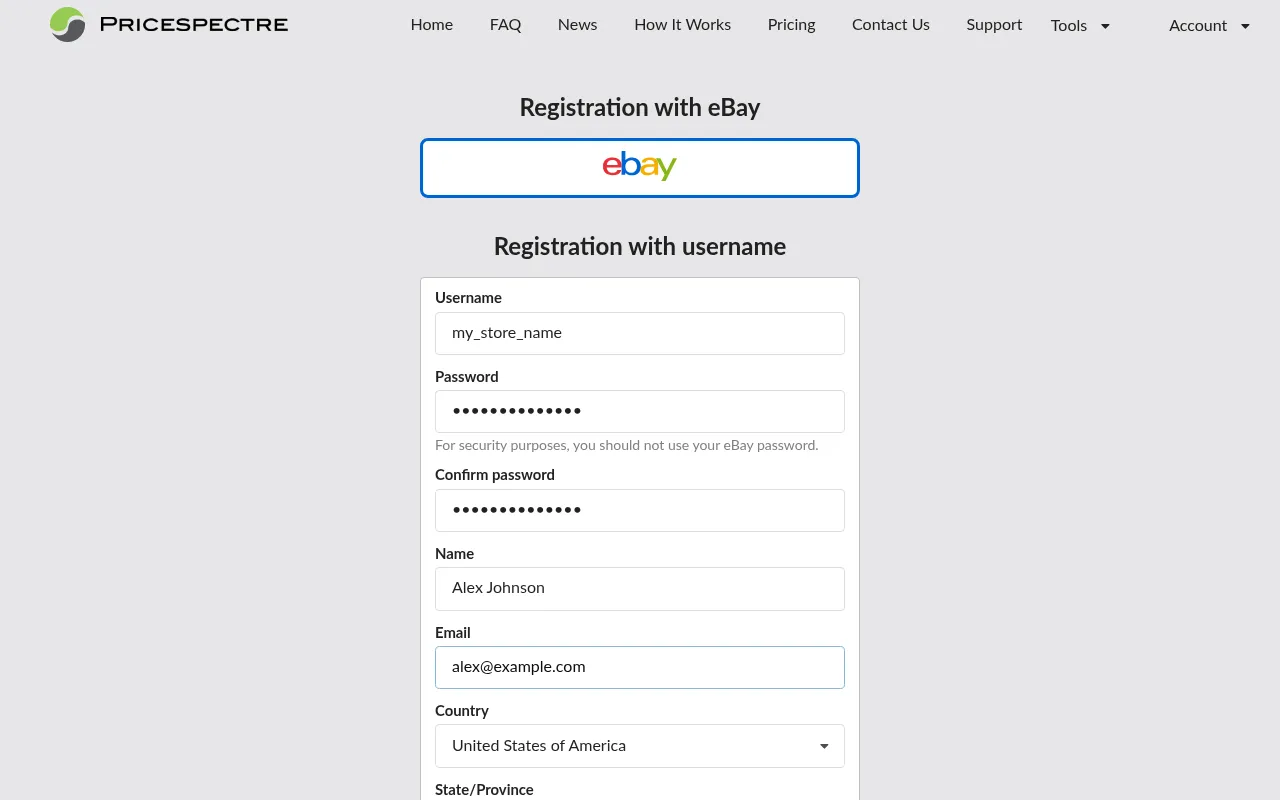
- Fill in the registration form:
- Username — choose a unique username
- Password and Confirm Password — choose a secure password
- Name — your full name
- Email — a valid email address for notifications
- Country, State/Province, and Postal Code — your location
- Check the box to agree to the Terms of Service and Fee Schedule.
- Complete the captcha verification.
- Click Register.
After registering, you will be prompted to link your eBay account. You can do this immediately or come back to it later from the Account section.
Note: You will need to link at least one eBay account before you can use Price Spectre's repricing features.
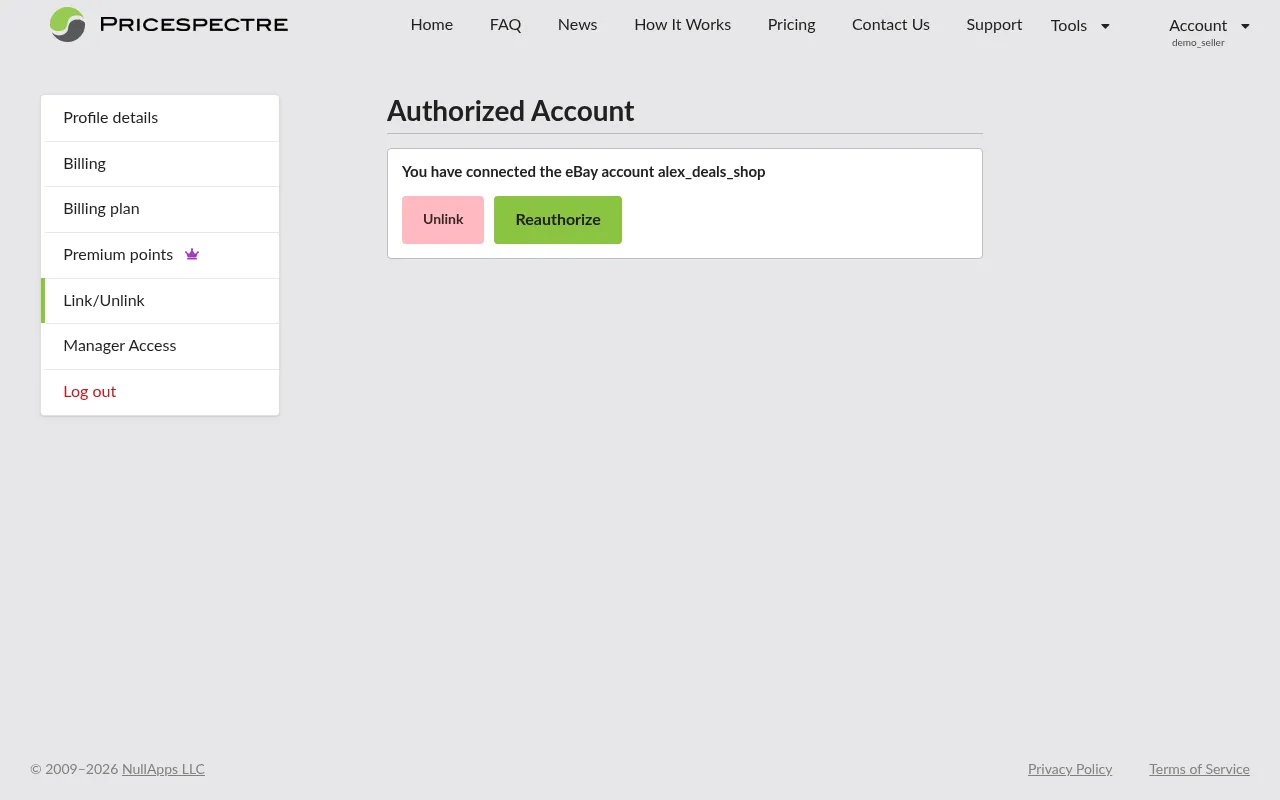
Linking Your eBay Account
If you registered with email (Option B above), you will need to link your eBay account before you can use repricing features:
- Navigate to Account > Link/Unlink from the account menu.
- Click the button to link your eBay account.
- You will be redirected to eBay's authorization page. Sign in and grant Price Spectre the required permissions.
- After authorizing, you will be redirected back to Price Spectre with a confirmation that your account has been linked.
One account per login: Each Price Spectre account supports one linked eBay seller account. If you operate multiple eBay stores, create a separate Price Spectre account for each one, or apply for a manager account to oversee multiple stores from a single dashboard.
Reauthorization: eBay authorization tokens expire periodically. When this happens, Price Spectre will notify you, and you can reauthorize from the Link/Unlink page by clicking the reauthorize option next to the affected account.
Unlinking: If you no longer want Price Spectre to manage listings from a particular eBay account, you can unlink it from the same page.
Setting Up Billing
Price Spectre uses a tiered billing model based on the number of listings you have set to "managed" status. You only pay for listings that are actively being repriced.
- Navigate to Account > Billing from the account menu.
- Review your current account balance and billing status.
- Add a payment method or make a deposit to fund your account.
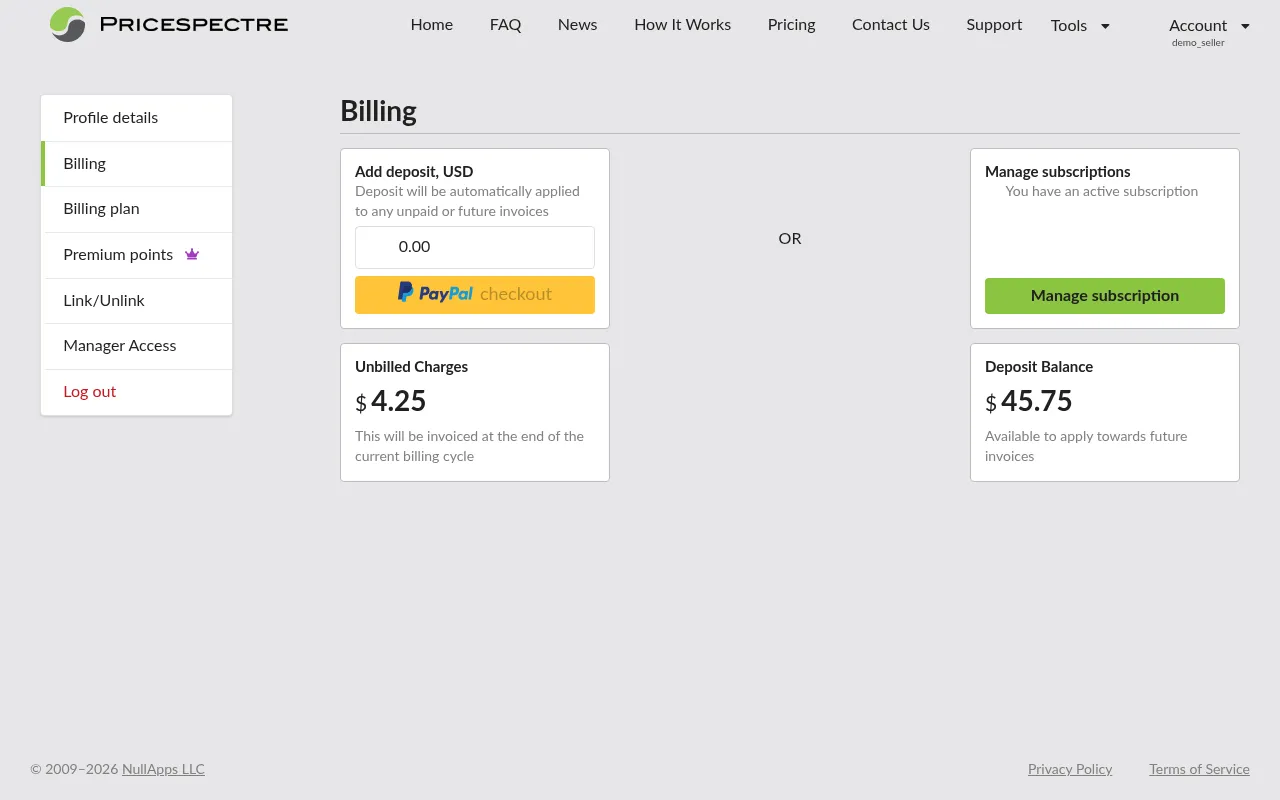
To view or change your subscription plan:
- Navigate to Account > Billing Plan.
- Review the available plan tiers and their features.
- Select the plan that best fits your needs.
Tip: Start with a small number of managed listings to learn the system before scaling up. You can always upgrade your plan later.
Price Spectre also offers Premium Points, a secondary credit system that unlocks advanced features like faster repricing intervals. You can learn more about Premium Points in the Managing Your Account section.
Your First Look Around
Once you have registered and linked your eBay account, your listings will begin downloading automatically. This is usually fast — even large stores typically finish within seconds to a few minutes. Price Spectre will let you know when the download is complete and your listings are ready.
To see your listings:
- Click Tools in the navigation bar.
- Select Price Spectre from the side menu — this is your main dashboard.

The Tools menu on the left side contains 18 different tools. You do not need to learn them all at once — the most important one to start with is the Price Spectre main dashboard, where you can search, browse, and manage your listings.
Key Concepts
Before diving into the repricing setup, it helps to understand a few core concepts that you will encounter throughout Price Spectre.
Managed vs. Unmanaged Listings
Every eBay listing that Price Spectre downloads from your account starts as unmanaged. This means it appears in your dashboard but is not being actively repriced.
When you set a listing to managed, Price Spectre will:
- Regularly search eBay for competing listings
- Apply your chosen pricing algorithm to determine the best price
- Automatically update your eBay listing price, or generate price recommendations for you to review if you prefer manual repricing
Both automatic and manual repricing modes count toward your billing tier when a listing is managed. You control which listings are managed at any time.
Floor and Ceiling Prices
These are the hard price boundaries that Price Spectre will never cross:
- Floor Price — the absolute minimum price for your listing. Price Spectre will never set your price below this amount, no matter what the competition looks like.
- Ceiling Price — the maximum price limit. Price Spectre will never set your price above this amount.
Note: A floor price is required for all managed listings — Price Spectre will not allow you to enable repricing without one. Take the time to calculate a meaningful floor that covers your product cost, eBay fees, shipping costs, and desired profit margin.
Search Parameters
Search parameters define how Price Spectre finds your competitors on eBay. When the system reprices a listing, it runs a search using the parameters you configure and analyzes the results. Key parameters include:
- Keywords/Title — the search terms used to find competing listings
- Category — the eBay category to search within
- Item Condition — filter by New, Used, Refurbished, etc.
- Feedback Range — minimum and maximum seller feedback scores
- Price Range — filter out competitors outside a price window
- Quantity Range — filter by available stock levels
- Handling Time — maximum handling time for competitors
- Seller Lists — include, exclude, or exempt specific sellers
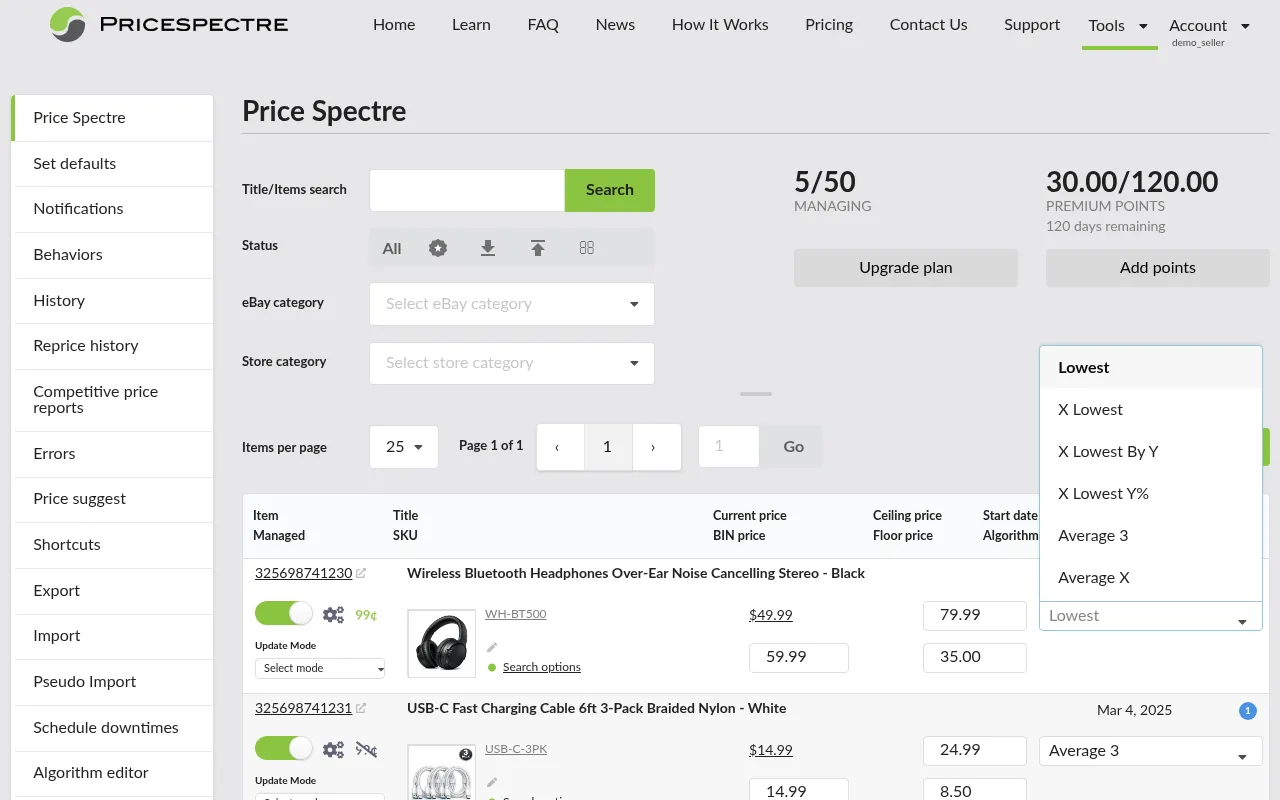
Repricing Algorithms
Algorithms are the rules that determine how your price is calculated based on competitor data. Price Spectre offers several built-in algorithms, and you can also create your own.
Built-in Algorithms:
Lowest — sets your price just below the lowest competitor. Example: If competitors are priced at $20, $22, and $25, your price is set to $19.99.
X Lowest — sets your price just below the Xth lowest competitor. Example: With X=2 and competitors at $20, $22, and $25, your price is set to $21.99 (just below the 2nd lowest).
X Lowest By $Y — sets your price at the Xth lowest competitor's price minus a fixed dollar amount $Y. Example: With X=1 and Y=2, competitors at $20, $22, and $25, your price is set to $18.00 ($20 minus $2).
X Lowest Y% — sets your price at the Xth lowest competitor's price minus Y percent. Example: With X=1 and Y=10, competitors at $20, $22, and $25, your price is set to $18.00 ($20 minus 10%).
Average 3 — sets your price at the average of the 3 lowest competitor prices. Example: Competitors at $20, $22, and $25 gives an average of $22.33, so your price is set to $22.33.
Average X — sets your price at the average of the X lowest competitor prices. Example: With X=5 and competitors at $20, $22, $25, $27, and $30, your price is set to $24.80.
Discount X Days Y — reduces your price by a fixed dollar amount (Y) every X days. Useful for clearance or time-sensitive inventory. Example: With X=7 and Y=1, your price drops by $1 every week until it reaches your floor price.
Discount X Days Y% — reduces your price by Y percent every X days. Example: With X=7 and Y=5, your $100 item drops to $95 after one week, $90.25 after two weeks, and so on until it reaches your floor price.
Tip: If you are just getting started, the Lowest or Average 3 algorithms are good choices. They keep you competitive without requiring advanced configuration. You can always switch algorithms later.
Custom Algorithms: For more advanced pricing strategies, you can write custom algorithms using the Algorithm Editor or use the AI-powered AlgoForge tool to build them through conversation.
Repricing Frequency
Price Spectre reprices your managed listings on a regular schedule:
- Standard repricing runs approximately every 4 hours. This is included with all plans.
- Premium repricing runs as frequently as every 15 minutes. This requires Premium Points and is ideal for high-competition categories where prices change rapidly. Even faster intervals may be available — contact support for details.
Baťa Pricing
Baťa pricing (also known as psychological pricing) rounds your repriced amounts to end in .99 or .9 — for example, $19.99 instead of $20.00. This is enabled on a per-listing basis through a toggle in the listing's settings. The specific cents value or rounding behavior can be configured through the Behaviors tool.
Setting Up a Listing for Repricing
This section walks you through the complete process of taking an eBay listing and configuring it for automated repricing in Price Spectre. By the end of these steps, Price Spectre will be actively monitoring your competition and adjusting your price automatically.
Step 1: Find Your Listing
Once your eBay account is linked, your listings are automatically downloaded into Price Spectre. To find a specific listing:
- Navigate to Tools > Price Spectre from the side menu.
- Use the search bar at the top of the page to find your listing. You can search by:
- eBay Item ID — the numeric ID from your eBay listing
- Title — full or partial listing title
- Category — browse by eBay category
- Adjust the results per page (25, 50, 75, or 100) if you need to browse through many listings.
Tip: If you have a large number of listings, consider using the Shortcuts tool to manage them in bulk — you can toggle all listings at once, or filter by eBay or Store category.
Step 2: Set Floor and Ceiling Prices
These are your safety rails — the absolute boundaries that Price Spectre will never cross.
- Floor Price — enter the minimum price you are willing to accept for this item.
- Ceiling Price — enter the maximum price you want to list at (optional but recommended).
How to calculate your floor price:
Consider all costs associated with selling the item:
- Product cost — what you paid for the item
- eBay fees — final value fees, insertion fees, and payment processing fees (typically 13-15% of the sale price)
- Shipping costs — if you offer free shipping, factor this in
- Desired profit margin — the minimum profit you need to make the sale worthwhile
Example: You sell a widget that costs you $12. eBay fees are approximately 13%, and shipping costs you $4. To maintain a minimum $3 profit:
Floor = ($12 + $4 + $3) / (1 - 0.13) = $21.84
So you would set your floor at $22.00 (or slightly higher for additional margin).
Note: A floor price is required before a listing can be set to managed. Price Spectre enforces this to ensure your price never drops below a level you are comfortable with.
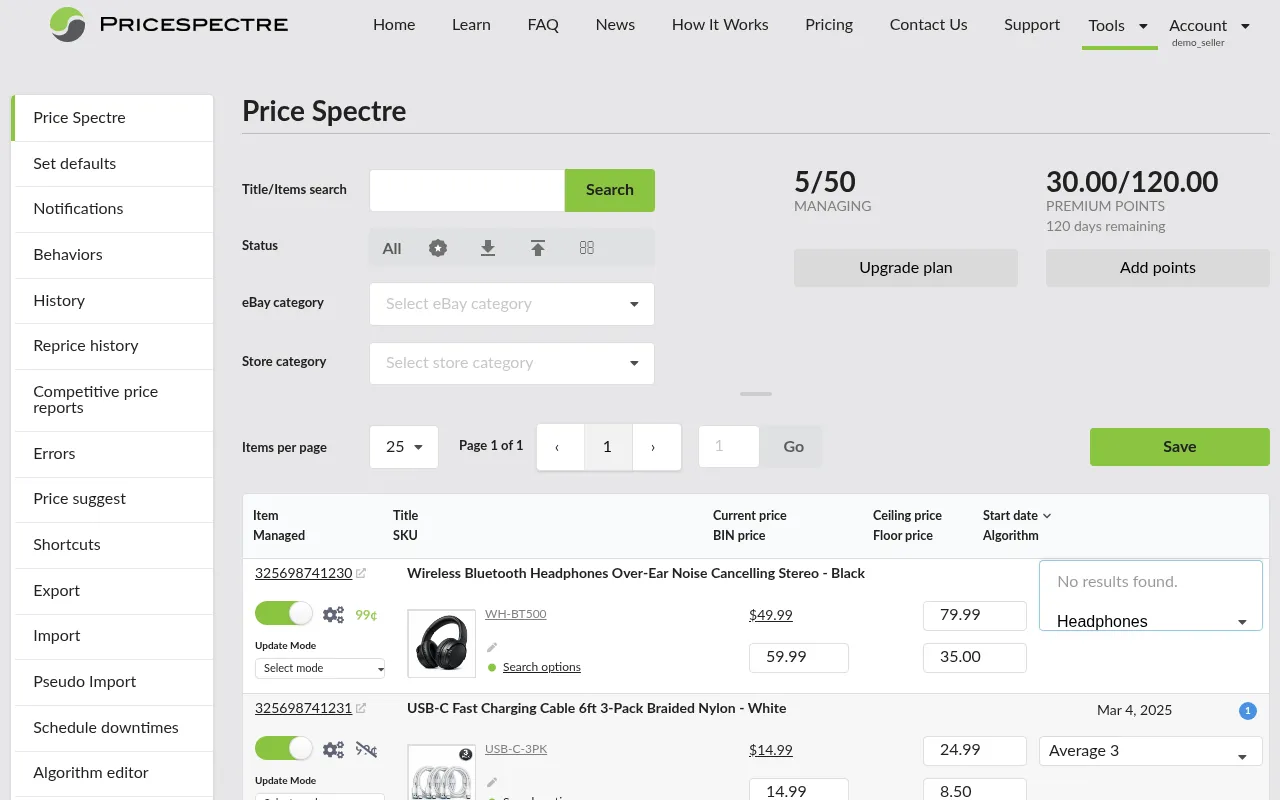
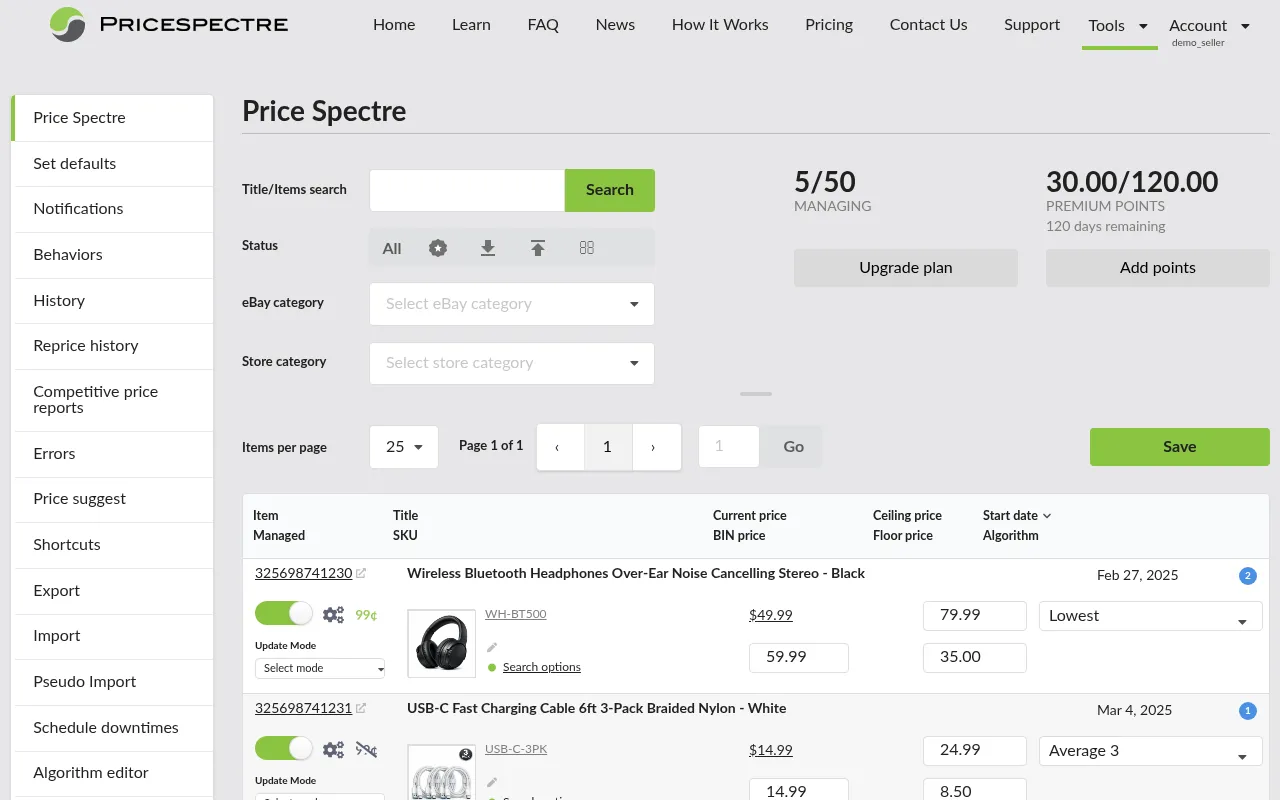
Step 3: Choose a Repricing Algorithm
Select the algorithm that best fits your pricing strategy for this listing:
- In the listing detail view, find the Algorithm dropdown.
- Select from the available algorithms.
Recommendations for getting started:
- If you want to always be the lowest price, choose Lowest. This undercuts the cheapest competitor by $0.01.
- If you want a more moderate approach, choose Average 3. This prices you at the average of the three lowest competitors, keeping you competitive without always being the cheapest.
- If you are clearing inventory, choose Discount X Days $Y or Discount X Days Y% to automatically reduce your price over time.
You can change your algorithm at any time without disrupting the listing. Price Spectre will apply the new algorithm on its next repricing cycle.
Step 4: Configure Search Parameters
Search parameters tell Price Spectre how to find your competitors. Getting these right is the most important part of the setup — accurate search parameters lead to accurate repricing.
To access the search parameters for a listing, click the Search Options button on the listing detail view. This opens the search console where you can configure the following:
Keywords
- Keywords are the search terms used to find competing listings on eBay. When available, they are automatically populated from your listing's product details (such as UPC, ISBN, or catalog data).
- You can customize the keywords at any time. Good keywords are concise and focus on the core product — avoid promotional text, condition notes, or filler words.
- Example: Rather than using "Brand New Apple iPhone 15 128GB - FAST SHIPPING!!!", use "Apple iPhone 15 128GB" to find more relevant competitors.
Category
- Optionally restrict the competitor search to a specific eBay category. If no category is selected, Price Spectre searches across all categories, which casts a wider net but may include less relevant results.
Item Condition
- Select which item conditions to include in competitor searches: New, Used, Refurbished, For Parts, etc.
- By default, this is set to match your own listing's condition. You can broaden it to compare against other conditions if relevant.
Feedback Range
- Set a minimum and maximum seller feedback score to compare against sellers of similar reputation.
- Example: If you have 5,000 feedback, you might set a minimum of 100 to filter out brand-new sellers who may be pricing unrealistically low.
Price Range
- Optionally set a minimum and maximum price window for competitor searches.
- This filters out outlier prices that could skew your repricing — such as listings priced absurdly low (possible scams) or absurdly high. It is also useful for filtering out listings that match your keywords but are not the same product (e.g., a perfume tester matching a full-size perfume, or a game manual matching the full game).
Quantity Range
- Filter competitors by how much stock they have available.
- This is useful for ignoring casual sellers with very low stock or for focusing on sellers with similar inventory levels.
Handling Time
- Set a maximum handling time to only compare against sellers who ship within a similar timeframe.
Seller Lists
- Include Sellers — only compare against these specific sellers (useful if you have known direct competitors).
- Exclude Sellers — never include these sellers in competitor analysis (useful for filtering out sellers who consistently list at unrealistic prices).
Step 5: Perform a Competitive Search
Before enabling repricing, use the search console to run a live competitive search and review the results. This lets you verify that your search parameters are finding the right competitors before any automated repricing takes place.
- In the search console (opened via Search Options), click the Search button to run a search using your current parameters.
- Review the competitor listings returned. Check that the results are relevant — they should be the same or comparable product at a similar condition.
- If the results include irrelevant listings or miss obvious competitors, go back and adjust your search parameters (keywords, category, price range, conditions, etc.) and search again.
- Repeat until you are satisfied that the results represent your true competition.
Tip: Too few results may mean your parameters are too narrow; too many may include irrelevant listings. Getting this right upfront saves you from unexpected repricing behavior later.
Tip: If competitors are present but seem wrong — unexpected sellers, missing obvious matches — open Tools > Search Diagnostic for the same listing. The Diagnostic shows the rejected candidates alongside the filter rule that dropped each one, making it easy to identify and fix the specific filter causing the mismatch.
Step 6: Enable (Manage) the Listing
With your floor price, algorithm, and search parameters all configured and verified, you are ready to enable repricing:
- Close the search console and return to the listing detail view.
- Toggle the listing status from Unmanaged to Managed.
When a listing is set to managed, Price Spectre will begin actively searching for competitors and repricing it on its regular cycle. This listing will now count toward your billing tier.

Note: You can switch a listing back to unmanaged at any time. When you do, Price Spectre stops repricing it and it no longer counts toward your billing tier.
Step 7: Configure Behaviors (Optional)
For fine-tuned control over how repricing works, navigate to Tools > Behaviors. Behaviors apply globally across all your managed listings:
- Ignore shipping costs — exclude shipping from price comparisons. This is useful for items that ship via freight or where shipping costs are customized per buyer.
- Permanent price changes — by default, repricing changes can be temporary. Toggle this to make all price changes permanent.
- Baťa pricing — configure the cents value or rounding behavior for listings that have Baťa pricing enabled (Baťa pricing itself is toggled per-listing in the listing's settings).
- No competition found — choose what happens when no competitors are found: use your Buy It Now price, floor price, ceiling price, or do nothing.
- Below floor — if the algorithm suggests a price below your floor, use the floor price or a custom fallback.
- Above ceiling — if the algorithm suggests a price above your ceiling, use the ceiling price or a custom fallback.
Tip: Behaviors apply to all your managed listings. The defaults you set in Set Defaults provide baseline configuration, while Behaviors give you control over global repricing rules.
Step 8: Monitor Your Listing
After setting up your listing, give Price Spectre one or two repricing cycles (4-8 hours for standard repricing) and then check how it is performing:
History — navigate to Tools > History and search for your listing. You will see a full reprice-history report: a listing card, summary stat cards for the last 30 days, a price chart that plots your price against the competitor low/high range and your floor, and a filterable list of recent reprice events. Click any event to open its detailed Reprice Record.
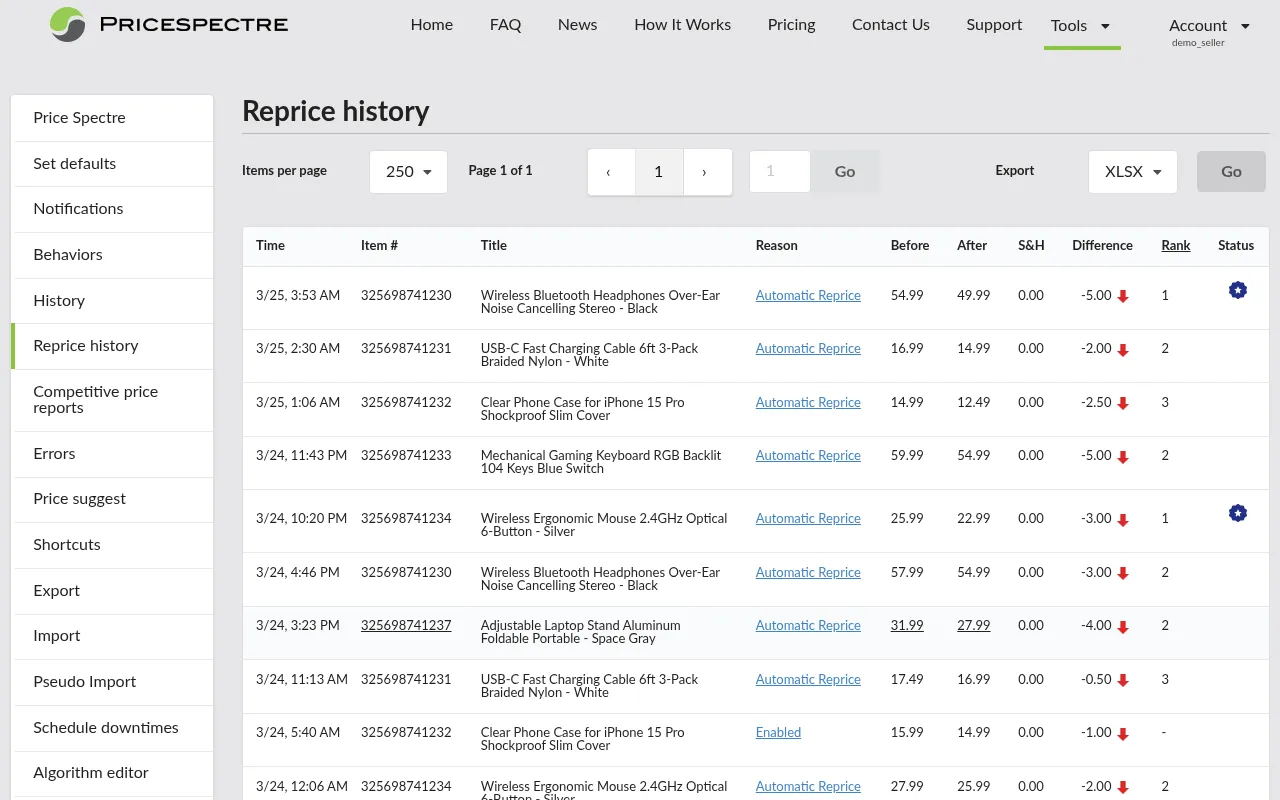
Reprice History — navigate to Tools > Reprice History to see a detailed log of every repricing action the system has taken. Each entry shows:
- The timestamp of the repricing action
- Your listing's price before and after the change
- The reason for the change
- Status flags (e.g., floor reached, ceiling reached, lowest price, no competition found)
Tip: Check your Reprice History after the first 24-48 hours to verify that repricing is behaving as expected. If something looks off, revisit your search parameters or algorithm selection.
Quick Setup Summary
| Step | Action | Where |
|---|---|---|
| 1 | Find your listing | Tools > Price Spectre |
| 2 | Set floor and ceiling prices | Listing detail view |
| 3 | Choose an algorithm | Listing detail view |
| 4 | Configure search parameters | Search options console |
| 5 | Perform a competitive search | Search options console |
| 6 | Set to Managed | Listing detail view |
| 7 | Configure behaviors (optional) | Tools > Behaviors |
| 8 | Monitor performance | Tools > History / Reprice History |
Tools Reference
The Tools menu contains 18 tools organized in the left sidebar. Here is a reference for each one, covering what it does, when to use it, and a practical tip.
Price Spectre
Your main dashboard for searching, browsing, and managing all your eBay listings. From here you can view listing details, current prices, competition data, and managed/unmanaged status. This is where you will spend most of your time in Price Spectre.
You can search by item ID, title, or category, and adjust pagination to show 25, 50, 75, or 100 listings per page.

Tip: Bookmark this page — it is your home base for day-to-day repricing management.
Set Defaults
Configure the default search parameters and repricing behaviors that automatically apply to all new managed listings. Settings include default algorithm, feedback ranges, price ranges, seller lists, condition filters, shipping options, and edge-case handling (what happens when no competition is found, when price falls below floor, or above ceiling).
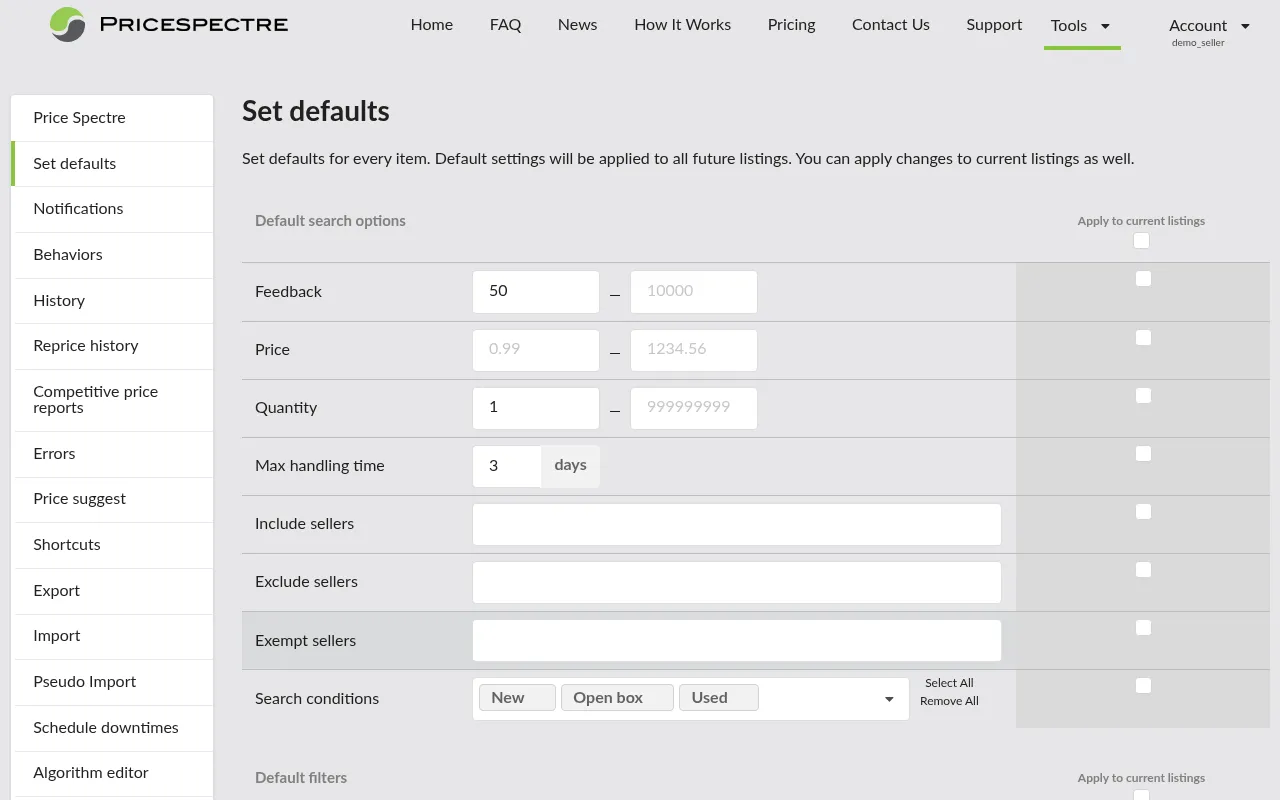
Tip: Configure your defaults before onboarding your inventory. This saves significant time because every new managed listing inherits these settings automatically.
Notifications
Configure which events trigger email notifications. You can enable or disable alerts for various events such as repricing actions, errors, import completions, and billing updates. Enter and verify your email address here to receive notifications.
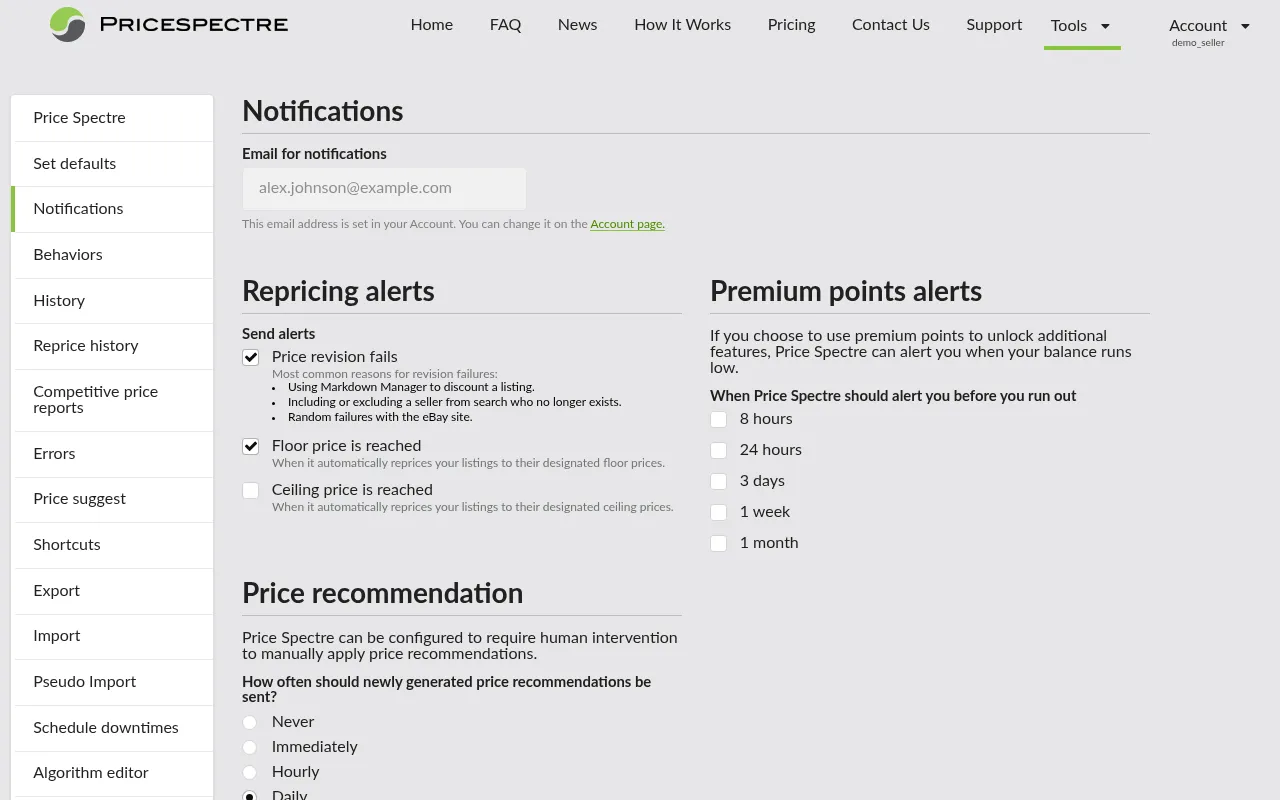
Tip: At minimum, enable error notifications so you are alerted when a listing cannot be repriced.
Behaviors
Configure global repricing behaviors that apply across all your managed listings. Options include ignoring shipping costs in price comparisons, configuring the Baťa pricing cents value, note fields, setting permanent price changes, and defining edge-case handling (what happens when no competition is found, when price is below floor or above ceiling).
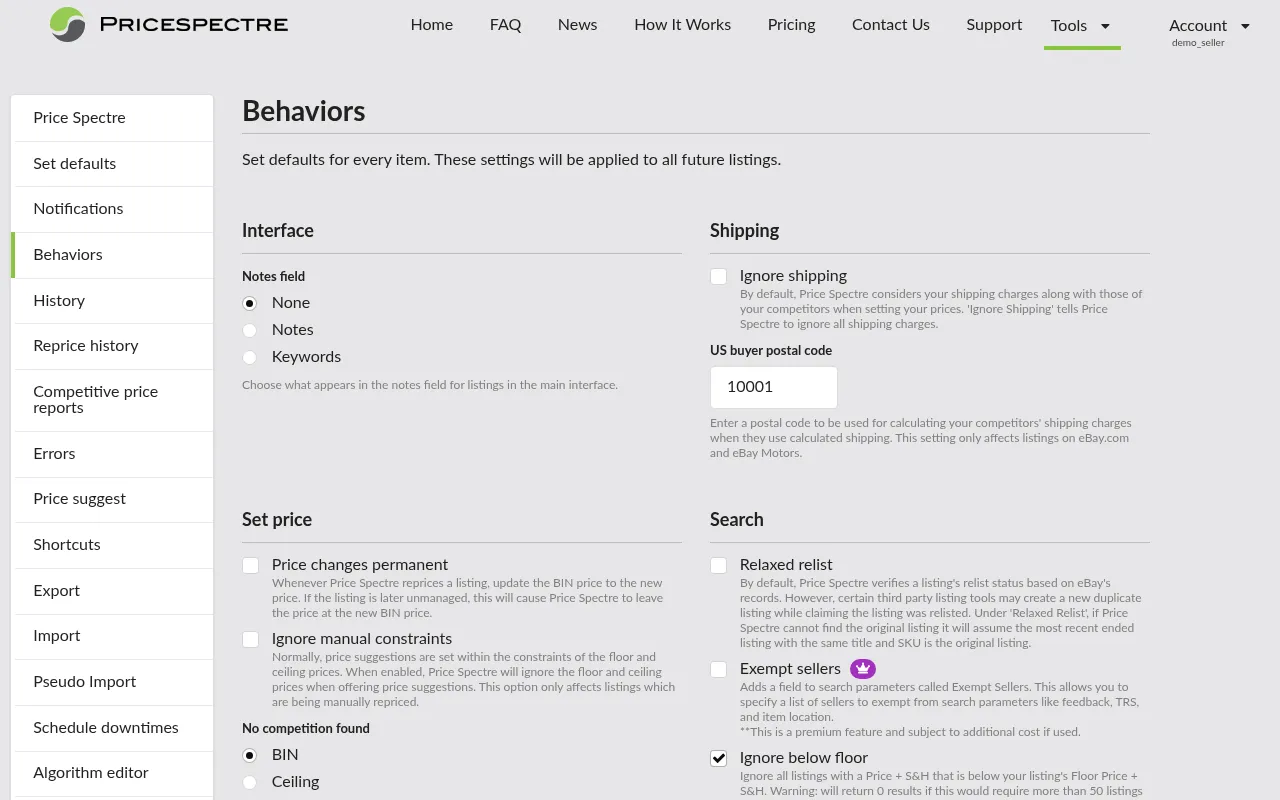
Tip: Use behaviors to fine-tune how repricing handles edge cases — for example, ignoring shipping in price comparisons for items that ship via freight or have customized shipping costs per buyer.
History
A per-listing reprice-history report. Search for a listing to see a listing card, summary stat cards for the last 30 days (reprice count, floor hits, price range, best rank, and price trend), and an interactive chart that plots your price against the competitor low/high range with your floor marked. Below the chart, filter chips and a list of recent reprice events let you drill into individual changes — click any event to open its Reprice Record. The chart defaults to the last 30 days and can expand to the listing's full price history.
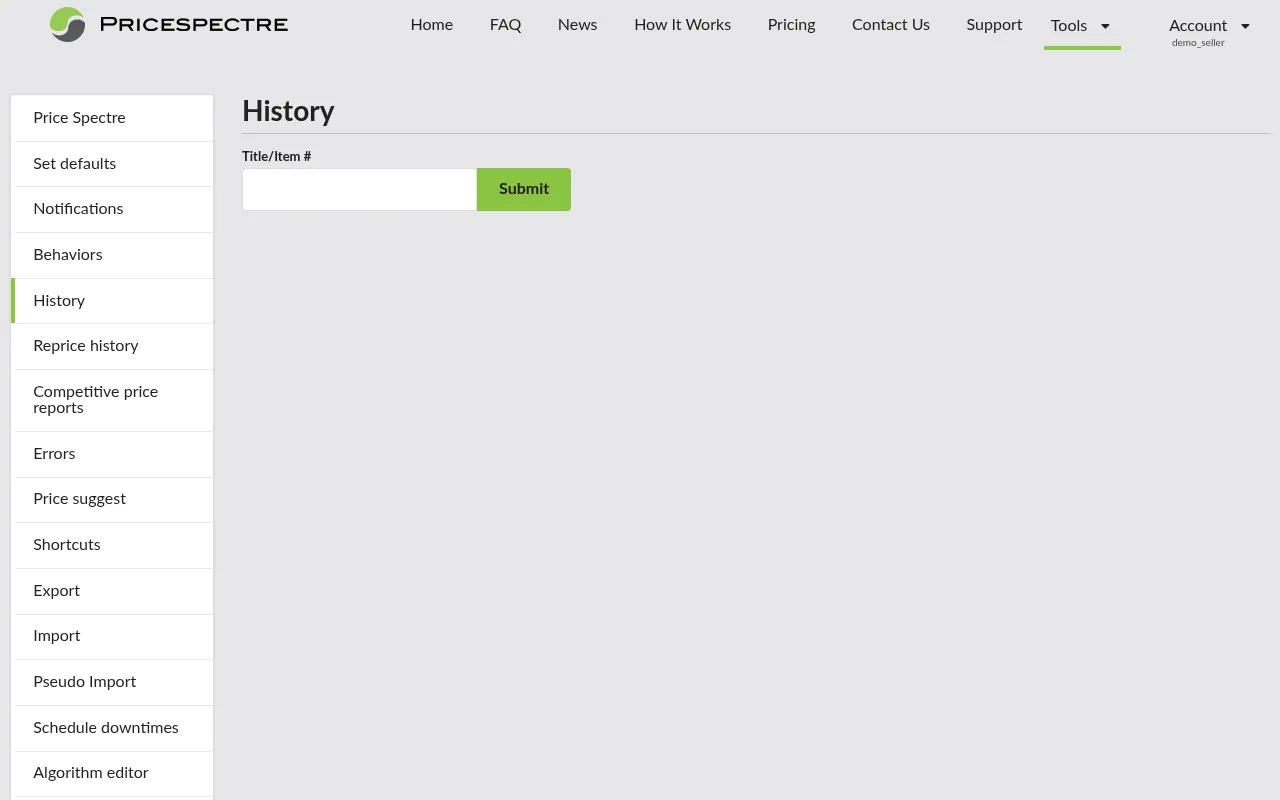
Tip: Use this to spot pricing trends and verify that your repricing strategy is working as intended over time. The competitor low/high lines and floor line make it easy to see whether your price is competitive or pinned to your floor.
Reprice History
A chronological log of every repricing action Price Spectre has taken across all your managed listings. Each entry shows the timestamp, item details, price before and after, the reason for the change, and status flags (floor reached, ceiling reached, lowest price, no competition found, scheduled downtime).
You can filter, paginate (25/50/75/100 per page), and export the history to CSV or Excel.

Tip: Review this weekly to catch unexpected behaviors early. Export to a spreadsheet for deeper analysis of your repricing patterns.
Competitive Price Reports
Generate detailed competitive analysis reports covering a configurable time period (1 to 30 days) and number of competitors (up to 99). Reports can be downloaded in PDF, CSV, or Excel format. You can also enable email notification when a report is ready.
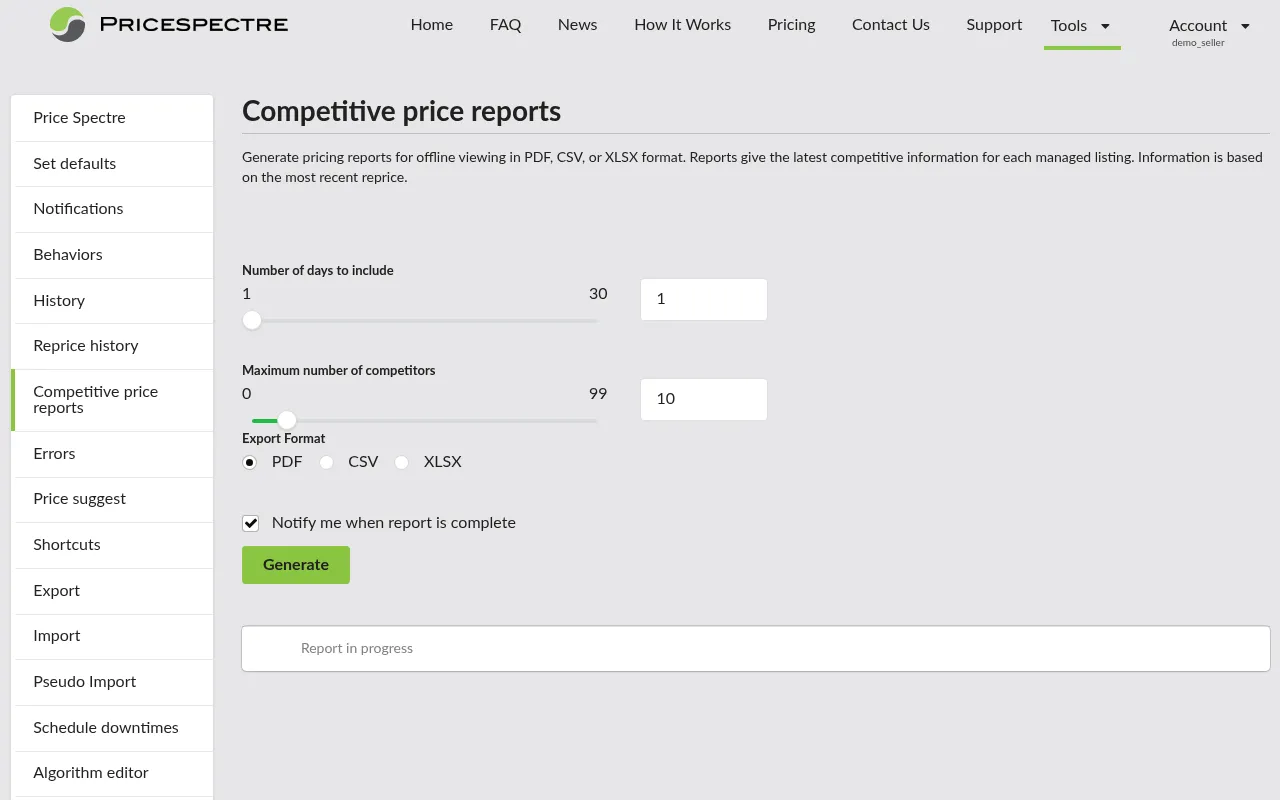
Tip: Generate a monthly report to review your market positioning and inform your pricing strategy.
Errors
View system errors and search failures that occurred during repricing cycles. If a listing is not being repriced as expected, check here first to see if there was a search failure or API error affecting it.
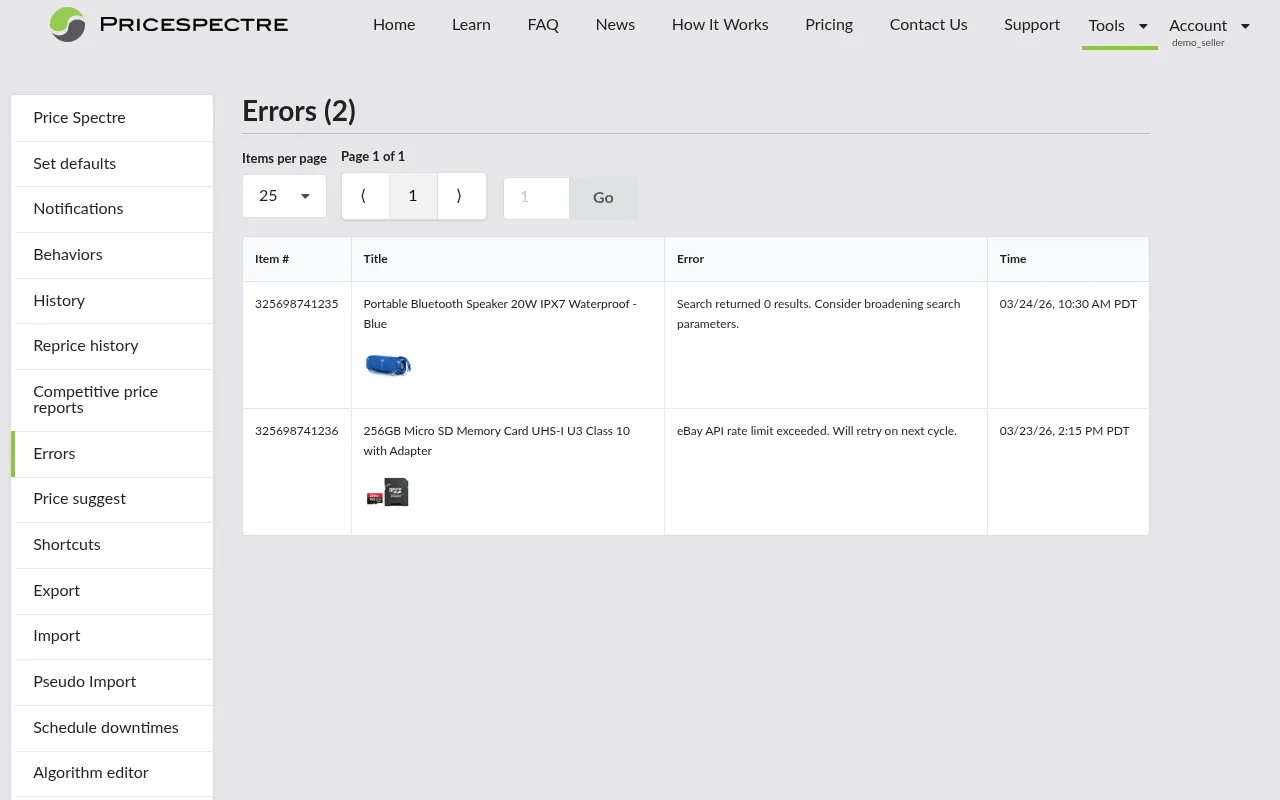
Tip: If you see recurring errors for a specific listing, revisit its search parameters — the keywords or category may need adjustment.
Search Diagnostic
Investigate why a listing's competitor set looks the way it does. Where the Search Console shows you which listings were kept as competitors, the Search Diagnostic also shows you which listings were rejected — and which specific filter rule dropped each one. A filter funnel breaks down how the raw eBay result set was narrowed to the final competitor set, one row per rule.
Use the Search Diagnostic when a listing is tracking the wrong competitors, when an expected competitor doesn't appear in the Search Console results, or when you want to tune include/exclude keywords with full visibility into their effect.
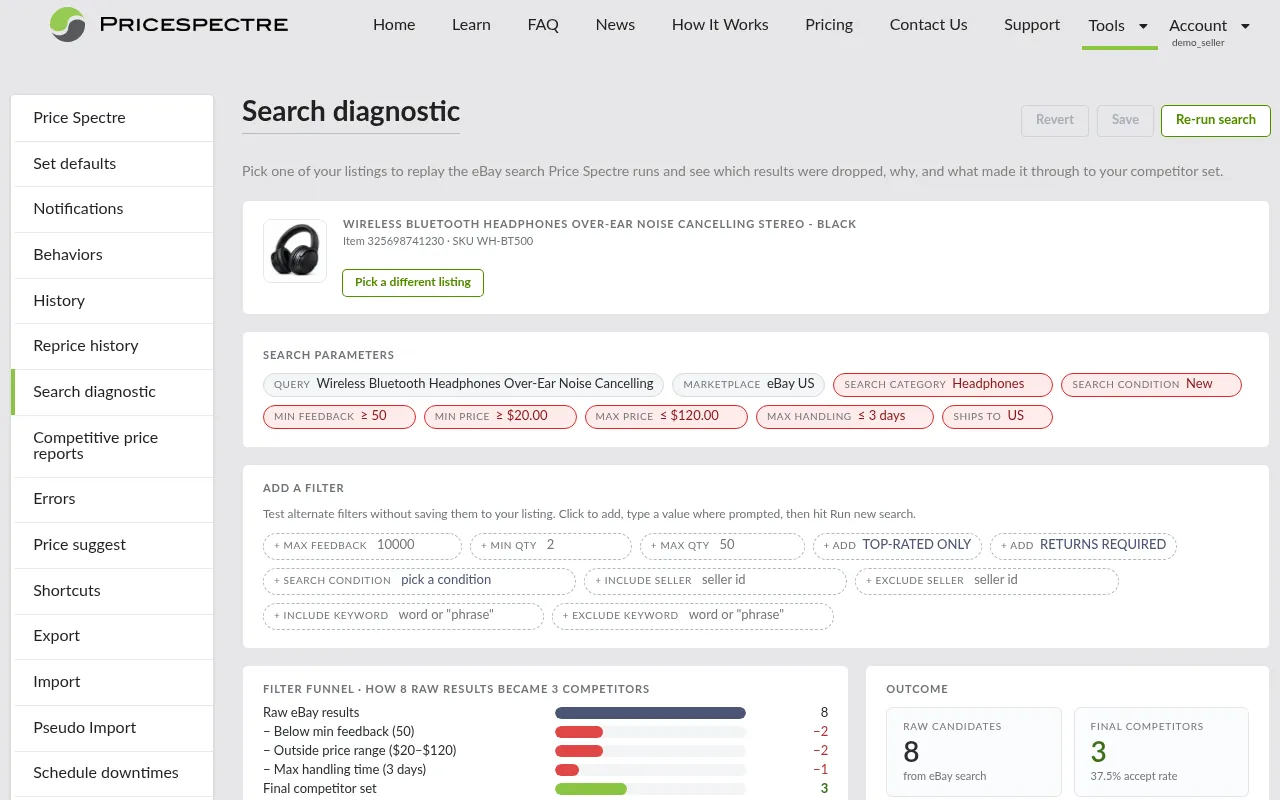
Tip: The Search Console answers what would my price be right now? The Search Diagnostic answers why are these the competitors at all? Use the Search Console for pricing questions and the Search Diagnostic for matching questions.
Price Suggest
Browse algorithm-generated price recommendations for your listings. Each suggestion shows your current price, the suggested price, the price difference with a trend indicator (up or down), and the reasoning behind the suggestion. You can accept or reject each recommendation individually.
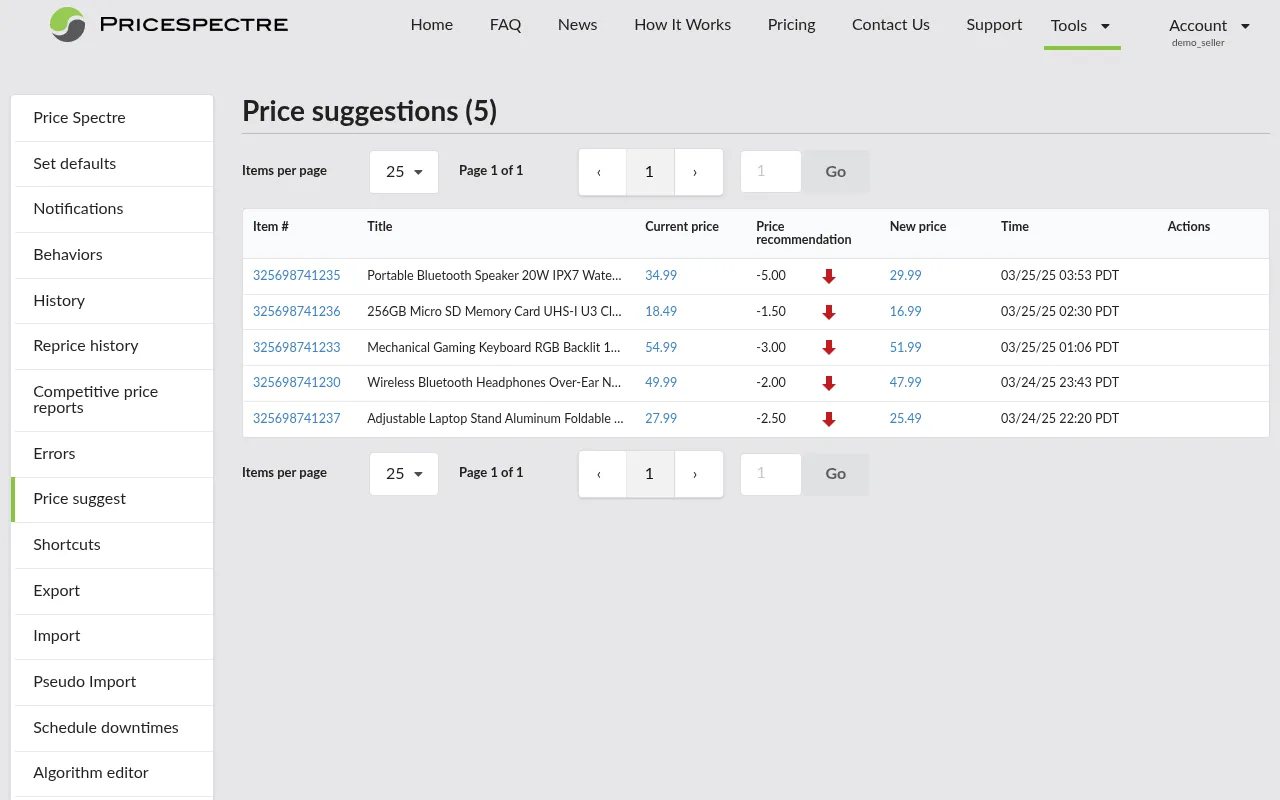
Tip: This is useful for semi-manual repricing — review the suggestions before they are applied, especially when you are first getting comfortable with the system.
Shortcuts
Bulk-manage your listings. You can toggle managed/unmanaged status for all listings at once, or filter by eBay or Store category to manage a subset. View statistics for each category (total listings, managed, unmanaged). You can also bulk-manage seller lists (include, exclude, or exempt sellers).
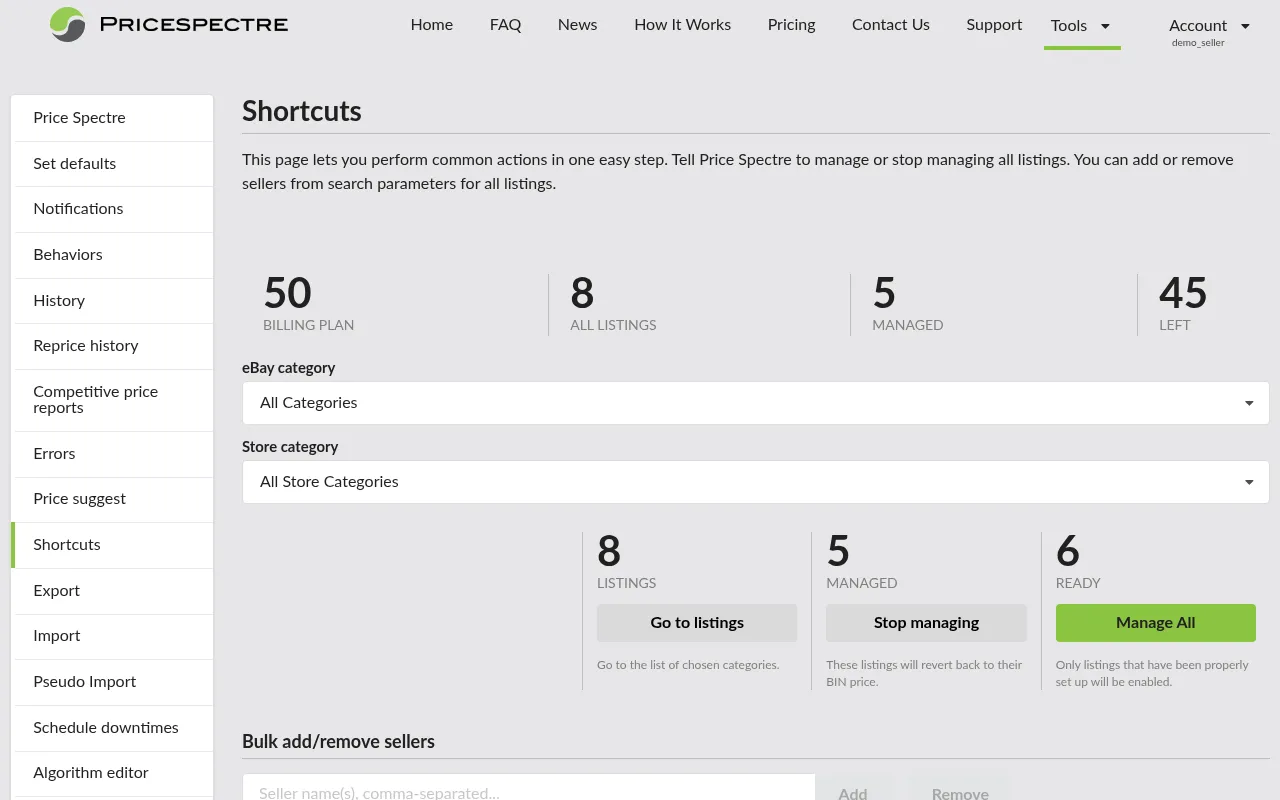
Tip: This is the fastest way to onboard a large inventory. Toggle all listings to managed in one click, or select a specific category to manage a subset.
Export
Export your listing data as an XLSX, CSV, or ODS file with fully configurable column selection. Columns are organized into categories: read-only listing properties (title, current price, quantity, condition, start date), customizable properties (Buy It Now price, floor price, ceiling price, search parameters, repricing options), competition and ranking data, and error information. The item ID is always included as an identifier. You can also include recently ended listings.
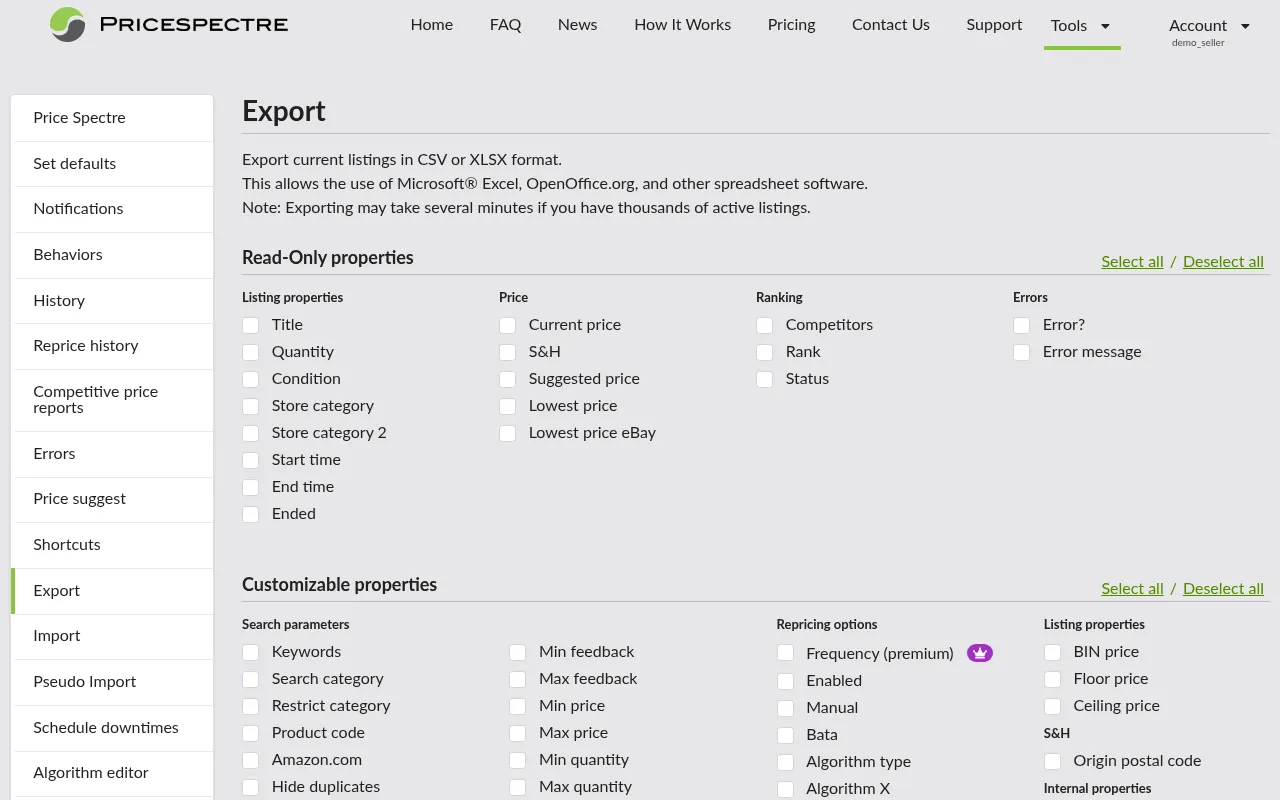
Tip: Use the Export/Import workflow to make bulk changes: export your listings, modify settings in a spreadsheet, and import the changes back.
Import
Upload spreadsheet files to bulk-update listing settings. Supports drag-and-drop file upload with Excel (.xls, .xlsx), CSV, and ODS formats, up to 100MB. Configure options for import failure/success notifications and whether to require item SKU/ID matching. View import history with timestamps and status for each upload.
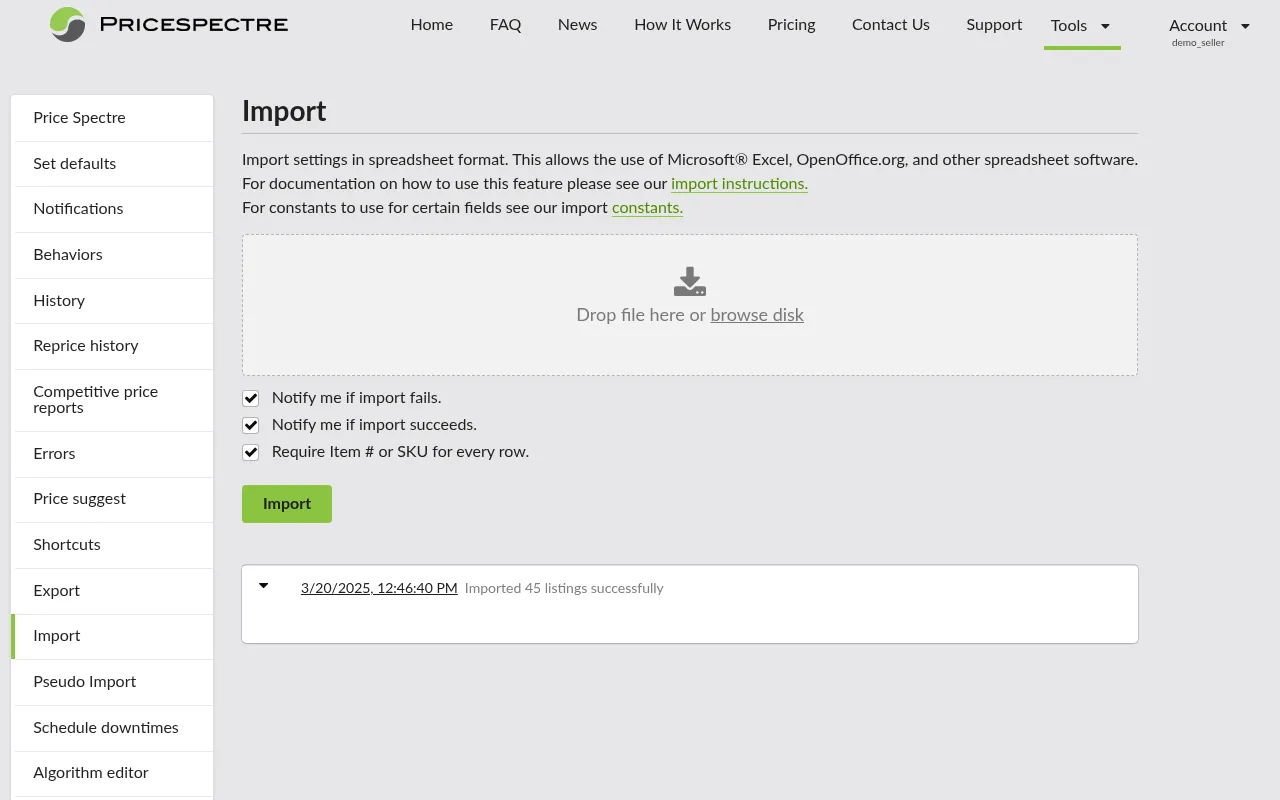
Tip: Always export your current data first as a backup before importing changes. This gives you a template with the correct column format and a safety net if something goes wrong.
Pseudo Import
Gather competitive pricing information from eBay without needing your own listing. Upload a CSV file with keywords or item identifiers, select from 22 international eBay sites (US, UK, Canada, Australia, Germany, France, and more), and Price Spectre searches the marketplace and returns competitive data. This is processed in the background — track progress with automatic status polling, view queued and completed jobs, and review detailed results.
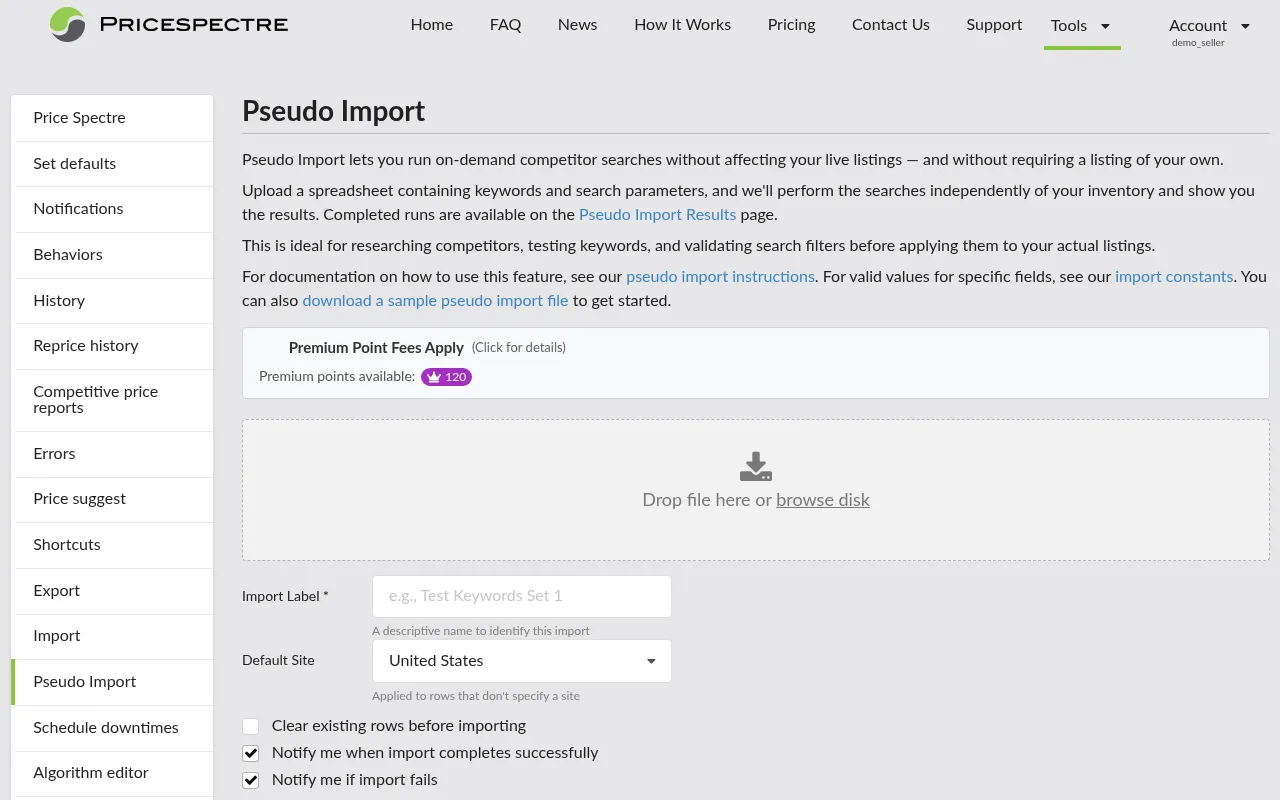
Tip: Use Pseudo Import to research competitor pricing before listing a new product, or to monitor prices on international eBay sites. Note that Pseudo Import may consume Premium Points depending on usage.
Schedule Downtimes
Pause repricing during specific periods using a visual calendar interface. The calendar displays a 7-day week with hourly time slots divided into 15-minute intervals. Create downtime rules with start/end times and recurrence patterns (one-time, daily, weekly, or monthly). Repricing resumes automatically when the downtime period ends.
During a scheduled downtime, what happens to your prices depends on your No Competition Found behavior setting: selecting "None" means prices are truly paused (no changes), while selecting "BIN Price" will temporarily reset your listings to their Buy It Now price — which can be useful for breaking out of pricing wars with other repricers.

Tip: Schedule downtimes during sales events, holidays, or inventory audits when you want to manually control your prices. You can also use short scheduled downtimes strategically to reset prices and break out of repricing wars with competitors.
Algorithm Editor
Create and edit custom repricing algorithms for advanced pricing strategies beyond the built-in options. The editor lets you write algorithm code, assign a name and description, specify data type requirements, set the number of searches required, and toggle auto-execution. You can also duplicate, delete, and simulate algorithms to test your logic before going live.

Tip: If you are not comfortable writing code, try AlgoForge first — it can generate algorithms for you based on plain English descriptions.
AlgoForge
An AI-powered algorithm builder that helps you create custom repricing algorithms through conversation. Describe your pricing strategy in plain English, and the AI assistant generates the algorithm code for you. You can review previous algorithms created and export them directly to your algorithm library.
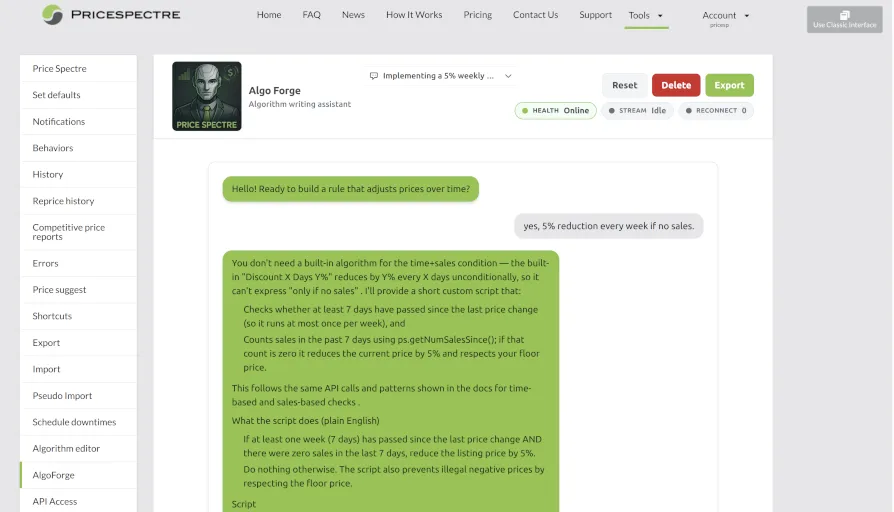
Tip: Even if you are not a programmer, AlgoForge can help you create sophisticated pricing rules. Try describing your strategy like: "I want to be 5% below the average of the 3 lowest competitors, but never go below $15."
API Access
Manage API tokens for programmatic access to Price Spectre. You can create up to 3 API tokens, each with a custom nickname, expiration date, and usage tracking. Tokens can be rotated (replaced with a new token while preserving history), revoked, and copied to your clipboard. Expiration warnings appear for tokens expiring within 30 days.
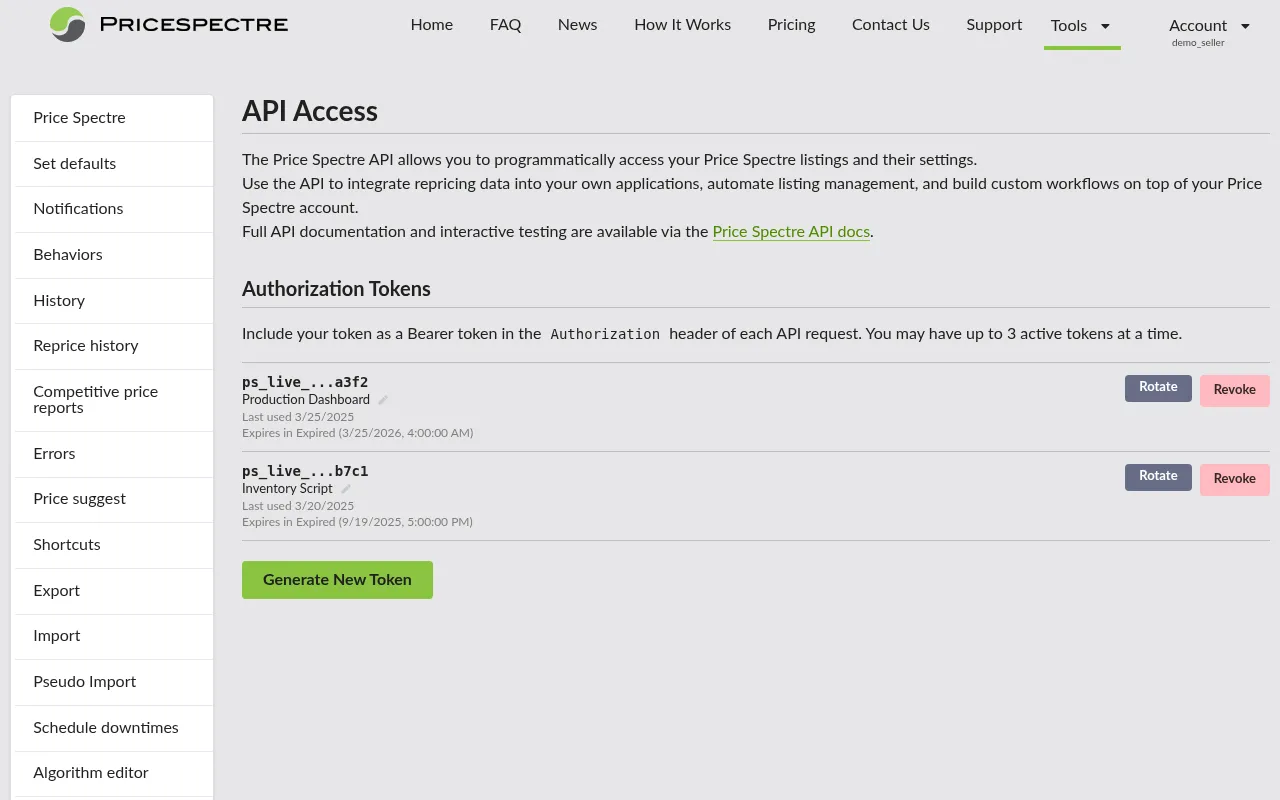
Tip: This is for advanced users who want to integrate Price Spectre with external tools, custom dashboards, or automation scripts. Keep your tokens secure and rotate them periodically.
Managing Your Account
All account management is accessible from the Account section in the navigation bar. Here is a summary of each page.
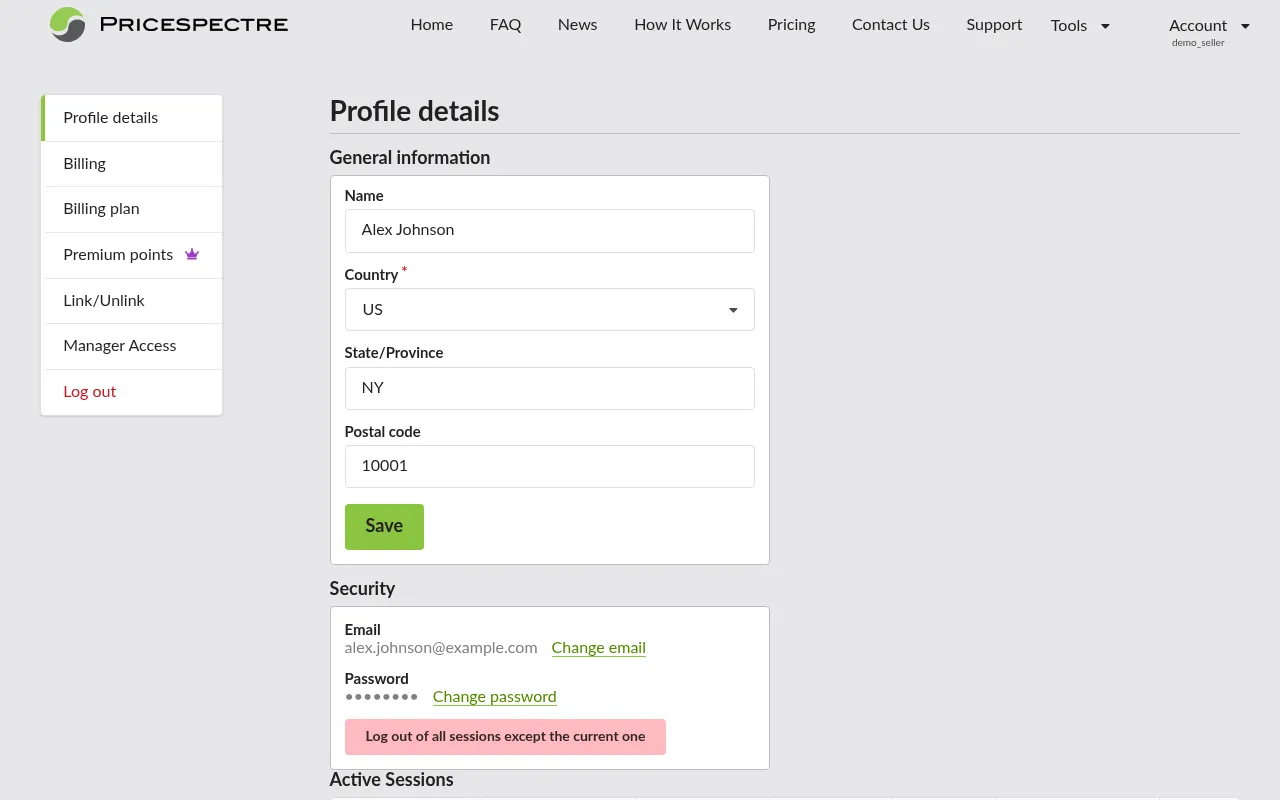
Profile and Sessions
Navigate to Account > Profile Details to view and update your profile information:
- Name, Country, State/Province, and Postal Code
- Your email address and username are displayed as read-only
You can also view all active sessions on your account, showing the IP address, browser/device, creation time, and last activity. Use the logout button next to any session to sign out a specific device.
Changing Email or Password
- Change Email — navigate to Account > Change Email to update the email address associated with your account.
- Change Password — navigate to Account > Change Password to set a new password. You will need to enter your current password for verification.
Managing eBay Accounts
Navigate to Account > Link/Unlink to manage your marketplace connection:
- Link your account — connect your eBay seller account via OAuth authorization.
- Reauthorize — refresh expired authorization tokens when Price Spectre notifies you.
- Unlink — remove your eBay account from Price Spectre.
Each Price Spectre account supports one linked eBay seller account. If you have multiple stores, create a separate Price Spectre account for each, or apply for a manager account.
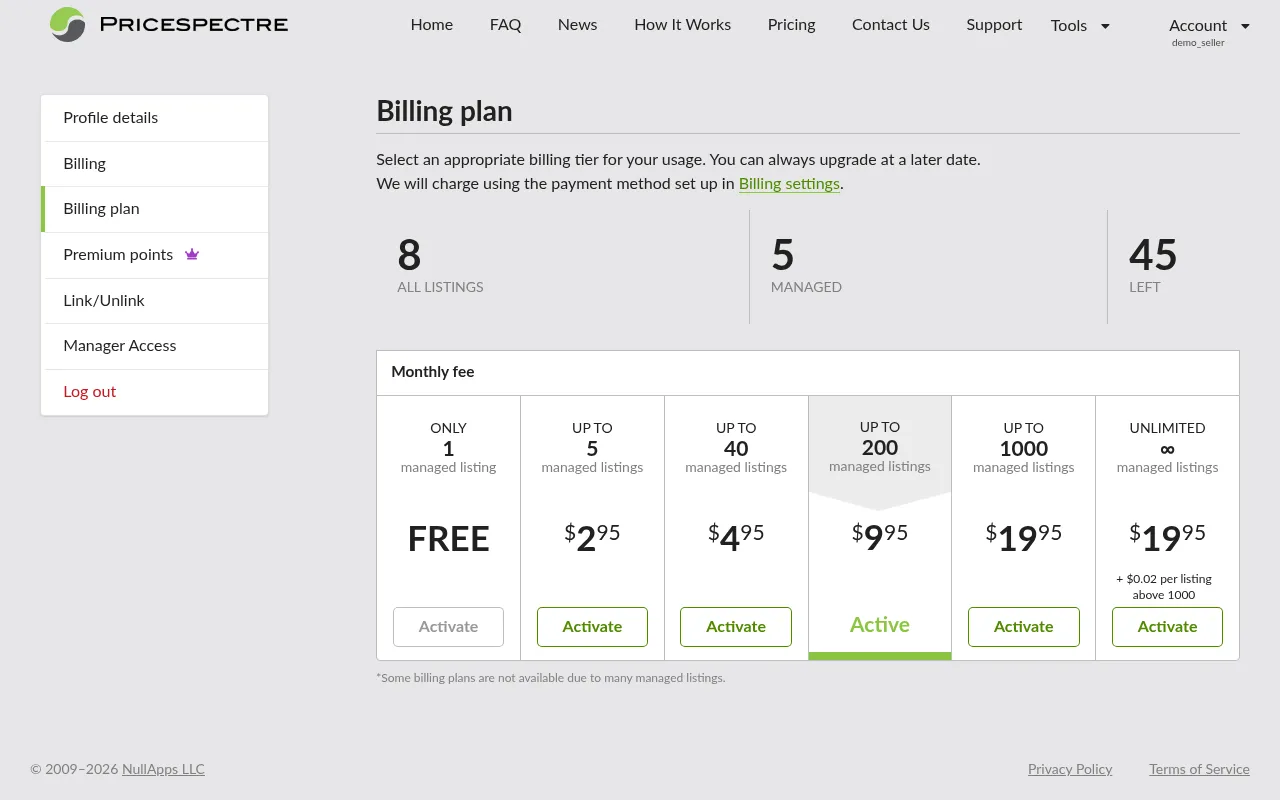
Billing and Plans
- Billing (Account > Billing) — view your account balance, manage payment methods, make deposits, view invoices, and pay outstanding balances. If your account is suspended due to an unpaid balance, you will be directed here to resolve it.
- Billing Plan (Account > Billing Plan) — view your current subscription tier, compare available plans, and upgrade or downgrade as your needs change. Plans are tiered based on the number of managed listings.
Premium Points
Navigate to Account > Premium Points to view your Premium Points balance and usage history.
Premium Points are a secondary credit system that unlocks advanced features:
- Faster repricing — upgrade from the standard 4-hour cycle to as frequently as every 15 minutes for time-sensitive or high-competition listings.
- Advanced search features — access to features like Exempt Sellers for more nuanced competitor analysis.
You can purchase Premium Points from the Premium Points page and apply them to specific listings or features.
Manager Access
Price Spectre supports delegated account management:
- Manager Access (Account > Manager Access) — if you want a team member or virtual assistant to help manage your account, you can grant them manager access from this page.
- Manager Dashboard (Account > Manager Dashboard) — managers see a dashboard of all accounts they have been granted access to, with the ability to switch between them and manage listings on behalf of the account owner.
Tips for Success
Start small. Manage 10-20 listings first to learn how the system works. Once you are comfortable with repricing behavior, scale up gradually.
Set meaningful floor prices. Never reprice without a floor. Factor in your product cost, eBay fees (typically 13-15%), shipping costs, and your desired profit margin. A listing without a floor is a listing that could lose you money.
Configure your defaults early. Before onboarding your inventory, visit Set Defaults and configure sensible default search parameters and repricing behaviors. Every new managed listing inherits these settings, saving you significant setup time.
Review Reprice History weekly. Make it a habit to check your repricing logs at least once a week. Look for unexpected price changes, recurring errors, or listings that are consistently hitting their floor or ceiling — these may need parameter adjustments.
Use Shortcuts for bulk operations. If you have a large catalog, do not manage listings one at a time. Use the Shortcuts tool to toggle entire eBay or Store categories to managed status in one click.
Schedule downtimes for sales events. If you run manual promotions (holiday sales, clearance events), schedule a downtime period so Price Spectre does not override your promotional prices.
Try AlgoForge before writing algorithms by hand. The AI assistant can handle most custom pricing logic — just describe your strategy in plain English. You do not need to be a programmer to create sophisticated repricing rules.
Keep your eBay authorization current. When Price Spectre notifies you that your eBay token is expiring, reauthorize promptly from Account > Link/Unlink. An expired token means repricing will stop until you reauthorize.
Frequently Asked Questions
How long does it take for my listings to download after linking my eBay account?
Listings download quickly — most stores are fully imported within seconds to a few minutes, even for large inventories. Price Spectre will wait for the initial download to complete before you can start using the tools. After that first sync, any new listings you create on eBay are picked up automatically in the background.
Can I use Price Spectre with multiple eBay accounts?
Each Price Spectre account supports one linked eBay seller account. If you have multiple eBay stores, create a separate Price Spectre account for each one. If you manage a large number of stores, you can apply for a manager account, which lets you oversee multiple Price Spectre accounts from a single dashboard.
What happens if I unlink my eBay account?
Unlinking an eBay account removes Price Spectre's access to that account's listings. Any managed listings from that account will no longer be repriced. You can re-link the account at any time to resume management.
Will Price Spectre ever set my price below my floor price?
No. The floor price is an absolute minimum. Price Spectre will never set a price below your floor, regardless of what the competition looks like. If the algorithm suggests a price below your floor, Price Spectre will use the floor price (or a custom fallback, depending on your behavior settings).
What happens when no competitors are found for my listing?
This depends on your behavior settings. You can configure Price Spectre to use your Buy It Now price, floor price, ceiling price, or do nothing when no competitors are found. Set this in Tools > Set Defaults or Tools > Behaviors.
How do I pause repricing temporarily?
Navigate to Tools > Schedule Downtimes and create a downtime period using the visual calendar. Repricing pauses during the scheduled period and resumes automatically when it ends. Scheduled downtimes still incur normal managed listing billing. Alternatively, you can set individual listings to unmanaged to stop repricing them entirely — note that this will revert the listing's price to its Buy It Now price.
What is the difference between standard and premium repricing?
Standard repricing runs approximately every 4 hours and is included with all plans. Premium repricing runs as frequently as every 15 minutes and requires Premium Points. Premium repricing is ideal for fast-moving categories where prices change rapidly. Even faster intervals may be available — contact support for details.
How do I export my repricing history?
Navigate to Tools > Reprice History. Use the export button to download your repricing log as a CSV or Excel file.
Can I undo a price change made by Price Spectre?
There is no one-click "undo" button, but you have several options. You can manually adjust your eBay listing price through eBay's seller tools — on the next repricing cycle, Price Spectre will factor in the current price and competition data. For bulk reversions, you can export your repricing history, convert it into a valid import file with the original prices, and import it back. This is an advanced workflow — we recommend making a full export backup of your settings first. If you want to prevent further changes, set the listing to unmanaged or schedule a downtime.
How do I contact support?
Use the Contact Us option available in the application to send a message to the Price Spectre support team. You can also visit the FAQ page on the Price Spectre website for additional help articles.
This tutorial covers Price Spectre's React-based interface. For the latest feature updates and release notes, visit the News section on the Price Spectre website.