
Import and Export Guide
Price Spectre's Import and Export tools let you manage your listing settings in bulk using a spreadsheet. Instead of editing listings one at a time, you can export your data to a file, make changes in Microsoft Excel, OpenOffice, or any other spreadsheet software, and import the updated file back into Price Spectre.
This is especially useful when you need to update floor prices, change algorithms, adjust search parameters, or modify any other configurable setting across many listings at once.
Table of Contents
- The Export/Import Workflow
- Exporting Your Data
- Understanding the Spreadsheet
- Editing Your Data
- Importing Your Changes
- Import Constants Reference
- Tips and Best Practices
- Frequently Asked Questions
The Export/Import Workflow
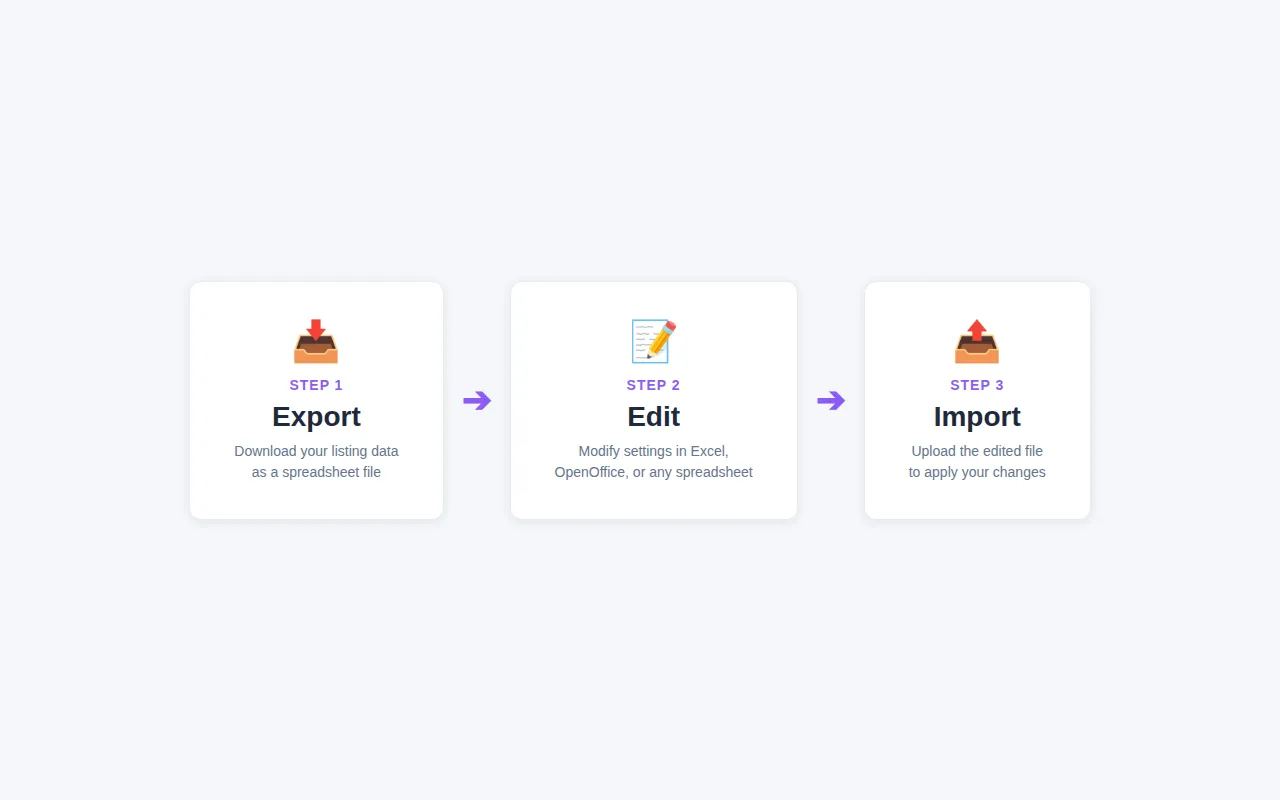
The recommended workflow for bulk editing is:
- Export your current listing data from Price Spectre to a spreadsheet file.
- Edit the customizable columns in the spreadsheet using your preferred software.
- Import the modified spreadsheet back into Price Spectre to apply your changes.
This approach gives you a template with the correct column format, a backup of your current settings, and the ability to make precise bulk changes efficiently.
Exporting Your Data
Navigating to the Export Page
- Click Tools in the navigation bar.
- Select Export from the side menu.
The Export page lets you choose exactly which data columns to include in your exported file.
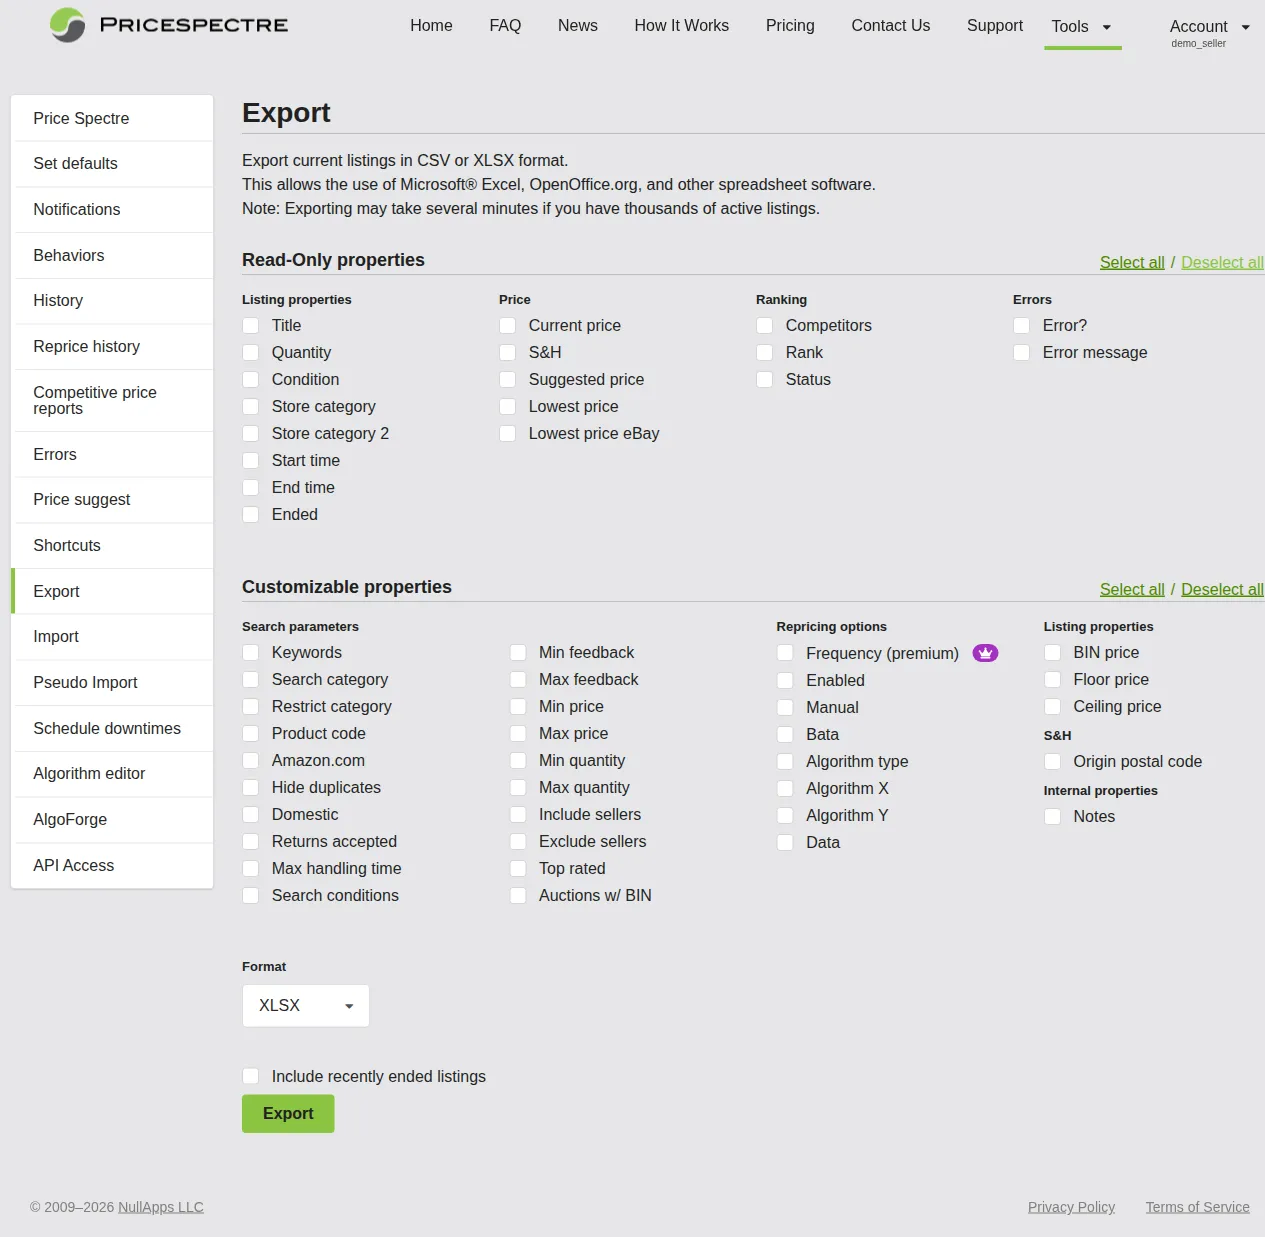
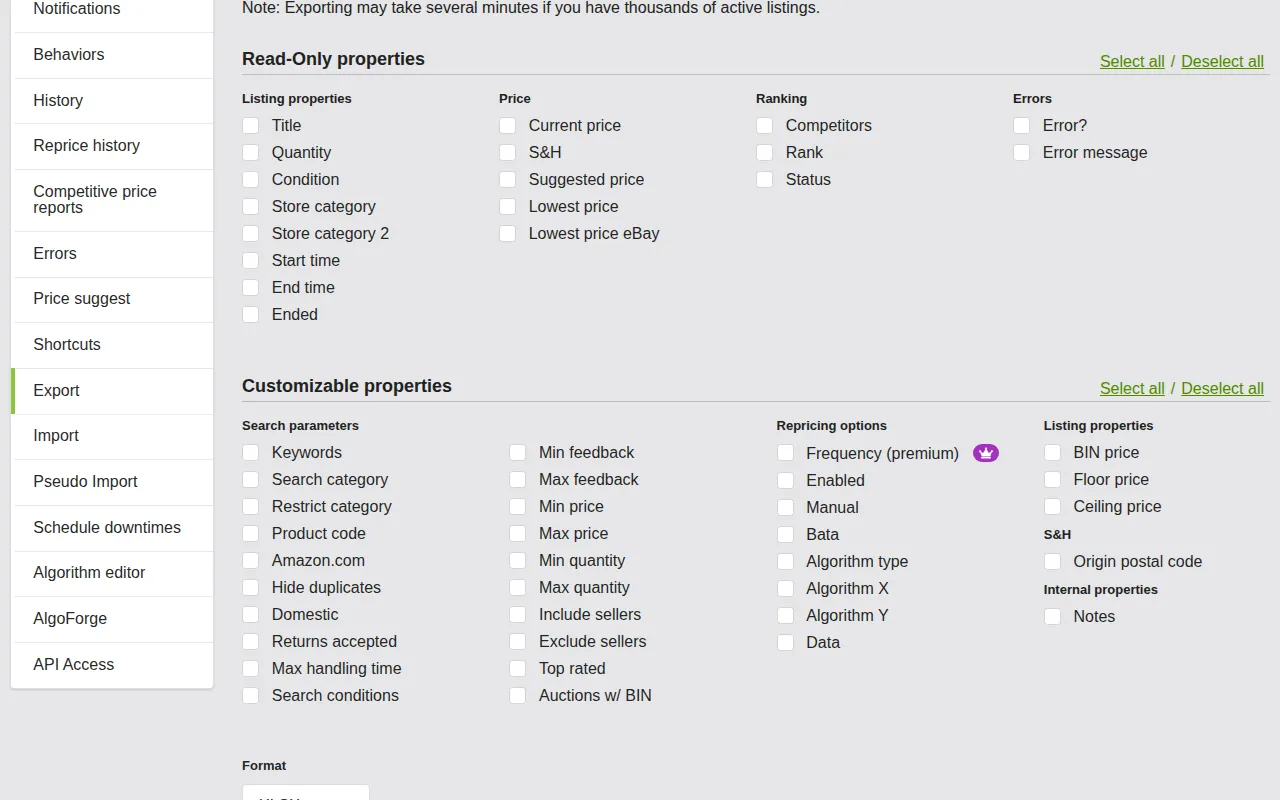
Selecting Read-Only Properties
The first section of the Export page is Read-Only properties. These columns provide reference information about your listings but cannot be modified through import. They are useful for identifying listings and understanding their current state.
Read-only properties are organized into four groups:
Listing properties:
- Title
- Quantity
- Condition
- Store category and Store category 2
- Start time and End time
- Ended
Price:
- Current price
- S&H (shipping and handling)
- Suggested price
- Lowest price
- Lowest price eBay
Ranking:
- Competitors
- Rank
- Status
Errors:
- Error? (whether the listing has an error)
- Error message
Use the Select all and Deselect all buttons at the top of the section to quickly toggle all read-only properties on or off.
Tip: Including read-only properties like Title and Current price in your export makes it much easier to identify which listing each row corresponds to when editing in a spreadsheet.
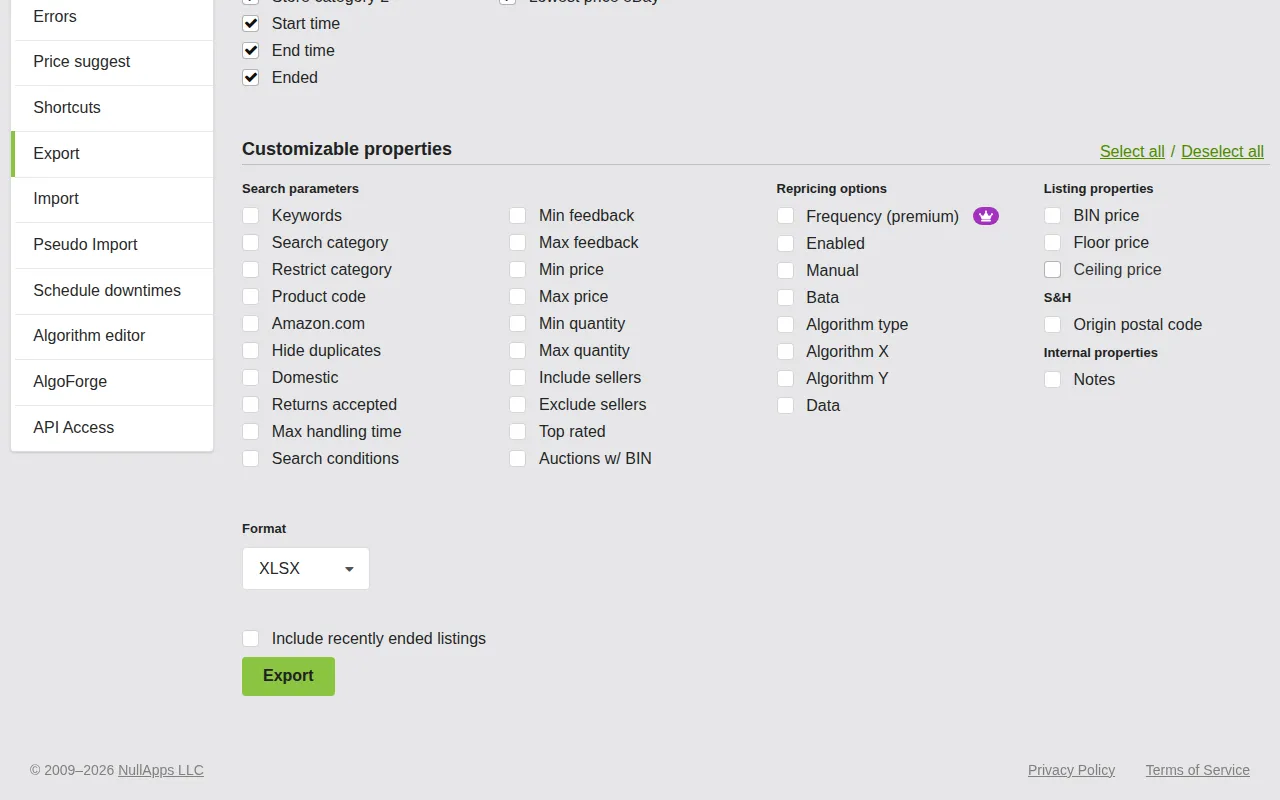
Selecting Customizable Properties
The second section is Customizable properties. These are the columns you can modify in your spreadsheet and import back into Price Spectre. This is where the real power of bulk editing lies.
Customizable properties are organized into several groups:
Search parameters:
- Keywords
- Search category
- Restrict category
- Product code
- Amazon
- Hide duplicates
- Domestic
- Returns accepted
- Max handling time
- Search conditions
- Min/Max feedback
- Min/Max price
- Min/Max quantity
- Include sellers and Exclude sellers
- Top rated
- Auctions w/ BIN
Repricing options:
- Frequency (premium feature)
- Enabled
- Manual
- Bata (Baťa pricing)
- Algorithm type
- Algorithm X
- Algorithm Y
- Data
Listing properties:
- BIN price (Buy It Now price)
- Floor price
- Ceiling price
S&H:
- Origin postal code
Internal properties:
- Notes
Use the Select all and Deselect all buttons at the top of this section to quickly toggle all customizable properties.

Tip: Only include the columns you plan to edit. A smaller, focused export is easier to work with than one containing every possible column.
Choosing a File Format
Below the property selections, choose your preferred file format from the Format dropdown:
- XLSX — Microsoft Excel format. This is the default and recommended option. It preserves formatting and is compatible with most spreadsheet software.
- CSV — Comma-separated values. A plain text format that can be opened in any spreadsheet application or text editor. Use this if you prefer working with simple text files or need to process the data programmatically.
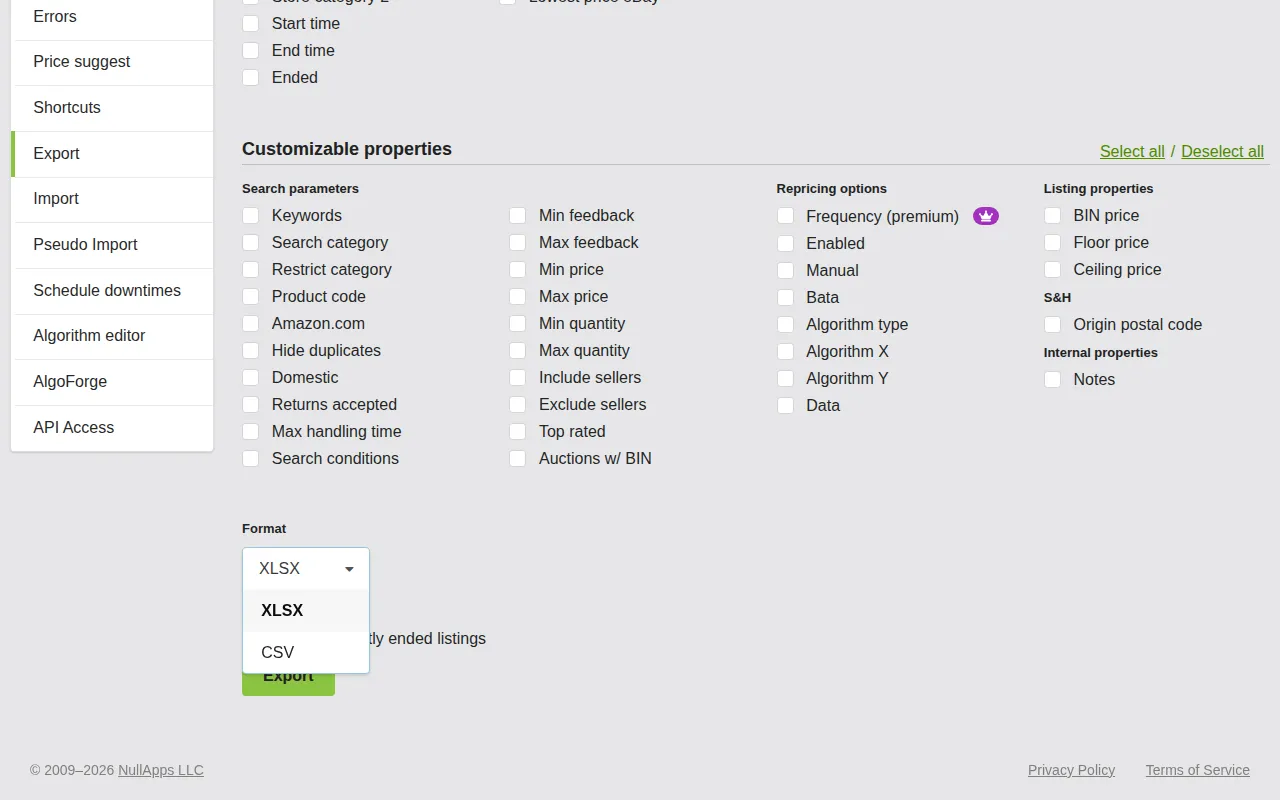
Including Recently Ended Listings
Check the Include recently ended listings box if you want to include ended listings in your export. This is useful for reviewing the settings you had on listings that have since ended. Note that Price Spectre will reject updates to ended listings — if you plan to relist items and want to apply settings from your export, relist the items on eBay first and then perform the import. Since the Item # changes when you relist, use the SKU column (leaving Item # blank) to match the relisted items by their SKU.
Downloading Your Export
- Verify that you have selected the columns you need.
- Click the Export button.
- The button will show Exporting... while your file is being generated. For most accounts this is fast, though accounts with hundreds of thousands of listings may take a few minutes.
- Once ready, the file will download automatically to your computer.
Note: The exported file includes selector columns (such as Item # and SKU) that Price Spectre uses to match rows back to your listings during import. See Selector Columns for details on how matching works.
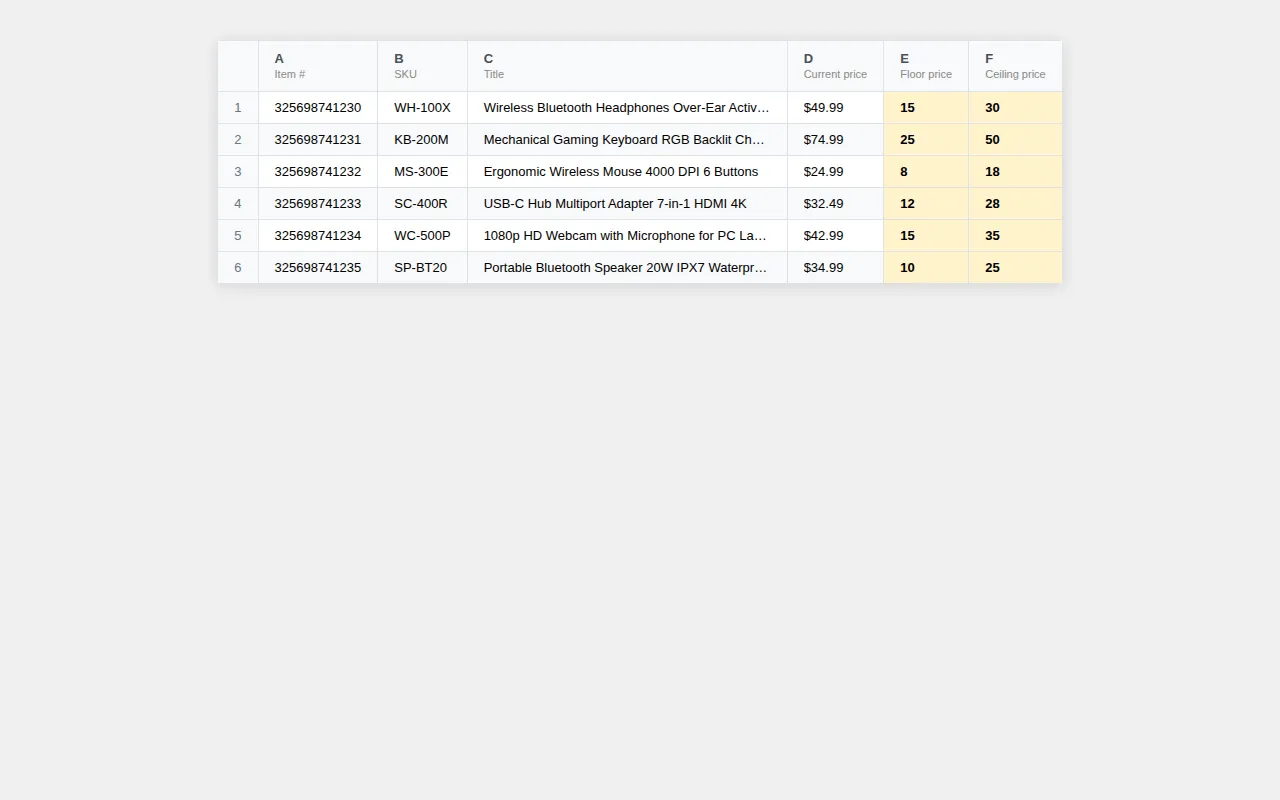
Understanding the Spreadsheet
When you open your exported file in spreadsheet software, you will see a row for each listing and a column for each property you selected.
Selector Columns
Price Spectre uses up to four selector columns to determine which listings a row applies to when you import changes. The four selectors are:
- Item # — the eBay Item ID. Matches a specific listing (or all variations of a multi-variation listing).
- SKU — the Stock Keeping Unit you assign to your products. Combined with Item #, it can target a specific variation within a multi-variation listing.
- Site — the numeric eBay site ID (e.g., 0 = US, 3 = UK, 77 = Germany). Matches all your listings on that eBay marketplace.
- Category — the eBay category ID. Matches all your listings in that category.
How matching works: When a row contains multiple selectors, all of them must match for a listing to be updated. If no listing matches all of the provided selectors, the row will produce a "No matches" error. This AND logic lets you target listings at different levels of granularity:
- Item # + SKU — targets a specific variation within a multi-variation listing.
- Item # alone — targets all variations of that listing.
- SKU + Site — targets listings with that SKU on a specific eBay marketplace. This is generally the recommended approach for large sellers who list on multiple eBay sites, since different marketplaces often require different pricing and strategies.
- Category alone — targets every listing in that category. This is powerful but dangerous if used incorrectly — a single row could update hundreds of listings at once.
- Site alone — targets every listing on that eBay marketplace. Use with extreme caution.
You do not need to include all four selector columns in your file. Include only the selectors that match how you want to target your listings. At minimum, your file must contain at least one selector column and at least one customizable property column for a row to be valid.
Tip: For most users, Item # is the simplest selector — each row updates one listing. For large sellers managing products across multiple eBay sites, SKU + Site is generally recommended. For multi-variation listings, use Item # + SKU to target a specific variation.
Read-Only Columns
Columns from the read-only properties section (Title, Current price, Quantity, etc.) are included for your reference. You can use them to identify listings, sort your data, or filter rows — but any changes you make to these columns will be ignored during import.
Customizable Columns
Columns from the customizable properties section are the ones you can edit. When you import the file back, Price Spectre reads the values in these columns and applies them to the corresponding listings.
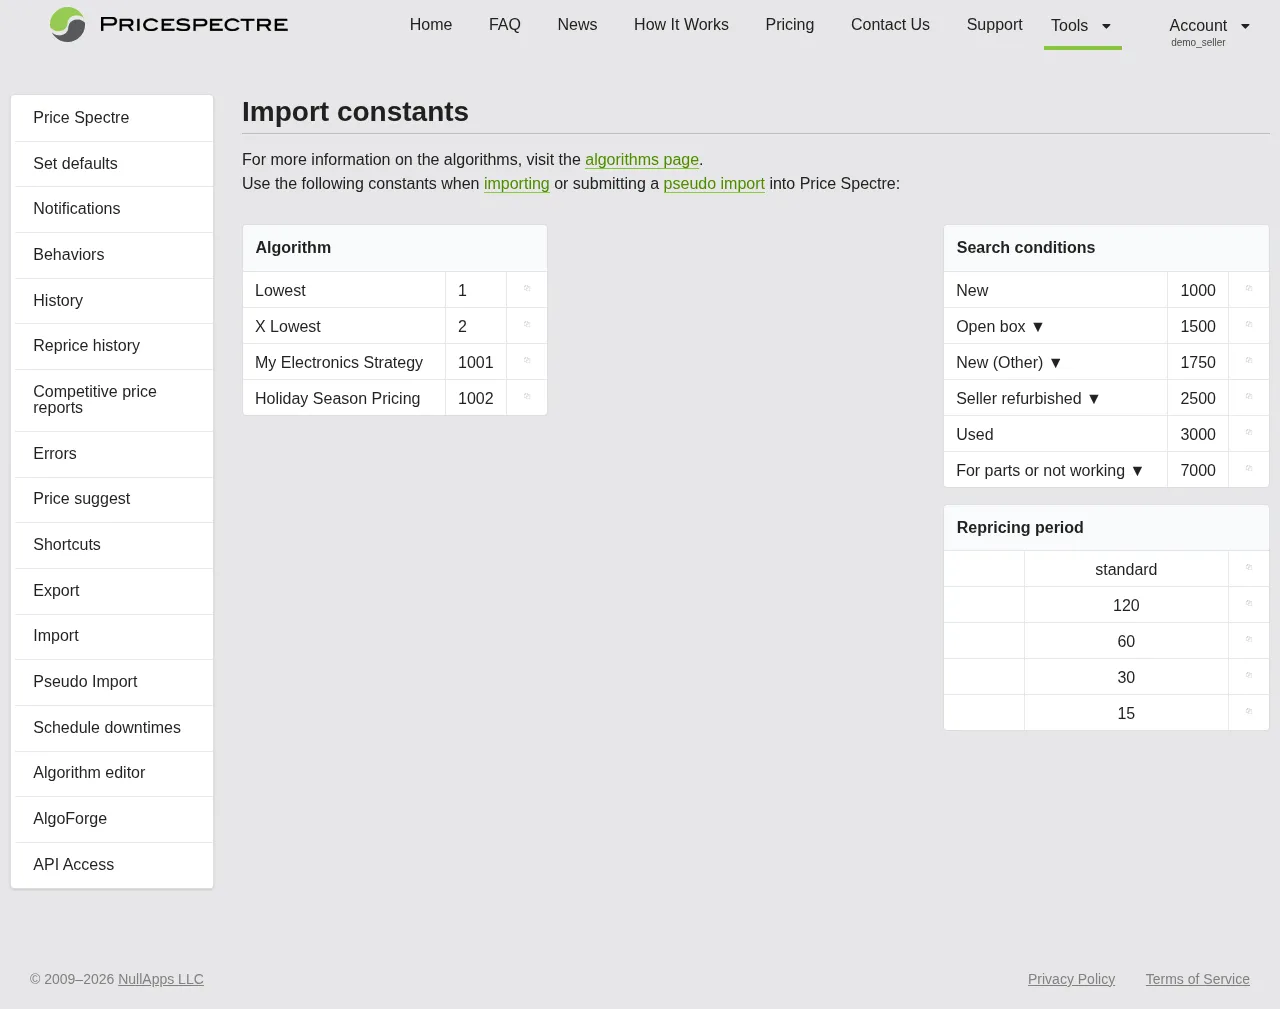
Fields That Use Constants
Some customizable fields require specific numeric values rather than free text. These include:
- Algorithm type — each algorithm has a numeric ID (for example, "Lowest" might be 1, "Average 3" might be 5).
- Search conditions — item conditions like New, Used, and Refurbished each have a numeric ID.
- Frequency — repricing frequency values depend on your billing plan.
To find the correct values for these fields, visit the Import Constants page at Tools > Import > Constants (or click the link at the top of the Import page). This page displays up-to-date tables of all algorithm IDs, condition IDs, and available frequency values for your account.
Important: Using incorrect constant values will cause import errors for those rows. Always check the Import Constants page for the correct values before editing these fields.
Editing Your Data
Open your exported file in your preferred spreadsheet software. Here are some common editing scenarios.
Changing Floor and Ceiling Prices
The Floor price and Ceiling price columns accept numeric values representing dollar amounts.
- Locate the Floor price and/or Ceiling price columns in your spreadsheet.
- Enter new values for the listings you want to update.
- Ensure floor prices are positive numbers.
- If setting both, make sure the ceiling price is higher than the floor price for each listing.
Example: To set a floor price of $15.00 and a ceiling price of $30.00, enter 15 in the Floor price column and 30 in the Ceiling price column.
Changing Algorithms
The Algorithm type column uses numeric IDs. To change a listing's algorithm:
- Visit the Import Constants page to find the ID for the algorithm you want.
- Enter the numeric ID in the Algorithm type column.
- If the algorithm requires X or Y parameters (such as "X Lowest By $Y"), enter those values in the Algorithm X and Algorithm Y columns.
Example: To switch a listing to the "X Lowest By $Y" algorithm with X=2 and Y=3 (price at the 2nd lowest competitor minus $3), you would enter the algorithm's numeric ID in the Algorithm type column, 2 in Algorithm X, and 3 in Algorithm Y.
Changing Search Parameters
Tip: You can preview how updated search parameters affect competitor matching in the Search Console before running the import.
You can modify search-related columns to refine how Price Spectre finds competitors:
- Keywords — enter the search terms as text.
- Search category — enter the eBay category ID number.
- Min/Max feedback — enter numeric values for seller feedback score range.
- Min/Max price — enter numeric values for competitor price range.
- Include sellers / Exclude sellers — enter seller usernames, separated by commas or spaces.
- Search conditions — enter the numeric condition ID from the Import Constants page.
Enabling or Disabling Listings
The Enabled column controls whether a listing is managed (actively repriced) or unmanaged:
- Set to
1to enable (manage) a listing. - Set to
0to disable (unmanage) a listing.
The Manual column controls manual repricing mode:
- Set to
1to enable manual mode (Price Spectre sends recommendations instead of automatically changing prices). - Set to
0to disable manual mode (Price Spectre changes prices automatically).
Note: The Enabled column is what controls whether a listing is managed. The Manual setting only takes effect on managed listings — setting Manual on an unmanaged listing has no effect until the listing is enabled.
Editing Tips
- Understand how empty and zero values work. If a column is not present in your file at all, that setting is not modified. Within columns that are present: for numeric fields (like Floor price or Algorithm type), entering
0clears or unsets the value. For text fields (like Include sellers or Keywords), leaving the cell blank clears the value. Be intentional about whether you want to clear a setting or leave it unchanged. - Make a full backup before major changes. Before making significant bulk edits, perform a full export with all columns selected and save it as a complete backup. This gives you the ability to revert any setting if needed. Consider doing this periodically even when you are not planning changes.
- Work on a copy. Keep your backup export untouched and make edits in a separate copy of the file.
- Use spreadsheet features. Take advantage of sorting, filtering, find-and-replace, and formulas to make bulk edits efficiently. For example, you could use a formula to calculate floor prices based on product cost plus a markup percentage.
- Save in the same format. If you exported as XLSX, save your edited file as XLSX. If you exported as CSV, save as CSV. Changing formats can sometimes cause data formatting issues.
Importing Your Changes
Navigating to the Import Page
- Click Tools in the navigation bar.
- Select Import from the side menu.
The Import page lets you upload your edited spreadsheet and apply changes to your listings.
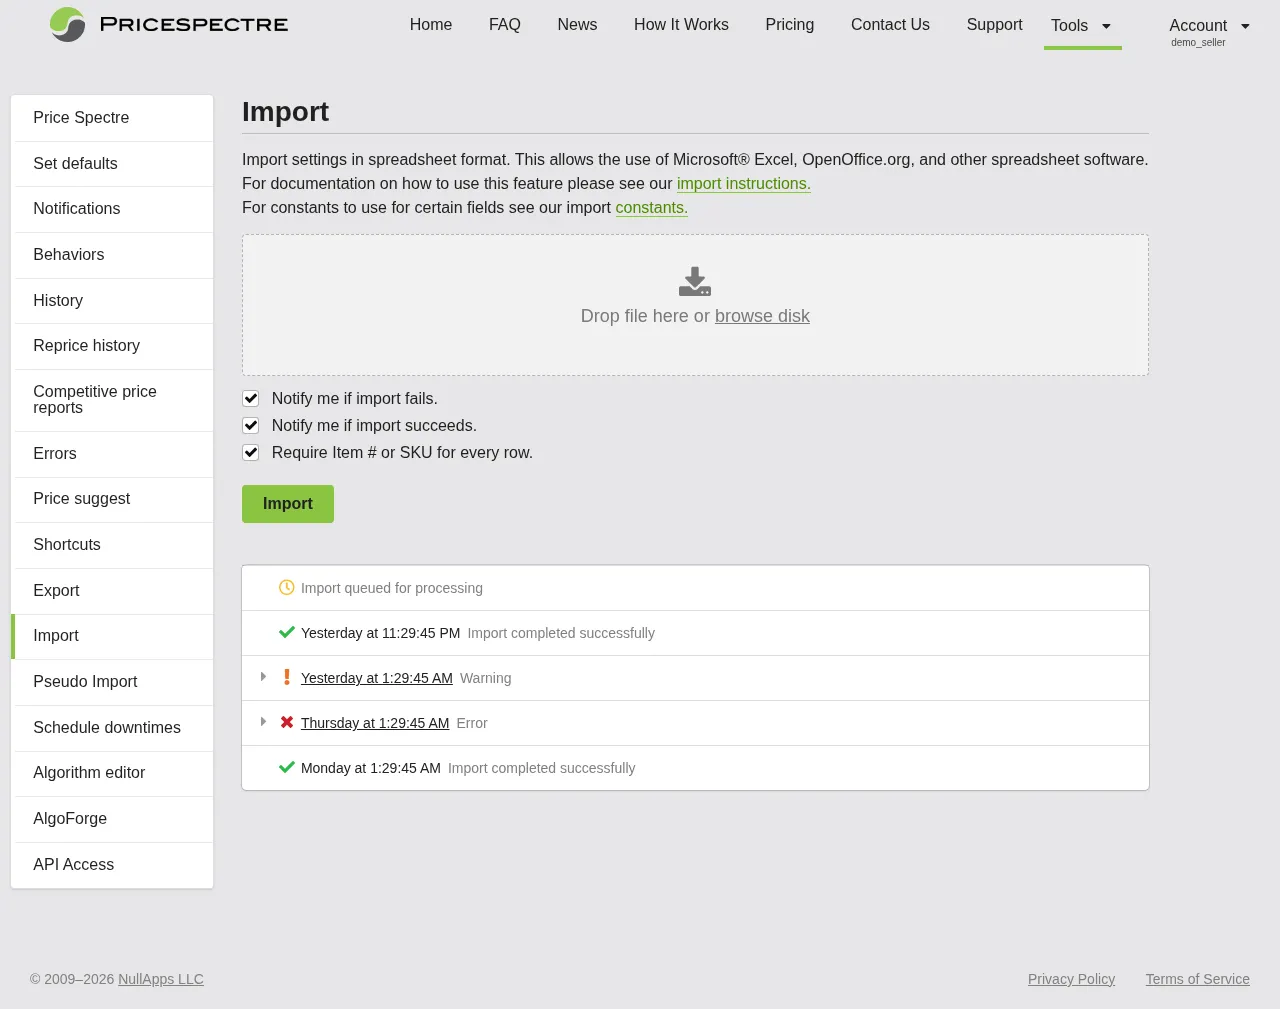
Uploading Your File
- Click the file upload area or drag and drop your file onto it.
- Supported file formats are:
- XLSX — Microsoft Excel (.xlsx)
- XLS — Legacy Microsoft Excel (.xls)
- CSV — Comma-separated values (.csv)
- ODS — OpenDocument Spreadsheet (.ods)
- Maximum file size is 100 MB.

Import Options
Before clicking Import, configure the following options:
- Notify me if import fails — receive an email notification if the import encounters errors. Enabled by default and recommended.
- Notify me if import succeeds — receive an email notification when the import completes successfully. Enabled by default.
- Require Item # or SKU for every row — when checked, every row in your spreadsheet must have either an Item # or SKU value. This prevents rows that use only Site or Category as selectors from being processed, which protects against accidentally applying settings to all listings matching a site or category. Enabled by default and strongly recommended.

Tip: Keep "Require Item # or SKU for every row" enabled unless you intentionally need to apply settings by Site or Category. Without this option, a row with only a Category selector would update every listing in that category — which could be hundreds of listings affected by a single row.
Starting the Import
Click the Import button to upload your file. The import is queued for processing — it does not happen instantly. Depending on the size of your file and current system load, processing may take a few seconds to several minutes.
Tracking Your Import
After uploading, the Import page displays two sections to help you monitor progress:
Pending Imports
- Shows any imports that are currently queued and waiting to be processed.
- Displays the time the import was queued.
Recent Imports
- Shows completed imports with their results.
- Each entry displays the completion time and a status indicator.
![]()
Reviewing Import Results
Click on a completed import to view its details. The status indicator tells you the overall result:
- Success (green) — all rows were processed without errors.
- Warning (yellow) — the import completed but some rows had issues. The import applied changes for valid rows and skipped rows with errors.
- Error (red) — the import failed or encountered significant problems.
When warnings or errors occur, the details section shows which rows had problems and why. Common error messages include:
- "Floor Price must be positive" — a floor price was set to zero or a negative number.
- "Row X: Invalid algorithm type" — an unrecognized algorithm ID was used.
- "Row X: Missing Item # or SKU" — the row did not have a listing identifier (when Safe CSV mode is enabled).

Tip: If you see errors, fix the problematic rows in your spreadsheet and re-import just those rows. You do not need to re-import the entire file — Price Spectre will process the corrected rows and leave already-updated listings unchanged.
Import Constants Reference
Certain spreadsheet fields require specific numeric values. The Import Constants page provides up-to-date lookup tables for your account.
To access the Import Constants page:
- Navigate to Tools > Import.
- Click the Constants link at the top of the page.
The page displays three reference tables:
Algorithms A table listing every available algorithm and its numeric ID. This includes both built-in algorithms (like Lowest, Average 3, Discount) and any custom algorithms you have created. Use these IDs in the Algorithm type column of your spreadsheet.
Search Conditions A table listing all eBay item condition values and their numeric IDs. Some conditions have multiple names — click the expand toggle to see all alternate names for a condition. Use these IDs in the Search conditions column of your spreadsheet.
Repricing Frequency A table listing the available repricing frequency values for your current billing plan. Use these values in the Frequency column. Note that some frequency options are only available with Premium Points.
Tip: Bookmark the Import Constants page for easy reference while editing your spreadsheet. Algorithm and condition IDs are stable, but custom algorithms will appear here as you create them.
Tips and Best Practices
Always export first. Before making any bulk changes, export your current data. This serves two purposes: it gives you a correctly formatted template, and it creates a backup you can re-import if something goes wrong.
Start with a small test. If this is your first time using Import, try editing just 5–10 listings first. Verify the results, then proceed with larger batches once you are confident in the process.
Keep "Require Item # or SKU for every row" enabled. This option prevents rows without identifiers from being processed, protecting against accidental changes when rows are shifted or deleted in your spreadsheet.
Enable both notification options. Turn on notifications for both success and failure so you are always informed of the outcome without needing to check the Import page manually.
Use read-only columns as reference. Include Title and Current price in your export even though they cannot be changed. They make it much easier to identify listings while editing.
Check Import Constants before editing. Always verify the correct numeric IDs for algorithms, conditions, and frequencies on the Import Constants page before entering values in your spreadsheet.
Review your changes before importing. Double-check your spreadsheet for obvious errors — negative floor prices, missing values in critical columns, or accidental changes to rows you did not intend to modify.
Save your original export. Keep an unmodified copy of your export. If an import produces unexpected results, you can re-import the original to revert your changes.
Frequently Asked Questions
What file formats are supported for import?
Import supports Microsoft Excel (.xls and .xlsx), CSV (.csv), and OpenDocument Spreadsheet (.ods) formats. The maximum file size is 100 MB.
What file formats are supported for export?
Export supports XLSX and CSV formats.
Do I need to include every column when importing?
No. You need at least one selector column (Item #, SKU, Site, or Category) and the customizable property columns you want to change. Columns that are not present in the spreadsheet will not be modified. This means you can export a full set of data, delete the columns you are not editing, and import just the changes.
What happens if my import file has errors?
Price Spectre processes valid rows and skips rows with errors. You will see a warning status on the import result, and the error details will tell you exactly which rows had problems and why. Fix those rows and re-import them.
Why am I seeing "No matches" errors?
This is one of the most common import issues. It means the selectors in a row do not match any listing in your account. Two frequent causes:
- Item # changed after relisting. When you end a listing on eBay and relist it, the new listing gets a new Item #. If your spreadsheet still contains the old Item #, it will no longer match. Update the Item # to the new value, or remove it and use SKU instead.
- Category changed by eBay. eBay periodically reorganizes its category structure, which can change the Category ID of your listings. If your spreadsheet contains an outdated Category ID, it will no longer match.
To resolve "No matches" errors, review the selector values in the affected rows and either update them to current values or remove selectors that are no longer accurate.
Can I import a file that was not originally exported from Price Spectre?
Yes. Column ordering does not matter — Price Spectre identifies columns by their header names, not their position. Your file needs at least one selector column (Item #, SKU, Site, or Category) and at least one customizable property column. A row is only considered valid if it contains values for both a selector and a property to update. The column headers must match the expected field names. The easiest way to get the correct headers is to do an export first and use it as a template.
Will importing overwrite all my settings?
Only the columns present in your import file will be updated. Any settings in columns not included in your file will remain unchanged. Within the columns you include, the values in your file will replace the existing values.
How do selector columns (Item #, SKU, Site, Category) work?
Price Spectre uses four selector columns to match rows in your spreadsheet to listings. Item # is the eBay Item ID — the unique numeric identifier for each listing. SKU is the Stock Keeping Unit you assign to your products. Site is the eBay marketplace ID. Category is the eBay category ID. When multiple selectors are present in a row, all of them must match (AND logic). This lets you target anything from a single variation (Item # + SKU) to all listings on a marketplace (Site alone). See Selector Columns for detailed examples and recommendations.
How long does an import take to process?
Most imports complete within a few seconds to a few minutes, depending on the number of rows. Very large files may take longer. The Pending Imports section shows your import's queue status, and you will receive an email notification when it completes (if you enabled notifications).
Can I cancel a pending import?
Once an import is queued, it cannot be cancelled. If the import applies unwanted changes, you can re-import your original export file to revert the affected settings.
What does "Require Item # or SKU for every row" do?
When enabled, this option (also called Safe CSV mode) requires every row to have an Item # or SKU value. Without it, rows can use Site or Category alone as selectors — which means a single row could apply changes to every listing on an eBay marketplace or in a category. Enabling this option ensures that changes are always targeted to specific listings identified by Item # or SKU, preventing accidental broad updates.
Can I use Import to add new listings to Price Spectre?
No. Import is for updating settings on listings that already exist in your Price Spectre account. New listings are automatically imported from your linked eBay account — you do not need to create them manually.
Where do I find the algorithm and condition IDs for my spreadsheet?
Visit the Import Constants page at Tools > Import > Constants. This page shows up-to-date tables of all algorithm IDs, condition IDs, and available frequency values for your account.
This guide covers the Import and Export tools in Price Spectre's React-based interface. For a complete walkthrough of all Price Spectre features, see the Tutorial.