
Search Diagnostic Guide
The Search Diagnostic is Price Spectre's investigative tool for understanding why a listing's competitor set looks the way it does. Where the Search Console shows you which listings were kept as competitors, the Search Diagnostic also shows you which listings were rejected — and, crucially, which filter rule dropped each one.
Reach for the Search Diagnostic when a listing's repricing is tracking the wrong competitors, when an algorithm seems to be ignoring obvious matches, or when you want to tune include/exclude keywords with full visibility into their effect.
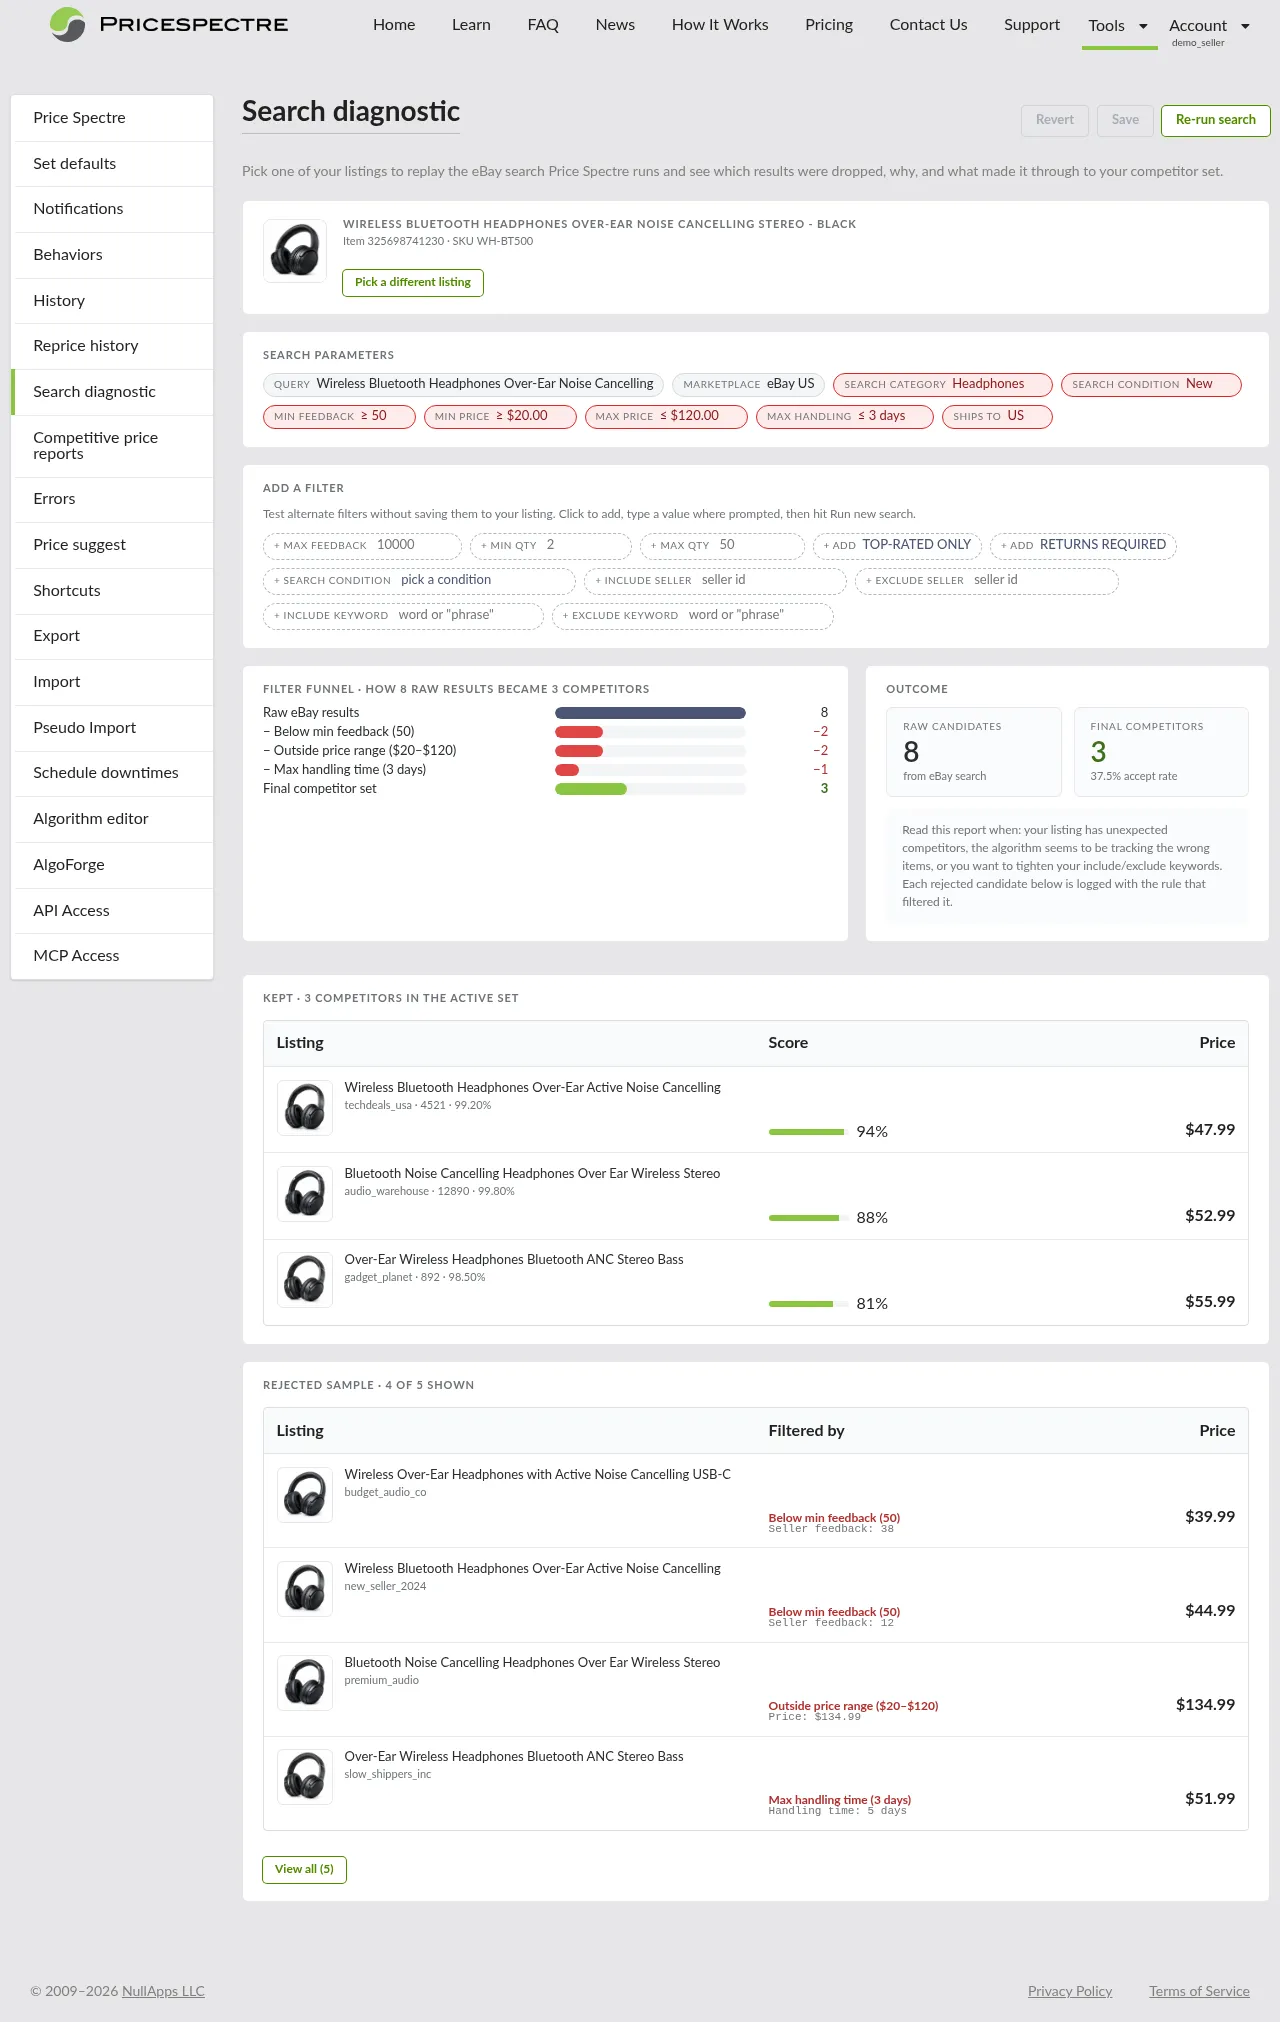
Table of Contents
- When to Use the Search Diagnostic
- Opening the Search Diagnostic
- Picking a Listing
- Reading the Diagnostic Report
- Tuning Filters in Place
- Search Diagnostic vs. Search Console
- Common Workflows
- Tips and Best Practices
- Frequently Asked Questions
When to Use the Search Diagnostic
Open the Search Diagnostic whenever you need to answer a why question about a listing's competitive landscape:
- Why are these particular listings my competitors? The Kept table shows the active set; the Rejected table shows everything eBay returned that did not survive your filters.
- Why is that listing not a competitor? If a specific eBay item should be in your competitor set but is not, the Rejected table will show it together with the rule that filtered it out.
- Which of my filters is doing the work? The filter funnel breaks down how the raw eBay result set was whittled down to the final competitor set, with one row per rule and the number of candidates each rule dropped.
- Are my include / exclude keywords too aggressive? Tune them in place and re-run to see candidates move between the Kept and Rejected tables in real time.
- Is the algorithm tracking the wrong items? Compare the listing's Kept set against what you expected. If real competitors are landing in Rejected, you have a filter problem, not an algorithm problem.
Tip: The Search Console answers what would my price be right now? The Search Diagnostic answers why are these the competitors at all? Use the Search Console for pricing questions and the Search Diagnostic for matching questions.
Opening the Search Diagnostic
- Go to Tools > Search Diagnostic.
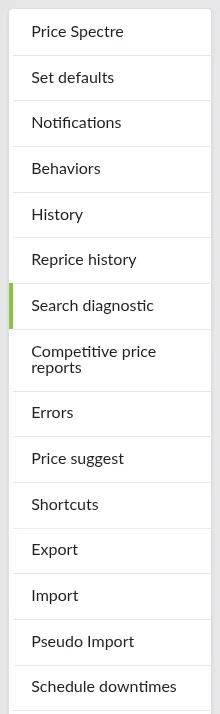
- The page opens with a listing picker at the top — type a listing title or paste a 12-digit eBay item number.
- Select a listing from the results. Price Spectre runs the diagnostic automatically and renders the report below.
You can also deep-link straight to a specific listing's diagnostic from elsewhere in Price Spectre — for example, from the Price Spectre tool page or from a reprice history row. When you arrive via a deep link, the diagnostic runs immediately, no picker step required.
Picking a Listing
The listing picker accepts two kinds of input:
- A title fragment — type a few characters and a list of matching listings appears. Each row shows a thumbnail, the listing title, and a small caption with the eBay item number, SKU, and variation details (when present).
- A 12-digit eBay item number — paste an item id and Price Spectre will narrow the picker to the exact match.
While the picker is searching your listings, a small spinner appears next to the input. If nothing matches your text, a "No listings matched" message replaces the result list so the picker does not look stuck.
Once you select a listing, the picker collapses and the diagnostic for that listing renders below it. You can return to the picker at any time by clicking Pick a different listing in the listing header.
Reading the Diagnostic Report
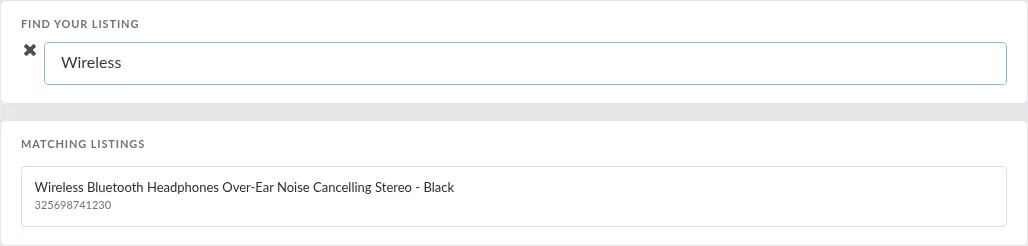
The report is laid out top-to-bottom in roughly the order you will read it:
- The listing header — what you are diagnosing.
- Search parameters — the filters currently in play, as removable chips.
- Add a filter — a row of chips you can add to test alternate filter values.
- Filter funnel + Outcome card — how the raw eBay results were narrowed down.
- Kept table — the final competitor set.
- Rejected table — everything that did not survive the filters, with the filtering rule called out per row.
The Listing Header
The header identifies the listing being diagnosed. It shows:
- A thumbnail and the listing title (the title links back to that listing's main Price Spectre page).
- The eBay item number and, when present, the SKU.
- A Pick a different listing button to return to the picker without losing your place on the page.

Search Parameters
The Search Parameters section renders the filters currently in play as a row of chips. Each chip is one filter; together they describe the search the diagnostic just ran.
There are two kinds of chips:
- Read-only chips (such as Query, Marketplace, Category, and the listing's own Condition) describe the listing itself and cannot be removed from this view. They are shown to give you context.
- Editable chips (such as Search Category, Search Condition, min/max feedback, min/max price, min/max quantity, max handling, top-rated only, returns required, include / exclude sellers, and include / exclude keywords) represent filters that are actively narrowing the competitor set. Hover an editable chip to reveal a remove control — clicking it stages a removal of that filter for the next run.
Prices on numeric chips render in the listing's marketplace currency (for example $, £, €, or C$).

Add a Filter
Beneath the active chips is an Add a filter row. This row shows the filters that are not currently set on the listing, again as chips. Click one to stage adding it; you will be prompted to enter a value where one is needed (for example a numeric threshold, a seller id, or a keyword).
This section is the fast way to ask "what would happen if I also restricted by feedback?" or "what if I excluded this one seller?" without leaving the page.
Note: Edits made in this section are staged in memory only. Nothing changes on your live listing until you click Save in the top-right of the page.

The Filter Funnel
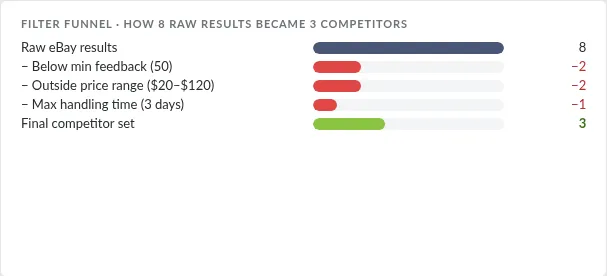
The funnel visualizes how the raw eBay results were narrowed down to the final competitor set. The first row is the Raw eBay results count — every candidate eBay returned for the underlying query. Each row beneath it represents one filter rule, with a bar showing how many candidates that rule dropped. The final row is the Final competitor set — what remained after every rule was applied.
The funnel is the single best place to look when you are not sure which filter is being too aggressive: the rule with the longest red drop bar is the one removing the most candidates.
The Outcome Card
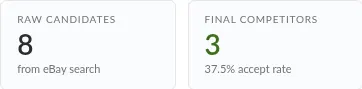
The Outcome card sits beside the funnel and summarizes the same data as two large stat cards:
- Raw candidates — how many candidates the underlying eBay search returned.
- Final competitors — how many survived all filters, alongside the accept rate (final ÷ raw, as a percentage).
A short "Read this report when…" hint underneath reminds you of the report's typical use cases.
The Kept Table
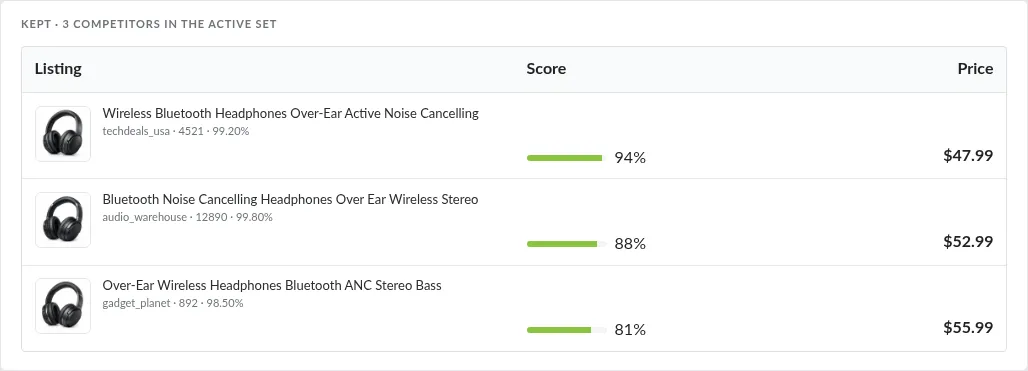
The Kept table lists every competitor that survived the filters and forms the active competitor set — exactly the set the algorithm would price against on the next reprice. Each row shows:
- A thumbnail and the competitor title (the title links to the listing on eBay).
- A sub-line with seller, feedback, and other identifying details.
- The total price, in the listing's marketplace currency.
The Kept table is what you compare against your expectations: if real competitors are missing from this list, they will be in the Rejected table below — with the rule that filtered them out called out per row.
The Rejected Table
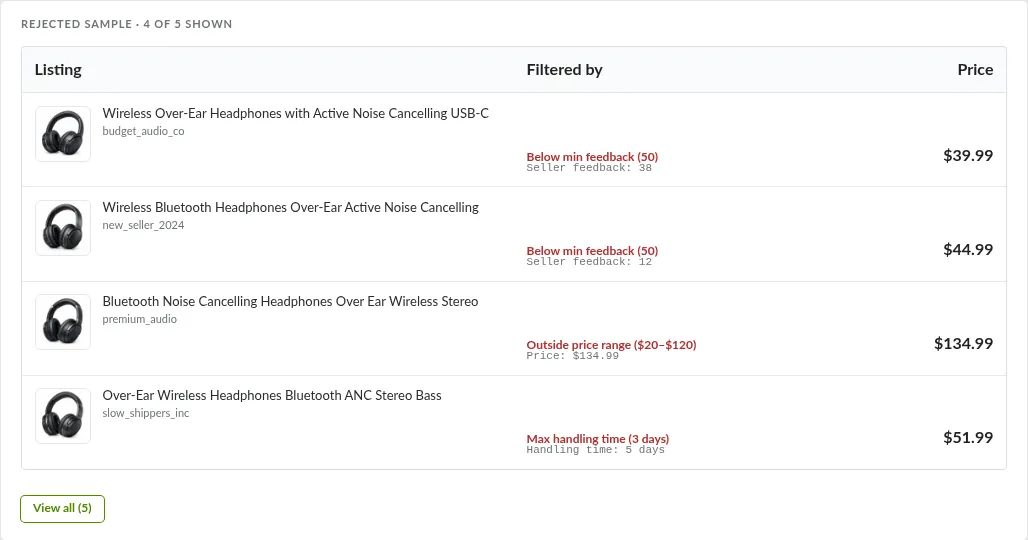
The Rejected table is the half of the report you cannot get from the Search Console: every candidate that did not make the cut, paired with the specific rule that dropped it.
By default the table shows a representative sample — enough rows to make the dominant rejection reasons obvious without overwhelming the page. The section header reads, for example, Rejected sample · 10 of 86 shown. Click View all beneath the table to expand to the full list.
Each row shows the same listing cell as Kept (thumbnail, title, sub-line, price) plus the filtering rule that rejected it (for example "excluded seller", "below min feedback", or "above max price"). Use this column to find the one filter responsible for excluding listings you wanted to keep.
Tuning Filters in Place
The Search Diagnostic is interactive: every edit you make to the search parameters or the "Add a filter" row is staged locally and applied on the next run. You can iterate as much as you like before saving anything back to the listing.
Run new search vs. Re-run search
The action button beneath the diagnostic changes label based on whether you have unsaved edits:
- Re-run search — there are no staged edits. Clicking it runs the diagnostic again with the same filter values as last time (useful when the eBay market may have shifted).
- Run new search — you have staged edits that have not been sent yet. Clicking it runs the diagnostic with your edits applied; on success, the staged edits become the new "applied" state and the button returns to Re-run search.
Either way, while the request is in flight the button reads Running… and is disabled.
Save and Revert
Two more buttons appear in the top-right of the page when any override is active or pending:
- Save — persist the currently applied filter overrides to the listing. Future reprices, and the Search Console for this listing, will use these values from now on.
- Revert — discard every in-memory edit and re-run the diagnostic against the listing's stored filter values. Useful when you have experimented your way into a state you do not want to keep.
Important: Until you click Save, your edits live only on this page. Navigating away — even to another tab in the app — discards them. Save when you find a combination you want to keep.

Search Diagnostic vs. Search Console
The Search Diagnostic and the Search Console overlap in subject matter but answer different questions:
| Search Console | Search Diagnostic | |
|---|---|---|
| Primary question | What would my price be right now? | Why are these my competitors? |
| Shows kept competitors | Yes | Yes |
| Shows rejected candidates | No | Yes, with the rule that filtered each one |
| Filter funnel | No | Yes |
| Candidate price highlight | Yes (green / red) | No — pricing is not the focus |
| Best for | Setting up new listings, tuning filters for price outcomes | Tuning filters for matching outcomes, debugging missing or unexpected competitors |
| Filter edits saved back to the listing | Yes (when you save) | Yes (Save / Revert at the top of the page) |
A common workflow uses both: open the Search Diagnostic first to verify the competitor set is right, then switch to the Search Console to verify the candidate price under that set.
Common Workflows
"This listing is repricing against the wrong things."
- Open the Search Diagnostic for the listing.
- Scan the Kept table. If real competitors are missing, scroll down to the Rejected table.
- Read the rule column on each missing competitor's row — that is the filter to relax.
- Edit the corresponding chip in Search Parameters (hover-X to remove it, or click the matching chip in Add a filter to add it), click Run new search, and verify the missing competitors have moved into Kept.
- Click Save to persist the change.
"My algorithm seems to be pricing too low."
- Open the Search Diagnostic and look at the Kept table. Are the cheapest items in the set the kind of seller you actually want to compete with?
- If not, add an EXCLUDE SELLER chip for the worst offender, or set a MIN FEEDBACK so brand-new sellers fall out.
- Re-run and watch the cheap end of the Kept table change.
- Once you are happy, save the change and then open the Search Console to confirm the candidate price has moved as expected.
"Searches are returning nothing."
- Look at the Outcome card. If Raw candidates is zero, the issue is the underlying eBay query — broaden the keywords on the listing.
- If raw candidates are non-zero but final is zero, the funnel will show one or more rules that dropped them all. Remove the most aggressive filter and re-run.
Tips and Best Practices
- Read the funnel before editing chips. The longest drop bar is almost always the rule worth questioning first.
- One change at a time. Edit a single filter, click Run new search, observe. Compound edits make it hard to attribute a change to the right cause.
- Use Save sparingly. It writes back to your listing's stored filters. Experiment freely; save only the combinations you actually want future reprices to use.
- Revert is your safety net. If a session of edits has spiraled, click Revert to throw away every override and start fresh from the listing's stored values.
- Cross-check with the Search Console. Once the Kept set looks right, switch to the Search Console to see what the candidate price would be under those filters.
- Pair with Reprice History. When a past reprice landed somewhere unexpected, open the Reprice History entry first to see the competitor set at the time, then open the Search Diagnostic for the live picture to compare.
Frequently Asked Questions
Does running a diagnostic change my listing's live price?
No. Running the diagnostic — and any number of Run new search clicks — never changes your listing's price on eBay. The diagnostic is read-only until you click Save, and even then only the filter settings are persisted; the live price still only changes when a real reprice runs.
Will my edits affect future reprices automatically?
Only if you click Save. Staged edits live in memory on the page. They are applied to this diagnostic run, but they are discarded the moment you leave the page unless you save them.
Why is the Rejected table only showing a sample?
To keep the page fast when a search returned hundreds or thousands of raw candidates. The sample is chosen to surface a representative spread of rejection reasons. Click View all to see every rejected row.
The error banner says "eBay rejected the search." What does that mean?
eBay's search service returned an error for the query the diagnostic just sent. The most common cause is an invalid seller id in the include or exclude seller lists. Fix the offending chip and click Run new search to try again — the filter editor stays available on the page so you do not have to start over.
My listing does not appear in the picker.
The picker searches your own Price Spectre listings, so the listing must be linked under your account. If you expected to find it and cannot, confirm the listing exists on the Price Spectre tool page and that the eBay account is still linked.
Can I diagnose listings I do not yet own?
No. The Search Diagnostic operates on listings already in Price Spectre. For one-time exploratory competitor research without owning the listing, see the Pseudo Import guide.
Is there a quicker way to open the Search Diagnostic for a specific listing?
Yes. Several places in Price Spectre link directly into the diagnostic for the listing you are currently looking at — for example from the Price Spectre tool page and from a reprice history record. When you arrive via one of those links, the diagnostic runs immediately.
This guide covers the Search Diagnostic in Price Spectre's React-based interface. For tuning a listing's filters with a candidate-price preview, see the Search Console guide. For inspecting past reprice decisions on a single listing, see the Reprice History guide.