
API Access and Token Management
The Price Spectre API lets you read and update your listings programmatically — listing the items in your account, looking up a specific listing by SKU or eBay item number, and updating settings like floor price, ceiling price, algorithm, and managed/manual mode without going through the web UI.
This guide covers the API Access tool, where you create and manage the authorization tokens that the API requires, and gives you everything you need to make your first authenticated request.
If you only need to upload bulk spreadsheets on a schedule, the SFTP and FTPS Uploads guide may be a simpler fit — it uses the same Price Spectre import pipeline as the in-app Import page and does not require any API tokens. The API is the right choice when you want fine-grained, real-time access to individual listings from your own code.
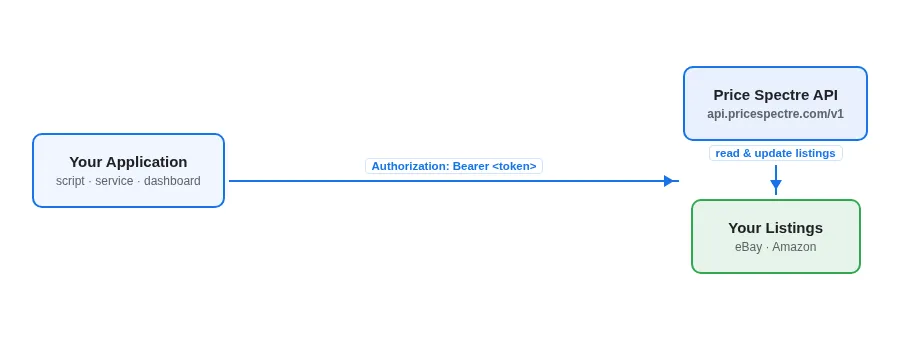
Table of Contents
- Overview
- When to Use the API
- Opening the API Access Page
- Generating a Token
- Reading the Token List
- Naming a Token
- Rotating a Token
- Revoking a Token
- Token Limits and Expiration
- Making an Authenticated Request
- Updates Must Be Unambiguous
- What the API Can Do
- Reference: Listing the API Reference
- Best Practices
- Troubleshooting
- Frequently Asked Questions
Overview
API access in Price Spectre has two halves:
- The API Access tool, in your account, is where you generate, name, rotate, and revoke the bearer tokens that authenticate your API calls.
- The Price Spectre API itself is hosted at
https://api.pricespectre.com/v1and accepts standard HTTPS requests with anAuthorization: Bearer <token>header.
Every token you generate is tied to your Price Spectre account. Anything you can do with that account in the web app's listing tools — read your listings, change floor and ceiling prices, switch algorithms, enable repricing, set a listing to manual mode — you can do over the API with that token. Treat tokens like passwords.
Note: This guide focuses on tokens and how to call the API. The full, interactive endpoint reference (every path, every parameter, every response field) is published at the Price Spectre API docs and is linked from the API Access page itself.
When to Use the API
The API is the right entry point when:
- You're building a custom integration. A dashboard, a price-monitoring script, or a back-office tool that needs to read or update listings on demand rather than on a schedule.
- You want per-listing control. The API lets you target a single listing by SKU or eBay item number and change just the fields you care about. You don't need to round-trip through a spreadsheet.
- You're reacting to events in another system. For example, your inventory system flags an item as low stock and your script flips that listing to unmanaged via the API in the same run.
- You're building tools for your team. A small internal app that lets non-technical staff edit a curated set of fields, backed by API calls under the hood.
The API is not the best tool for every job. Use the Price Spectre web app for one-off edits, the Import / Export workflow for bulk spreadsheet edits across hundreds or thousands of listings, and SFTP / FTPS uploads for scheduled file drops from another system.

Opening the API Access Page
API tokens live under Tools in the side navigation:
- Sign in to Price Spectre.
- Click Tools in the top navigation.
- Select API Access from the side menu.
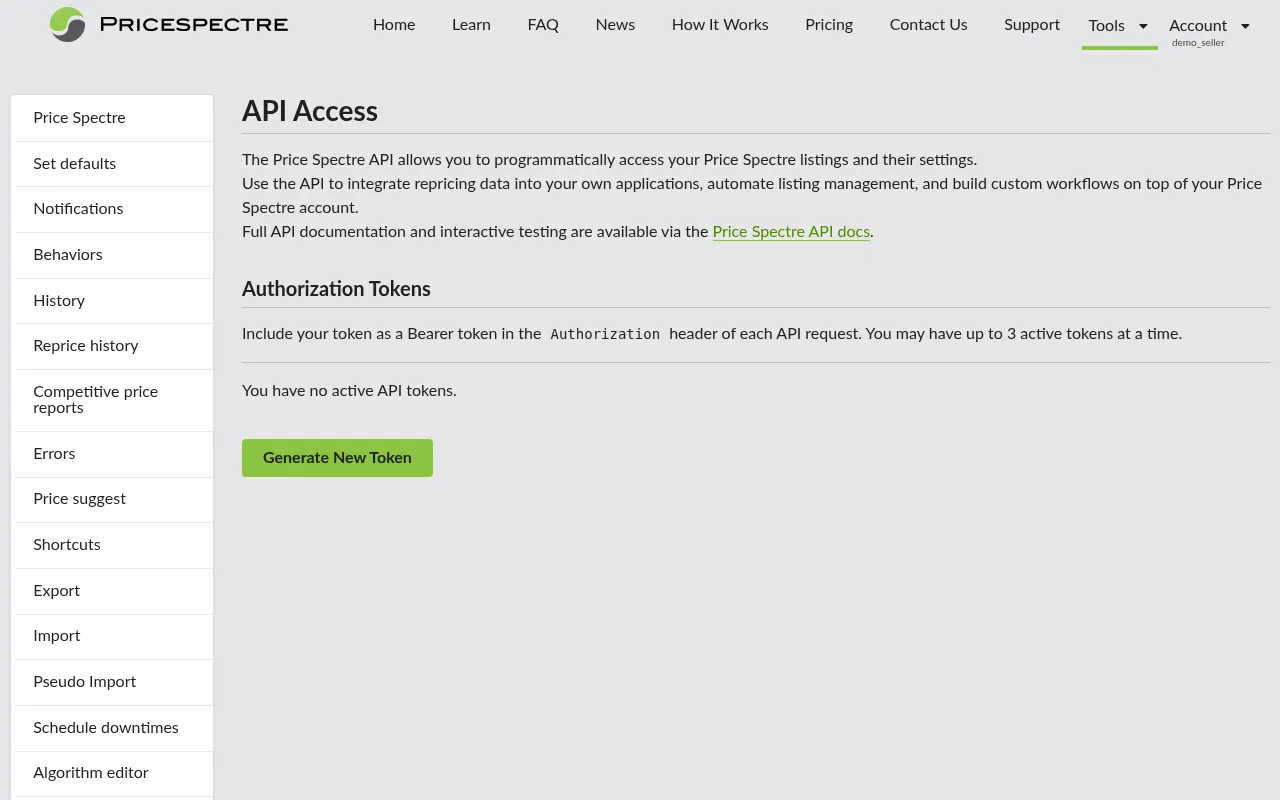
The page opens with a short intro, a list of your existing tokens (or an empty state if you haven't generated any), and a Generate New Token button.
Generating a Token
To create your first token:
- Click Generate New Token.
- The newly generated token appears at the top of the page in a highlighted "Your new token" panel, alongside a banner that reads "Copy this token now — it will not be shown again."
- Click Copy to copy the full token to your clipboard. The button briefly changes to Copied! to confirm.
- Paste the token immediately into your secrets manager, environment variable file, or wherever your application reads its credentials.
- When you're done, click Dismiss to clear the panel. From this point on the full token value is no longer recoverable from Price Spectre — only a short identifying hint remains visible.

Important: If you lose the token after dismissing the panel, you cannot recover it. The fix is to revoke that token and generate a new one. Plan to capture the value into your application's secrets store before you dismiss the reveal panel.
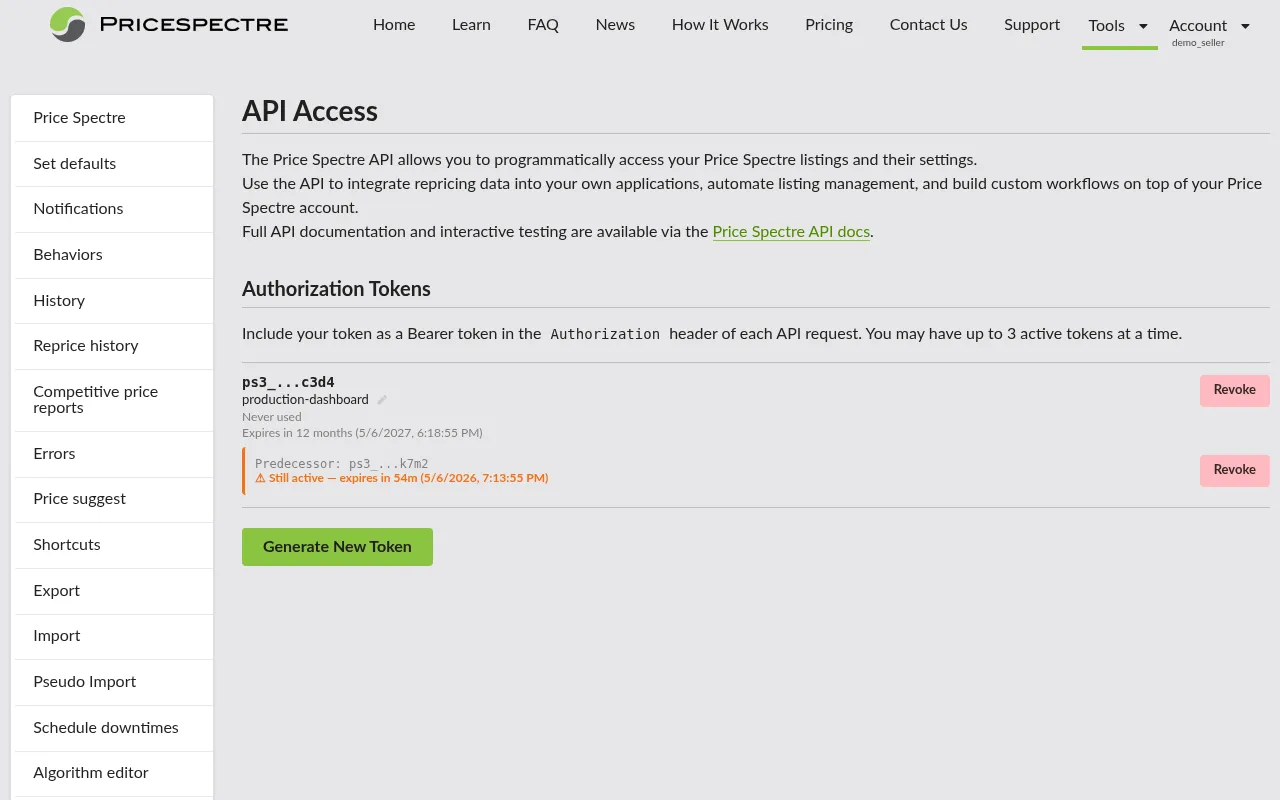
Reading the Token List
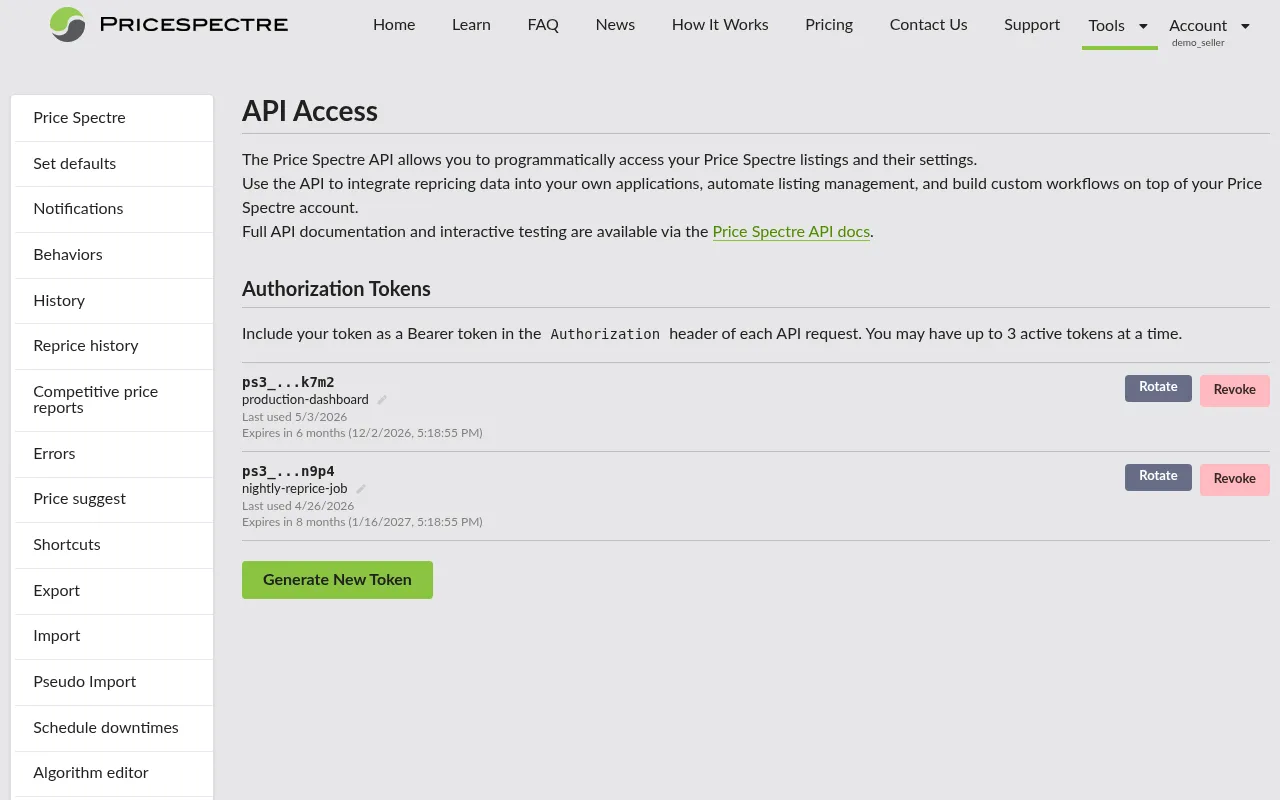
After you generate a token, it appears in the Authorization Tokens list with the following information:
- Token hint — a short, partial identifier (the first and last few characters of the token). This is the only way to identify a token in the list once it's been dismissed. Use it when matching a row to a credential stored in your application.
- Nickname — an optional human-friendly label you can edit at any time. If you haven't set one, the row shows an Add nickname placeholder.
- Last used — either a date (
Last used <date>) or Never used if the token has not yet authenticated a request. - Expiration — the token's expiration time, displayed both as a relative duration (
Expires in 7 months) and a full timestamp. Tokens expiring within 30 days are highlighted as a warning. - Actions — the Rotate and Revoke buttons (Rotate is only shown for tokens that are eligible — see below).
Naming a Token
Tokens default to no nickname. Setting one is optional but strongly recommended once you have more than one — the hint alone is hard to recognise at a glance.
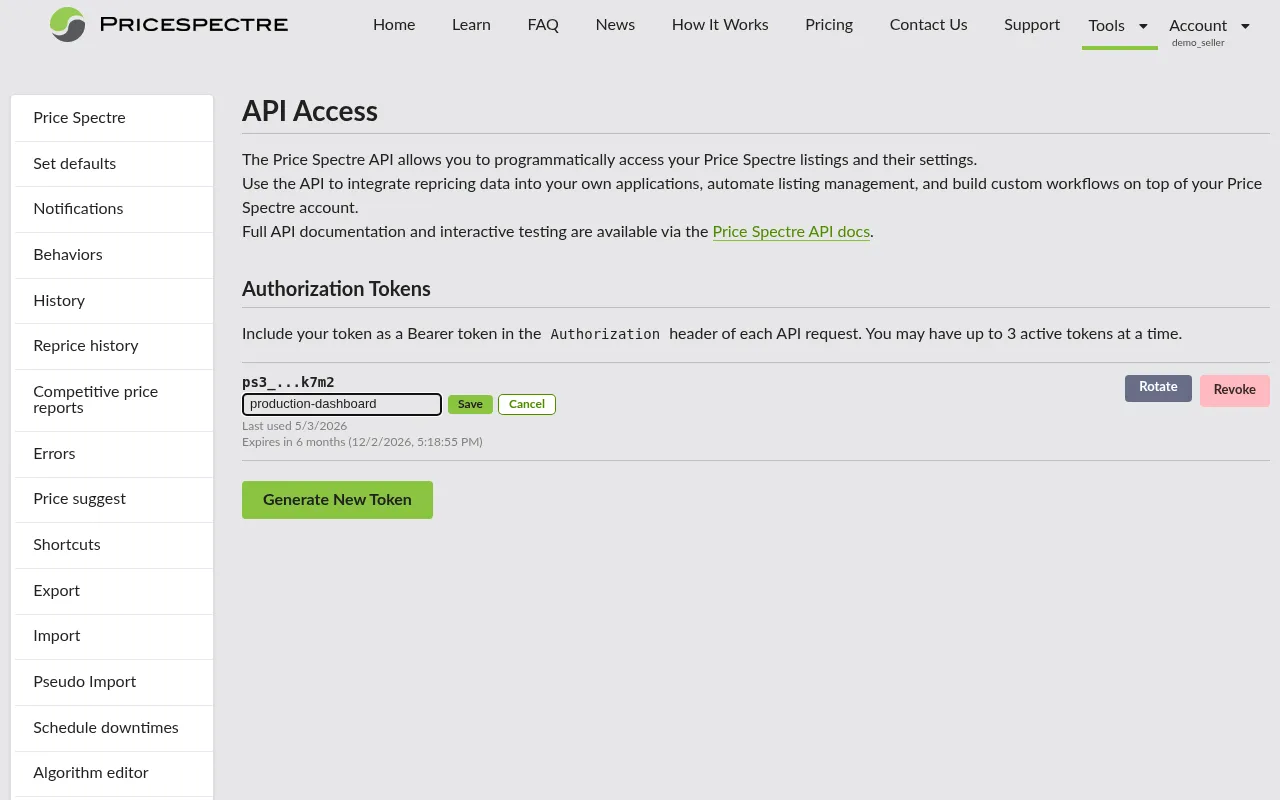
- In the row for the token, click the small edit (pencil) icon next to Add nickname (or next to the existing nickname if you're renaming).
- Type a short name. Up to 30 characters is allowed. Good nicknames describe where the token is used:
production-dashboard,nightly-reprice-job,intern-laptop. - Press Enter or click Save. Press Escape or click Cancel to back out without saving.
Tip: Pick a naming convention for your team and stick to it. When something goes wrong at 2am,
production-dashboardis far more useful thanabcd…wxyz.
Rotating a Token
Rotating a token issues a brand-new token while keeping the previous one alive for a short overlap window. This is the recommended way to change a token in production without downtime: deploy the new token, verify it works, then let the old one expire (or revoke it explicitly once you're confident).
To rotate:
- In the token's row, click Rotate.
- A confirmation modal explains: "Your existing token will stop working in one hour. Your new token will be available immediately — update all your integrations before the old token expires."
- Click Rotate Token to confirm.
- The new token is revealed in the same "Your new token" panel as a fresh generation. Copy it now and update your integrations.
- Once the rotation completes, the row for the new token shows the original (now-expiring) token underneath as its Predecessor, with a warning indicating how long it has left and a Revoke button if you want to expire the predecessor immediately rather than wait the full hour.

Tip: The overlap window means rotation does not require precise coordination — deploy the new token, watch the Last used timestamp on the new row update, and then revoke the predecessor when you're satisfied. If you forget, the predecessor expires on its own.
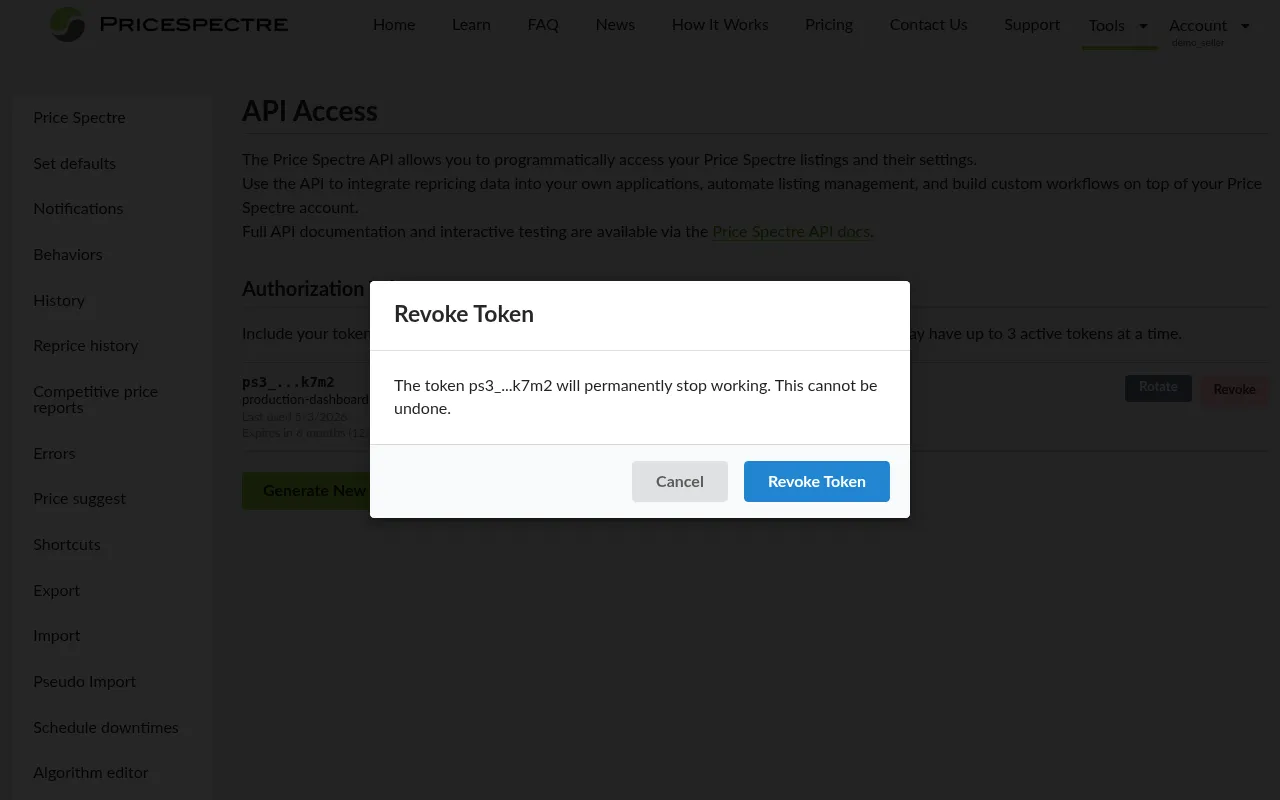
Revoking a Token
Revoking a token permanently disables it. There is no undo.
- In the token's row, click Revoke.
- Read the confirmation modal carefully — it identifies the token by its hint and reminds you the action cannot be undone.
- Click Revoke Token to confirm.
The token disappears from the list immediately, and any further API calls using it return a 401 Unauthorized error.
When to revoke:
- A token has been exposed (committed to a repository, pasted into a chat, leaked in a screenshot).
- A laptop, server, or contractor that held the token is no longer trusted.
- You are decommissioning an integration permanently.
- You used Rotate for a planned changeover and want to retire the predecessor sooner than the automatic one-hour cutoff.
If you simply want to change a token in production without downtime, prefer Rotate over Revoke + Generate — rotation gives you the overlap window, whereas a hard revoke means a brief outage between the moment the old token stops working and the moment your application picks up the new one.
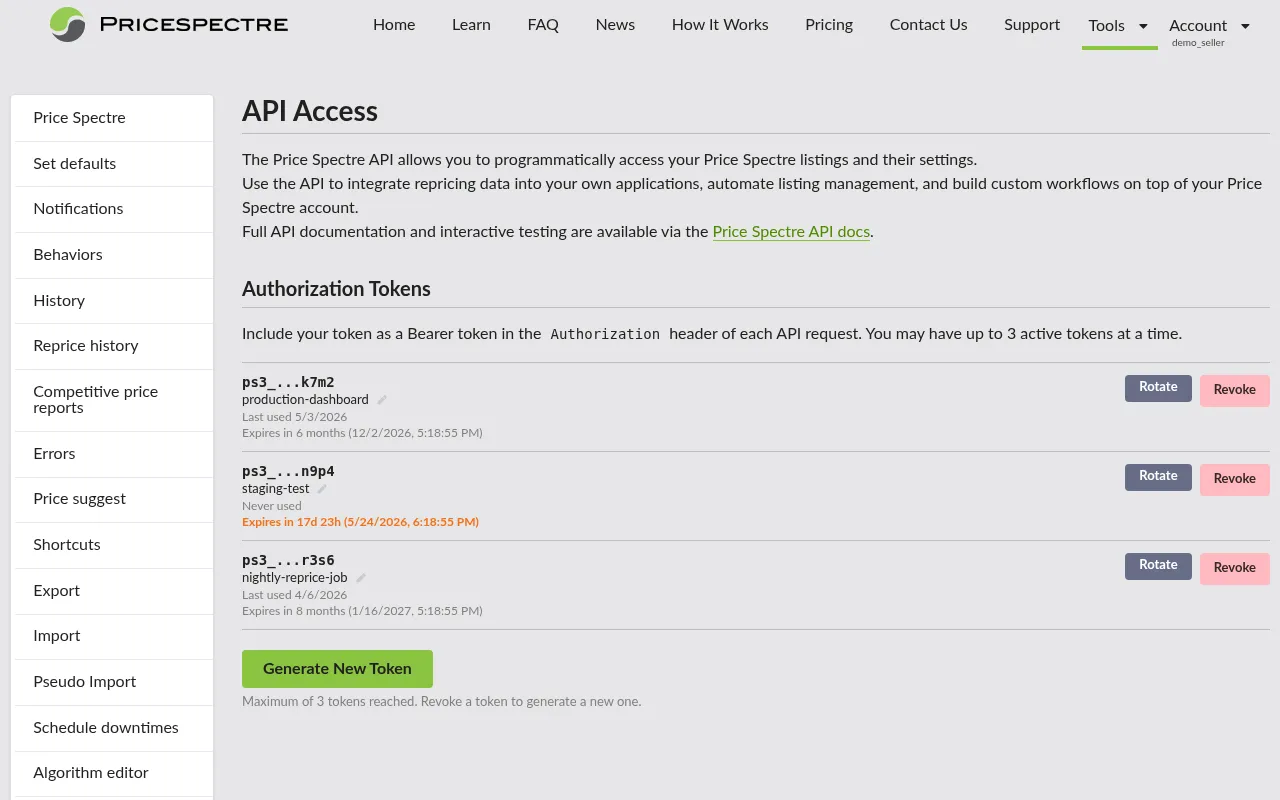
Token Limits and Expiration
A few constraints to be aware of:
- You can have at most 3 active tokens at a time. When you hit the limit, the Generate New Token button is disabled and the page shows: "Maximum of 3 tokens reached. Revoke a token to generate a new one." (A token in the rotation overlap window — a "predecessor" — does not consume one of the 3 active slots; the 3-token cap applies to standalone, non-predecessor tokens.)
- Tokens have an expiration date. The exact lifetime is shown next to each token (for example,
Expires in 7 months). Tokens expiring within the next 30 days are highlighted in the list so you have time to plan a rotation. - An expired token returns 401 Unauthorized. The fix is to rotate it (preferred) or revoke and regenerate.
Last usedupdates only on successful authentication. If your application recently changed credentials, this is a good signal to confirm everything has switched over.
Making an Authenticated Request
Every Price Spectre API endpoint is authenticated with a bearer token in the Authorization header:
Authorization: Bearer YOUR_TOKEN_HERE
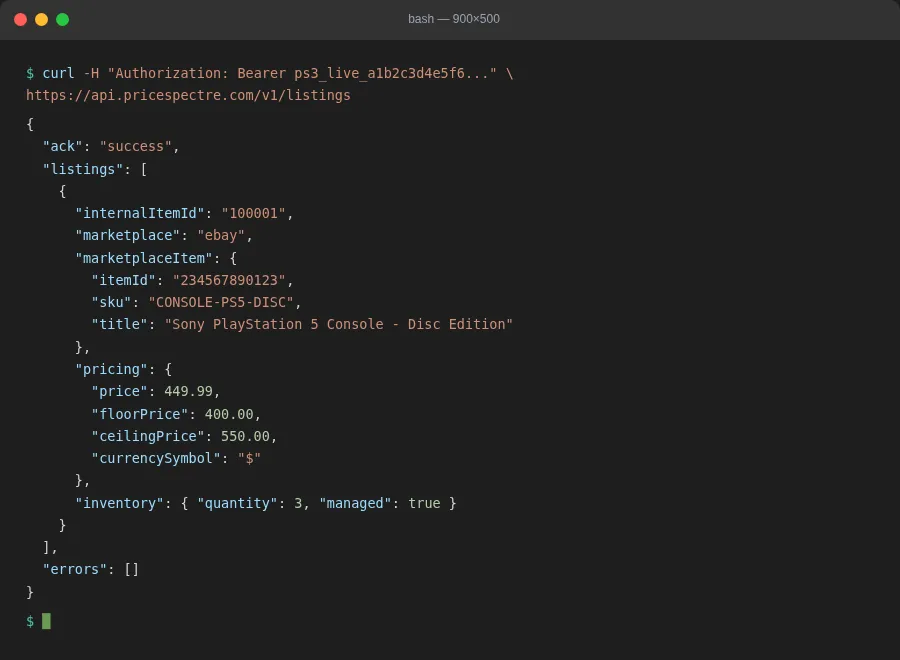
A minimal curl example that lists the first page of your listings:
curl -H "Authorization: Bearer YOUR_TOKEN_HERE" \
  https://api.pricespectre.com/v1/listings
Looking up a listing by SKU:
curl -H "Authorization: Bearer YOUR_TOKEN_HERE" \
  https://api.pricespectre.com/v1/listings/sku/CONSOLE-123
Updating a listing's floor and ceiling:
curl -X POST \
  -H "Authorization: Bearer YOUR_TOKEN_HERE" \
  -H "Content-Type: application/json" \
  -d '{"floorPrice": 200, "ceilingPrice": 500}' \
  https://api.pricespectre.com/v1/listings/sku/CONSOLE-123
A few request-level notes:
- All requests use HTTPS. Plain HTTP is not accepted.
- Update requests must send
Content-Type: application/json. Sending another content type returns 415 Unsupported Media Type. - Unknown fields in an update body are ignored, so a typo like
floorprice(lowercase) won't blow up the request — but it also won't update the floor. Double-check field names against the API docs. - Validation errors return 400 with an
errorsarray describing what was wrong. Authentication failures return 401.
Updates Must Be Unambiguous
Update calls (the POST endpoints under /v1/listings/...) require the path you choose to identify exactly one listing in your account. If the identifiers you supply could match more than one listing, the update is rejected and no fields are changed.
Two common situations trigger this:
- Item numbers that belong to a multi-variation listing. A single eBay item number can hold many variations (different sizes, colors, configurations). Posting to
POST /v1/listings/item/{itemnumber}against a multi-variation item number resolves to several internal records, so the update fails. Add the variation's SKU to disambiguate usingPOST /v1/listings/item/{itemnumber}/sku/{sku}. - SKUs that appear on more than one listing. Many sellers reuse a SKU across multiple eBay sites or maintain duplicate listings with the same SKU. Posting to
POST /v1/listings/sku/{sku}when the SKU matches more than one listing fails for the same reason. Add the eBay site to disambiguate usingPOST /v1/listings/sku/{sku}/site/{site}, or fall back to an item-number-based path.
The pattern to remember: read first, then update. Issue the corresponding GET request with the same path you intend to use for the update. If the response contains a single listing, the update will succeed. If it contains more than one, narrow the path until exactly one listing comes back.
# Step 1: confirm the path resolves to exactly one listing
curl -H "Authorization: Bearer YOUR_TOKEN_HERE" \
  https://api.pricespectre.com/v1/listings/sku/CONSOLE-123

# Step 2: if you got one listing back, the same path is safe to update
curl -X POST \
  -H "Authorization: Bearer YOUR_TOKEN_HERE" \
  -H "Content-Type: application/json" \
  -d '{"floorPrice": 200}' \
  https://api.pricespectre.com/v1/listings/sku/CONSOLE-123
When the listing isn't unambiguous, the API returns an error rather than guessing — picking the wrong record on a partial match would silently change a listing you didn't intend to. The fix is always to use a more specific path: add the missing site or SKU/item-number qualifier and try again.
Tip: For a multi-variation parent listing, plan to drive updates by (item number, SKU) pairs. The variation SKU is what makes each child record unique, and the combined path is the safest way to target one and only one variation per call.
What the API Can Do
The API is centered around listings. At a high level you can:
- List your listings, with pagination, sorting, and an optional filter by eBay site.
- Look up a single listing by SKU, by eBay item number, or by both — optionally scoped to a specific eBay site for sellers active on multiple marketplaces.
- Update a listing's repricing settings: floor and ceiling prices, BIN price, search keywords, feedback / price / quantity / handling-time filters, included / excluded / exempt seller lists, search category and conditions, and the various toggles like
restrictCategory,returnsAccepted,topRated, andamazon. - Switch a listing between modes: enabled vs. disabled (managed vs. unmanaged), automatic vs. manual repricing, and Baťa pricing on or off.
- Choose an algorithm by ID and supply its
xandyparameters where applicable. - Set repricing frequency to standard or premium.
- Attach free-form notes that show up alongside the listing in the web UI.
A typical end-to-end flow for a custom integration:
- Call
GET /v1/listings(paginated) to mirror your listings into your own database. - When something changes in your system — a cost change, a stock-out, a promotion — call
POST /v1/listings/sku/{sku}(or a more specific path if SKUs are not unique) with just the fields you want to adjust. - Periodically poll the same endpoint to see the current price, the suggested price, the lowest competitor, and the most recent search or revise warnings.
Tip: Updates are partial. You only need to send the fields you want to change — the rest are left untouched. This keeps your code simple and avoids accidentally clobbering settings you didn't mean to touch.
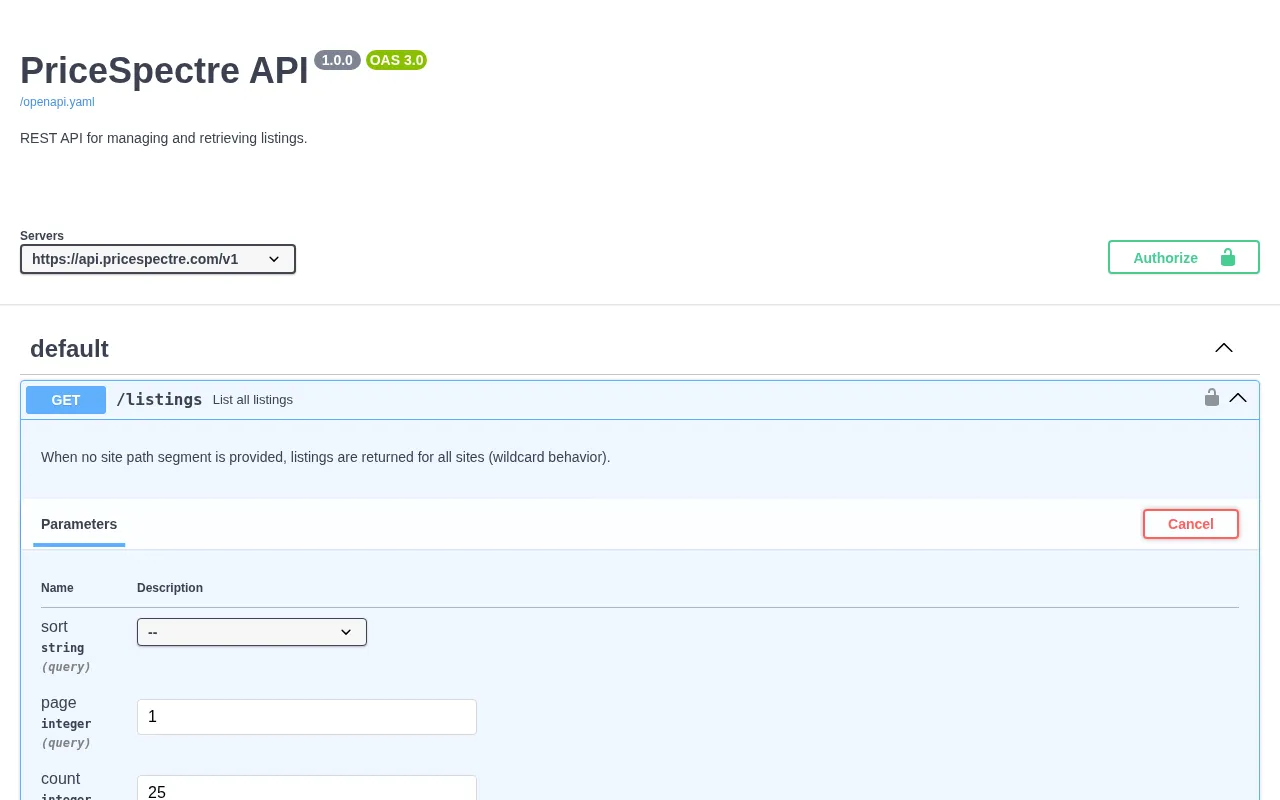
Reference: Listing the API Reference
Inside the API Access page itself, you'll find a link reading "Full API documentation and interactive testing are available via the Price Spectre API docs." That link opens the live, interactive reference at:
https://api.pricespectre.com/docs
The interactive docs are the source of truth for:
- The complete list of endpoints, request parameters, and response schemas.
- An in-browser Try it out button that issues real API calls against your account when you paste in a token.
- The full set of allowed values for fields that take enums (sort keys, frequency, condition codes, site identifiers, and so on).
If anything in this guide drifts out of date, the interactive docs win.
Best Practices
A short checklist for keeping your integration safe and easy to maintain:
- Treat tokens like passwords. Store them in a secrets manager, environment variables, or your platform's secrets store — never check them into source control, paste them into chat, or include them in screenshots.
- Use one token per integration. A separate token per environment (production, staging, local laptop) makes audit, rotation, and revocation surgical. The 3-token cap is enough for most teams; if you need more, share one token across multiple jobs that already share their secrets store.
- Name your tokens. A clear nickname like
nightly-reprice-jobis much easier to act on than a partial hint when you need to revoke something in a hurry. - Rotate, don't revoke, for routine changes. Use Rotate when you're swapping credentials in production. The one-hour overlap means zero downtime if your deploy hits any hiccups.
- Watch the expiration warning. When you see the orange warning that a token is expiring within 30 days, schedule a rotation rather than waiting for it to expire and break a job at an inconvenient time.
- Send only the fields you want to change. The update endpoints are partial — there's no benefit to re-sending the entire listing on every call, and doing so is more likely to introduce bugs.
- GET before you POST when in doubt. If your data model can't guarantee that a SKU or item number is unique, run the matching
GETfirst and confirm it returns exactly one listing before issuing an update against the same path. - Handle 401, 400, and 415 explicitly in your code. Each one points at a specific category of mistake (bad token, bad data, bad headers). Logging which one you got makes incidents much easier to debug.
- Use SKU lookups when you can. SKUs are stable, item numbers can change as listings are relisted; if your integration already knows the SKU, prefer the SKU-based endpoints — and combine SKU + site or SKU + item number when SKUs aren't unique across your catalog.
Troubleshooting
401 Unauthorized on every request.
Check the token in your Authorization header. The format must be Bearer <token> with a literal space between Bearer and the token. Confirm the token still exists in the API Access page and isn't expired or revoked. If you've recently rotated a token, make sure your application picked up the new value rather than continuing to use the predecessor that has now expired.
400 Bad Request with a validation error.
The body of the response includes an errors array describing what failed (for example, itemnumber must be numeric). Fix the request and retry. The most common causes are passing the wrong type for a numeric field, sending an unsupported eBay site code, or supplying an item number of zero.
My update was rejected because it matched more than one listing.
The POST endpoints require the path you supply to identify exactly one listing — if it resolves to multiple records, the update is refused and nothing changes. This typically happens with multi-variation item numbers (one item number, many variation SKUs) or with SKUs reused across listings (for example, the same SKU on multiple eBay sites). Re-issue the call against a more specific path: add the SKU to an item-number path, or add the site to a SKU path. Run the matching GET first to confirm the narrower path returns exactly one listing.
415 Unsupported Media Type.
Update endpoints require Content-Type: application/json. Add the header and resend.
My update returned 200 OK but nothing changed.
Unknown fields are silently ignored. Double-check the field names against the interactive API docs — for example, floorPrice is camelCase, not floor_price or floorprice. The response body's ack field will be success either way.
Generate New Token is disabled.
You've hit the 3-token cap. Revoke a token you no longer need — or rotate the oldest one if you're still using it — and the button will become available again.
Rotate isn't shown on a token I expected to be able to rotate.
A token that's already serving as a rotation predecessor for another token can't be rotated again. Wait for it to expire (or revoke it) and rotate the active successor instead.
My token's Last used date didn't update after I deployed it.
Last used only updates on successful, authenticated requests. If it isn't moving, your deploy is probably still using the old credentials, or your requests are getting rejected with 401 before they reach the listings endpoints. Check your application logs.
I revoked a token by mistake. Revocation is permanent — there is no recovery for the original token value. Generate a new token and roll it out to the affected integration.
Frequently Asked Questions
How is API access billed? There is no separate fee for using the API itself. Billing follows the same managed-listing model as the web app: it's the listings you have set to managed (whether you manage them through the UI or via the API) that count against your plan tier.
Are there rate limits? Reasonable use is fine. If you're planning a large bulk operation — for example, mirroring tens of thousands of listings or pushing a wave of updates from a one-off migration — contact support so we can confirm your workload is in good shape.
Do API updates trigger an immediate reprice?
No. API updates change the settings Price Spectre uses when it next reprices the affected listing on its normal repricing cycle. If you need a price change to land on eBay right now, set the binPrice directly via the API or use the web UI's manual price tools.
How do I update one variation of a multi-variation listing?
Target it with both the item number and the variation's SKU: POST /v1/listings/item/{itemnumber}/sku/{sku}. The combined path is unambiguous, even on listings with many variations. Updates against the bare item-number path (POST /v1/listings/item/{itemnumber}) are refused on multi-variation listings because the path resolves to more than one record.
Why does my SKU update fail when I know the SKU exists?
The update endpoints don't pick a "best" match — they require exactly one match. If the same SKU appears on more than one listing in your account (typically because the listing exists on multiple eBay sites, or because you've ended-and-relisted variants), the bare POST /v1/listings/sku/{sku} path is ambiguous and the call is rejected. Add the site to the path (POST /v1/listings/sku/{sku}/site/{site}) or use an item-number-based path to point at the specific listing you want to change.
Can I write to listings on a marketplace I haven't linked? No. The API operates on the listings already in your account, which means listings that came from an eBay account you've linked through the Tutorial's Linking Your eBay Account flow. To work with a new marketplace, link the account in the web app first.
Can a manager use my API tokens? Tokens are tied to the account that generated them. If a manager has access to your account, they can generate and manage tokens from within your account just as you can. They cannot use tokens issued under their own manager account to call the API on your behalf — see the Manager Access guide for how delegated access works.
Can I script everything I can do in the web app? The API covers the listing-management surface — reading listings and changing their repricing settings. Account-level configuration (Set Defaults, Behaviors, Schedule Downtimes, billing, eBay account linking, manager access) is not part of the v1 API and must be done in the web app. The interactive API docs are the canonical list of what's currently available.
What happens if I delete or unlink the underlying eBay account? Listings from an unlinked eBay account stop being repricable, and API updates targeting them have nothing to act on. The token continues to work for any other listings in your account.
Where do I report API bugs or request new endpoints? Use the Contact Us option in the application. Include the request URL, the response status, and (where it doesn't expose sensitive data) the response body — that's enough for support to track the request down.