
Price Spectre Account & Listing Defaults
The Set Defaults page is where you tell Price Spectre how every new listing in your account should be configured — the repricing algorithm to use, the floor and ceiling that constrain it, the filters that decide which competitors count, and a handful of other settings that would otherwise have to be filled in on every listing by hand. Setting these values well once is the difference between a large catalog that onboards in minutes and one that needs per-item attention.
This guide explains what each control on the page does, what gets applied to brand-new listings versus to listings you already have, and a short workflow for getting a freshly imported catalog into a consistent state. It is aimed at Price Spectre account holders who have already linked an eBay account and are about to add — or have recently added — more than a handful of listings. If you have not linked an eBay account yet, start with the Tutorial.
Table of Contents
- What "Defaults" Mean in Price Spectre
- Before You Begin
- Finding the Set Defaults Page
- How the Page Is Organized
- Default Search Options
- Default Filters
- Other Defaults
- Saving: Future vs. Future + Current Listings
- A Recommended Workflow for New Catalogs
- Frequently Asked Questions
- Related Guides
What "Defaults" Mean in Price Spectre
Every listing Price Spectre reprices carries its own copy of a small bundle of settings: which algorithm decides the price, the floor and ceiling that bound that decision, the filters that describe which competitor listings should count, and whether the repricer runs on its own schedule or waits for you. The Set Defaults page is where you fill in that bundle once so that every brand-new listing starts out already configured.
A few points that are easy to get wrong on first contact with the page:
- Defaults are a template, not a global setting. When you create or import a listing, Price Spectre copies the current defaults onto that listing. After the copy, the listing has its own independent values. Changing the defaults later does not automatically rewrite the listings you already have unless you ask for it.
- Per-listing values always win. Anything you have set directly on a listing — for example, a custom floor on one high-margin item — takes precedence over the default. Defaults exist to avoid typing the same value on every listing; they are not a "force" setting.
- You control whether changes reach existing listings. The page lets you push any subset of your saved values to the listings you already have. This is opt-in on a per-row basis, explained in Saving: Future vs. Future + Current Listings.
Tip: If you are onboarding a large catalog, configure the Set Defaults page before running your first import. Each imported listing inherits whatever defaults are in place at the moment of the import, so having the page set up beforehand saves you a round of bulk edits later.
Before You Begin
The Set Defaults page requires a linked eBay account. Defaults are meaningless until Price Spectre knows which store they apply to, so if no marketplace account is linked the page asks you to link one before it will let you continue.
If you have not already linked eBay:
- Go to Account > Link/Unlink.
- Authorize the eBay account you want Price Spectre to manage.
- Return to Tools > Set Defaults.
If you see a message that says your eBay account must be linked first, follow the link in the message to the Account > Link/Unlink page and complete or re-authorize the connection. The Set Defaults page will load normally once the link is in place.
Note: The same message appears if you previously linked an eBay account but the authorization has since lapsed. Re-authorizing in Account > Link/Unlink restores access to this page.
Finding the Set Defaults Page
From anywhere in Price Spectre, open the Tools menu and select Set Defaults.
The page loads with your current saved defaults already filled in. If you have never saved anything here, the controls show Price Spectre's starting values so you can edit from a sensible baseline rather than a blank page.
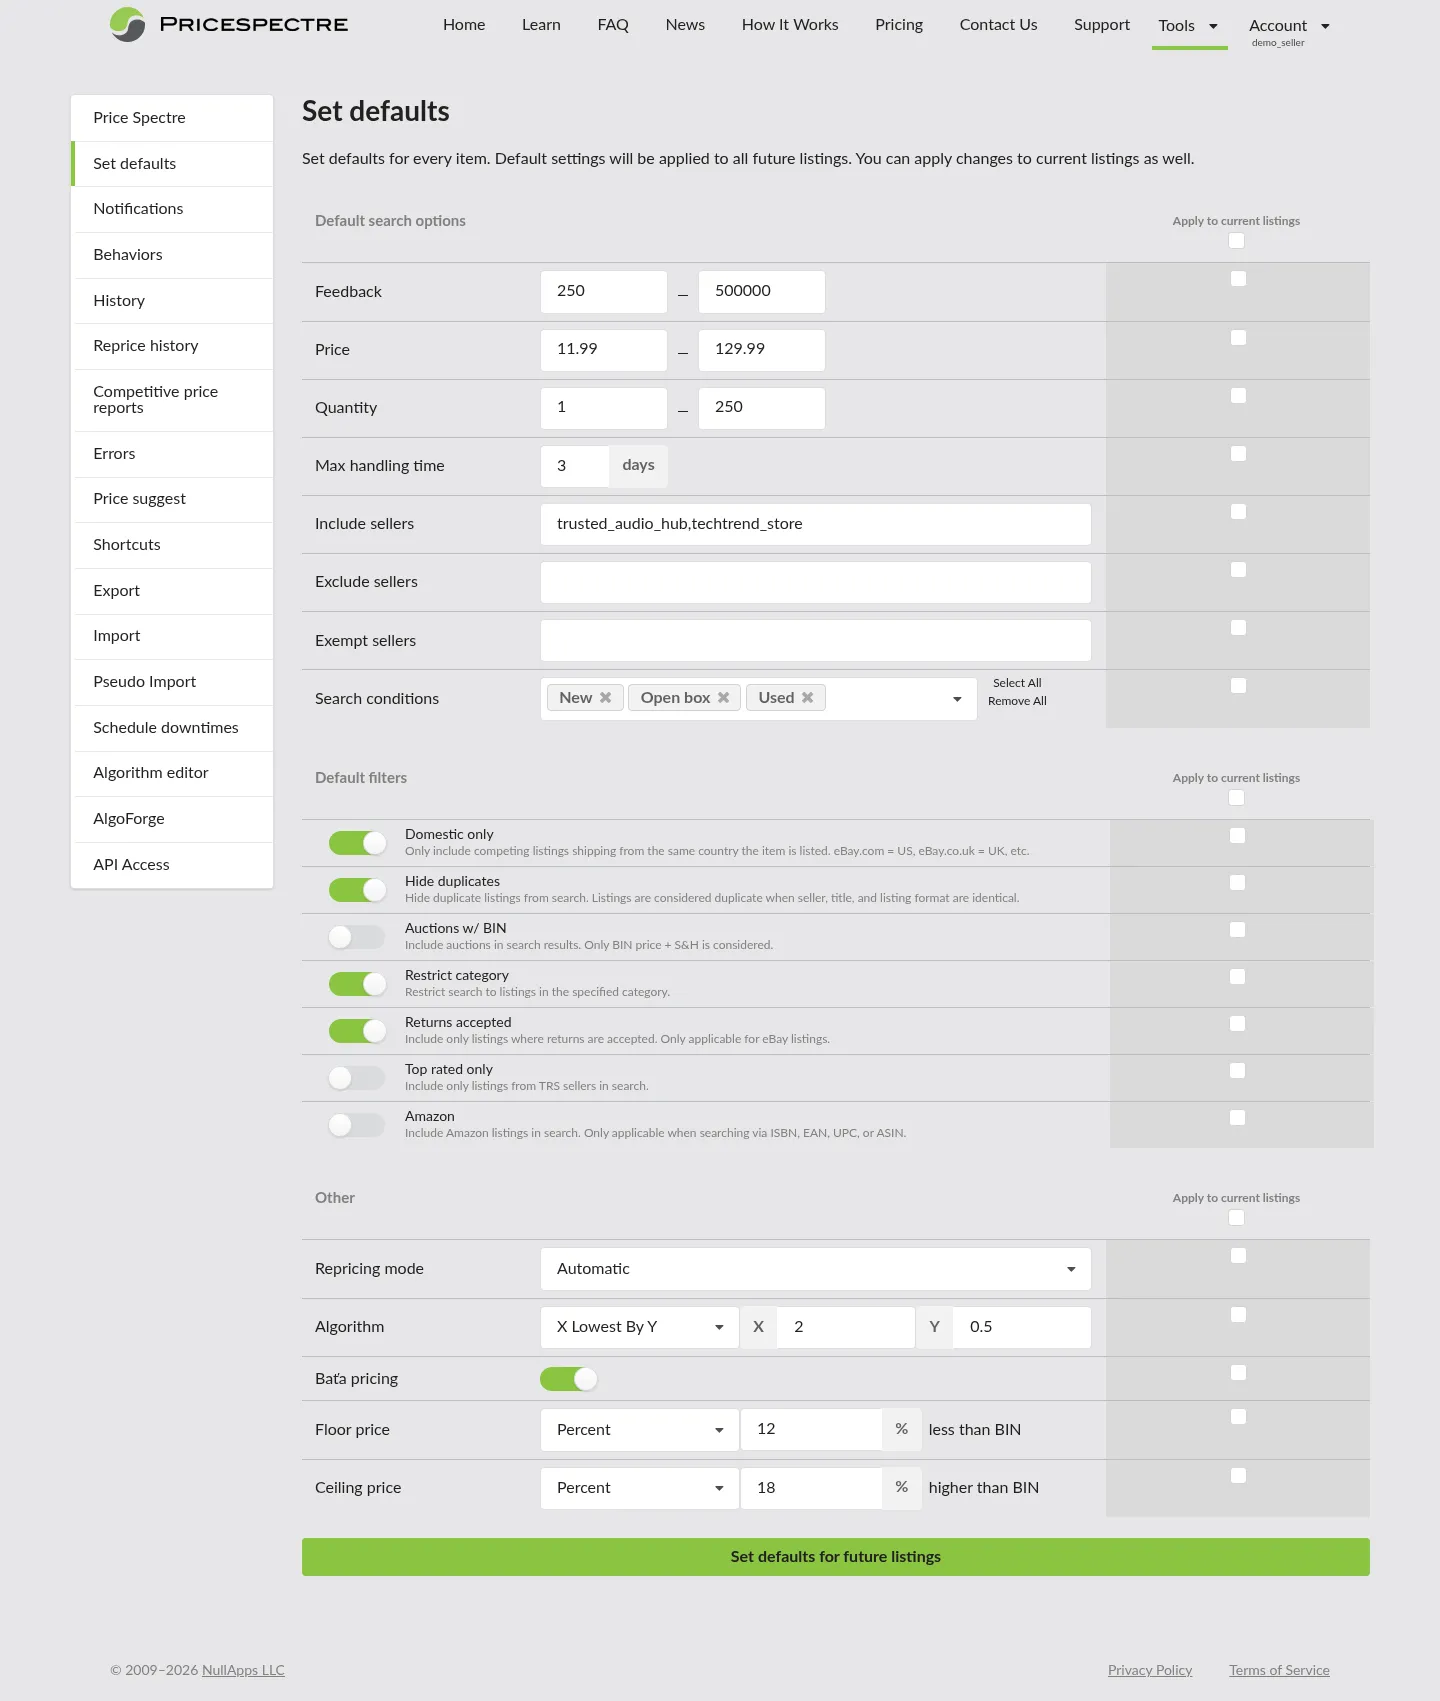
At the top of the page you will see the heading Set defaults and a short explanation that these values apply to every future listing and can optionally be applied to your current listings as well. That is the single mental model for the whole page.
How the Page Is Organized
The Set Defaults page has three stacked sections and a single save button at the bottom:
| Section | What it covers |
|---|---|
| Default search options | The criteria Price Spectre uses when it searches eBay for the competitor listings your items will be priced against — feedback range, price range, quantity, handling time, included/excluded/exempt sellers, and acceptable item conditions. |
| Default filters | Additional on/off switches applied to every search — things like domestic-only shipping, whether to include auctions with Buy-It-Now, whether to include Amazon listings, and so on. |
| Other | Everything else: repricing mode, the pricing algorithm and its parameters, psychological (Baťa) pricing, and the floor and ceiling that constrain the final price. |
Each row in every section has the same two parts:
- A control (input, dropdown, or toggle) on the right that holds the value of the default.
- A checkbox to the left of the row. Leaving the checkbox unticked means the value is saved only as a template for future listings. Ticking the checkbox opts that specific row in to also being applied to every listing you already have when you save. See Saving: Future vs. Future + Current Listings for the full behavior.
At the top of each section there is a single header checkbox that ticks or unticks every row in the section at once — useful when you want to push a whole section's worth of changes to existing listings in one go.

Tip: The row checkboxes do not affect whether a value is saved as a default — the control's value is always saved. They only decide whether that value is also pushed to your existing listings. It is perfectly fine to leave every checkbox unticked when all you want to do is set a template for future imports.
Default Search Options
The first section of the page, Default search options, controls which competitor listings Price Spectre looks at when it reprices your items. Every row here becomes part of the search the repricer runs on eBay on your behalf. Narrower criteria produce a tighter competitor set and usually a more consistent price; broader criteria find more candidates at the cost of sometimes pulling in listings you would not actually compete with.
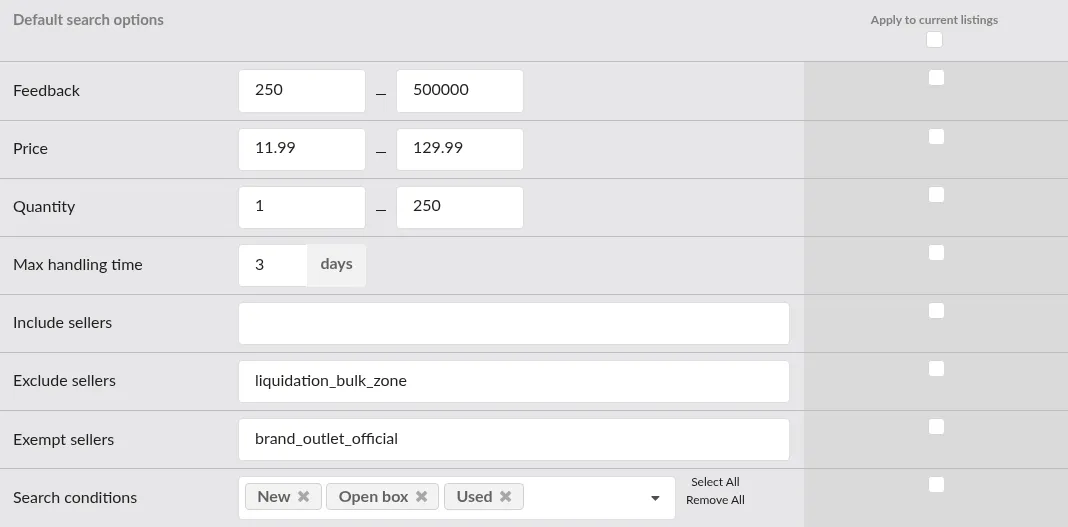
The table below lists each row, what it controls, and how the value is entered.
| Row | What it controls | How to enter it |
|---|---|---|
| Feedback | The seller-feedback range a competitor must fall into to be considered. Sellers below the minimum or above the maximum are excluded from the search. | Two numeric boxes — a minimum on the left and a maximum on the right — separated by a dash. Leave a box empty to remove that end of the range. |
| Price | The price range a competitor's listing must fall into to be considered, in the listing's own currency. | Two numeric boxes accepting decimals, separated by a dash. Use this to avoid being priced against outliers — extremely cheap bundles on one end or unusually expensive new-in-box listings on the other. |
| Quantity | The available-quantity range a competitor must have to be considered. | Two numeric boxes. Useful for excluding one-off "last one" listings when you are selling a regularly stocked item. |
| Max handling time | The largest handling time (in days) a competitor can have before they are excluded. A competitor slower than this value will not be counted. | A single number with a days label. Leave blank to apply no limit. |
| Include sellers | A list of seller usernames whose listings should be included in the search. | A comma-separated list of usernames (for example: seller1, seller2, seller3). Whitespace around each name is ignored. |
| Exclude sellers | A list of seller usernames whose listings should be skipped entirely. Useful for ignoring known low-price outliers. | Comma-separated usernames, same format as above. |
| Exempt sellers | A list of sellers who should not be filtered out by the other filters or rules (for example, you want to compete against them even if they would otherwise be excluded). | Comma-separated usernames, same format as above. |
| Search conditions | The eBay item conditions that a competitor's listing must have to be counted. | A multi-select dropdown. Two helper buttons sit next to it — Select All ticks every condition at once, and Remove All clears the selection. |
Tip: Make sure every username you type into one of the seller fields actually exists on eBay. A misspelt username — or a username belonging to a closed account — can cause eBay to reject the whole search for every listing that inherits the default. Those rejections show up on the Errors & Troubleshooting page. If you are unsure whether a name is spelt correctly, test it as a search filter in Tools > Price Spectre before saving it into defaults.
Note: Leaving a search option blank is not the same as unticking its checkbox. Blank means "no limit" for that option in the search; the checkbox in the left column only decides whether this row is also pushed to your existing listings when you save. See Saving: Future vs. Future + Current Listings.
Default Filters
The second section, Default filters, is a set of on/off switches that narrow the search further. Where Default search options lets you say what range a competitor has to fall into, Default filters lets you say what kind of competitor to count at all.
Each row is a single toggle next to a short description. Turn a toggle on to apply that filter to every search; leave it off to let competitors of that kind through.
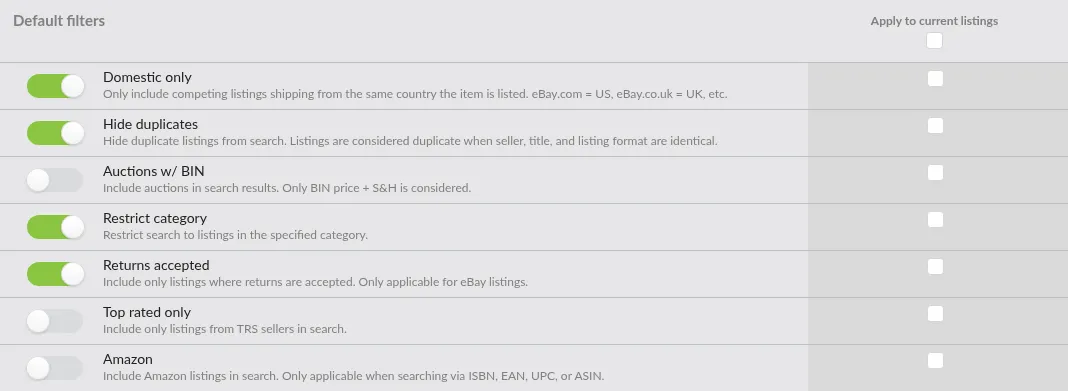
| Filter | Effect when on |
|---|---|
| Domestic only | Only includes competing listings that ship from the same country your listing is on. For example, listings on eBay.com are treated as United States; listings on eBay.co.uk are treated as the United Kingdom. Turn this on when you only want to compete domestically. |
| Hide duplicates | Hides duplicate listings from search results. Two listings are treated as duplicates when the seller, title, and listing format are identical. Useful when a single competitor has many near-identical listings that would otherwise dominate your competitor set. |
| Auctions w/ BIN | Includes auction-style listings that also have a Buy-It-Now price. Only the Buy-It-Now price plus shipping is considered — the live auction price is ignored. Leave this off to restrict the search to fixed-price listings only. |
| Restrict category | Restricts the search to listings in a particular eBay category. Each listing has two associated settings: this toggle, and a companion category selector that only takes effect when the toggle is on. The companion selector defaults to the listing's own eBay category and can be changed to any broader category above it in eBay's hierarchy. |
| Returns accepted | Only includes listings where the seller accepts returns. Applies to eBay listings only. Useful if you consistently offer returns and do not want to be undercut by sellers who do not. |
| Top rated only | Only includes listings from Top-Rated Sellers (TRS). Useful for premium listings where you want to compete only against established sellers rather than the long tail. |
| Amazon | Includes Amazon listings in the search as well. When this toggle is on, an additional Product Code entry becomes available so you can supply an ISBN, EAN, UPC, or ASIN for the Amazon lookup independently of the eBay search terms. |
Tip: The filters compose — every toggle you turn on applies in addition to the others. A combination like Domestic only + Hide duplicates + Restrict category is a reasonable starting point for most catalogs and substantially reduces the chance of being dragged around by an unrelated competitor.
Note: Turning off a filter here does not turn it off on listings that have already copied it as part of their per-listing settings. If you have existing listings that need the filter change applied too, tick the row's checkbox before saving — see Saving: Future vs. Future + Current Listings.
Other Defaults
The final section, Other, covers everything that is not a search criterion or a search filter. Five rows control how the repricer behaves once it has found its competitors: the mode it runs in, the algorithm that makes the pricing decision, how the final number is rounded, and the floor and ceiling that bound it.
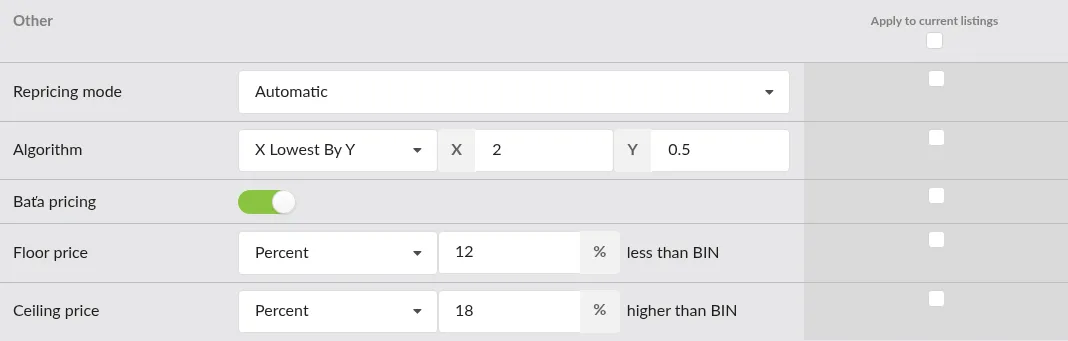
Repricing Mode
Repricing mode decides whether Price Spectre acts on its own or waits for you. The dropdown offers two choices:
- Automatic — Price Spectre reprices matching listings on its normal schedule, applying the new price directly to eBay.
- Manual — Price Spectre still evaluates listings on its schedule, but instead of pushing a price change it produces a recommendation that you review and accept.
Which mode is the right default depends on how hands-on you want to be. A catalog of thousands of steady-selling items is usually easier to run in Automatic with conservative floor and ceiling values. A smaller set of high-margin items where you would rather be in the loop on every price change is a better fit for Manual. Manual is also a good choice for very large catalogs where you want to trial Price Spectre first and see what the prices would have been set to before committing to automatic repricing. Either mode gives you access to the Competitive Price Reports feature, which can surface more detail about what Price Spectre would do or has done.
Algorithm
Algorithm chooses the built-in or custom repricing algorithm Price Spectre uses to decide a price. Pick one from the dropdown; the list includes every algorithm available on your account.
Depending on the algorithm you pick, one or two extra numeric inputs may appear to the right of the dropdown:
- No extra inputs — the algorithm does not take parameters.
- One input labelled X — the algorithm takes a single numeric parameter.
- Two inputs labelled X and Y — the algorithm takes two numeric parameters.

Each algorithm interprets X and Y differently — for example, one algorithm might treat X as "the rank of the competitor to compete against" while another treats it as "the number of days to wait between price changes". The value labels and step granularity (whole numbers vs. decimals) adjust automatically when you pick a different algorithm.
Tip: If you want to write or edit a custom algorithm for your account, do that first in Tools > Algorithm Editor and then come back here to set it as the default. See the Algorithm Editor guide for the full workflow, including how to simulate an algorithm before making it a default.
Baťa Pricing
Baťa pricing is a toggle that applies psychological rounding to the final price. It is named after the shoe company that popularized the pattern. When the toggle is on, Price Spectre may nudge the calculated price upward to land on a psychologically friendlier number — for example, if the algorithm calculates a price of $9.50 and the next competitor above you is at $10.50, the price can round up to $9.99 (or another rounding target configured on the Behaviors page). Baťa pricing will never reduce your rank against competitors — it will not push you above a competitor whose price you would otherwise be under — and it will never lower your price. The toggle has no effect on how competitors are searched or which algorithm runs; it only influences the number that is written to eBay at the end.
Floor Price
Floor price is the minimum price the repricer is allowed to pick. Even if an algorithm would otherwise drop the price lower, Price Spectre will not go below the floor. The row has a dropdown that controls how the floor is expressed:
- None — no floor is enforced. The only lower bound is whatever the algorithm itself decides.
- Amount — a fixed dollar amount. A second input appears for the value, with a note reading less than BIN — the amount you enter is subtracted from the listing's Buy-It-Now price to get the floor.
- Percent — a percentage. A second input appears for the percent value, also noted as less than BIN — Price Spectre reduces the Buy-It-Now price by that percentage to get the floor.
- Fixed — an absolute price. A second input appears for the value, and the floor is exactly that price, independent of the Buy-It-Now.

Note: Price Spectre will not reprice a listing that has no floor, so leaving the default at None does not open the door to unexpectedly low prices. What it does mean is that every new listing will arrive without a floor and cannot start being repriced until you set one on the listing by hand. For most catalogs it is simpler to pick a sensible Amount, Percent, or Fixed floor here so that newly added listings become eligible for repricing on their own.
Ceiling Price
Ceiling price is the maximum price the repricer is allowed to pick. It has the same shape as the floor, with one fewer option because a ceiling based on an absolute price is rarely useful:
- None — no ceiling is enforced.
- Amount — a fixed dollar amount. The value you enter is added to the listing's Buy-It-Now price to get the ceiling, and a higher than BIN note appears next to the input.
- Percent — a percentage. The Buy-It-Now price is increased by that percentage to get the ceiling, again noted as higher than BIN.
A ceiling is what keeps the repricer from walking the price upward indefinitely when competition disappears. Setting both a floor and a ceiling makes every listing's pricing predictable within a known band.
Tip: If your floor and ceiling end up in conflict — for example, a floor that works out to be higher than the ceiling — Price Spectre gives the floor precedence but the ceiling then prevents the price from being raised back down through it, so the listing gets locked at the floor. Review the combined effect of your floor and ceiling settings against a representative listing's Buy-It-Now price to make sure you actually want that outcome. See the Errors & Troubleshooting guide for how to diagnose pricing-boundary problems on specific listings.
Saving: Future vs. Future + Current Listings
At the bottom of the page there is a single save button. What it does when you click it depends on which checkboxes are ticked in the rows above it — and the button's label changes to tell you which mode it is in.
With No Checkboxes Ticked
When none of the row checkboxes are ticked, the button reads:
Set defaults for future listings
Clicking it saves every value on the page as your new default template. Nothing changes on any listing you already have. Anything you add to your account from this point forward — a fresh listing created in the dashboard, a listing brought in through the Import & Export workflow, or any other newly created listing — starts out with these values.
This is the mode to use when you are preparing for an upcoming import or adjusting a template you have not yet populated.

With One or More Checkboxes Ticked
As soon as any row checkbox is ticked — whether you tick it directly on a row or use the header "select all" checkbox to tick every row in a section — the button's label changes to:
Set defaults for future and current listings
Clicking it now does two things in sequence:
- Saves every value on the page as the new default template (the same future-listings save as above — no row is left out, regardless of which checkboxes are ticked).
- Pushes the values from the ticked rows into your existing listings, overwriting whatever each listing had on those specific fields. Rows whose checkbox is not ticked are left alone on existing listings.
That split is the most important thing to understand about this page: the control's value is always saved to the template; the checkbox decides whether it is also applied backwards to everything you already have.

Confirmation Messages
After a save, a short message appears near the top of the page:
- On success: Defaults saved for future listings successfully! (no checkboxes ticked) or Defaults saved for future and current listings successfully! (checkboxes ticked).
- On failure: an error banner with the reason. If the template portion of the save succeeded but the push to existing listings did not, the message says so explicitly and preserves the template change — you can retry the apply-to-current step without redoing the template.
Both messages can be dismissed with the × in the corner.
Tip: For large catalogs, save in two passes. First save with no checkboxes ticked to commit the template — this is quick and risk-free. Then, once you are comfortable with what you have chosen, tick the specific rows you want to push to existing listings and save again. Splitting the action this way lets you roll back by changing the defaults and saving again without ever having re-written every listing.
Note: The apply-to-current step only changes the fields you explicitly ticked. Everything else on every existing listing keeps its own values. Listings where you had previously set a specific floor or algorithm will therefore still have that specific value unless the corresponding row is ticked here.
A Recommended Workflow for New Catalogs
If you are bringing a catalog into Price Spectre for the first time, the sequence below gets you to a consistent, safe state with the least amount of per-listing work.
- Link your eBay account in Account > Link/Unlink if you have not already. Without a linked account the Set Defaults page will not open.
- Open Set Defaults and configure every section from top to bottom. Start with a conservative set of values — a restrictive search (domestic only, category-restricted, duplicates hidden), a predictable algorithm, and a floor and ceiling expressed as percentages of Buy-It-Now. Do not tick any checkboxes yet.
- Save with the button reading "Set defaults for future listings." This commits the template. Existing listings, if any, are untouched.
- Know that your existing eBay listings come in automatically. When you link your eBay account, Price Spectre pulls in every listing that is already live on eBay and treats them as existing listings — your saved template does not get applied to that initial batch automatically. Every new listing you create on eBay after the link is in place inherits the template without any extra action on your part.
- Spot-check a few listings after the import using Tools > Price Spectre. Confirm that the floor, ceiling, algorithm, and filters on individual items look the way you expected.
- If you have listings from before the import that need the same values, return to Set Defaults, tick the checkboxes on only the rows that should be pushed backwards, and save again. The button now reads Set defaults for future and current listings. Only the ticked rows are applied to your existing listings; everything else is left alone.
- Watch the Errors & Troubleshooting page for a day or two. Almost every problem caused by a bad default — an invalid seller filter, a floor/ceiling combination that cannot be satisfied — surfaces there. Fix the underlying default on this page and the errors will drop off on the next repricing cycle.
Tip: Keep a short note of which values you chose for your initial defaults. If you later need to onboard another batch of listings, you can reopen the page, re-apply the same values, and run the import with confidence that the new items will match the old ones.
Frequently Asked Questions
Do defaults get pushed to listings I already have, automatically?
No. Saving with no row checkboxes ticked only updates the template for future listings. Your existing listings are not modified. If you want a value to reach existing listings, tick its checkbox before saving — the button label will change to Set defaults for future and current listings so you know the behavior has switched.
I changed a default and saved, but my current listings still show the old value. Why?
You likely saved with that row's checkbox left unticked. Templates are decoupled from the listings they were once copied onto — once a listing is created, it carries its own independent values. Return to Set Defaults, tick the checkbox on the row whose value you want to push through, and save again. Only the ticked rows are written to existing listings on that save.
Can I save a partial change — for example, just the floor?
Yes. Every control's value is saved to the template every time you save the page, so you can change a single field and click save without touching anything else. If you want that partial change to also reach your existing listings, tick only that row's checkbox before saving.
Can I clear a default back to "no value"?
For the numeric search-option fields (Feedback, Price, Quantity, Max handling time), blank each box and save — blank is treated as "no limit" for that option. For the seller lists, clear the text to remove everyone. For the Search conditions dropdown, use the Remove All button next to it. For the floor and ceiling dropdowns, set the type to None.
What happens if I leave everything blank and click save?
Price Spectre stores the blank template and every future listing inherits it. There is no minimum number of fields you need to fill in. That said, saving with no floor, no ceiling, and permissive search options is rarely recommended.
What does the dash between two boxes on the Feedback, Price, and Quantity rows mean?
The boxes are a range. The left box is the minimum value and the right box is the maximum. Leaving a box blank removes that end of the range — for example, filling in only the right box on Price means "any price up to this value."
Do my defaults change live eBay listings without asking?
For most settings, no — Price Spectre only rewrites its own copy of a listing's settings, and the actual price on eBay only changes during a normal repricing cycle (and only if the algorithm, now working with the new default, decides to change it).
Floor and ceiling are the exception. Because they are pricing constraints that must be respected, changing either of them on existing listings triggers an immediate price check for every listing affected. The new price is worked out in three steps: Price Spectre starts with the listing's BIN price as the target, then lowers it to the ceiling if BIN sits above the ceiling, and finally raises it to the floor if the result would still sit below the floor. The number that comes out of those checks is what gets sent to eBay. In practice this means an unmanaged listing whose price was not already at BIN will reset to BIN whenever BIN falls inside the new bounds or to whichever price constraint that is applicable. You can watch the cycle's outcome on the Reprice History page.
Which settings are in this page, and which are set per listing?
The Set Defaults page is the account-wide template only. Every setting here can also be overridden on an individual listing from the main repricing tool (Tools > Price Spectre) — for example, a single high-margin item can have its own tighter floor without affecting the default. Defaults set the starting point; per-listing edits adjust individual exceptions.
Related Guides
- Price Spectre Tutorial — start here if you are still getting set up and have not yet linked an eBay account or configured your first listing.
- Algorithm Editor — reference for custom algorithms and their X/Y parameters, including how to simulate an algorithm's behavior before making it a default here.
- Import & Export — the companion workflow for bringing large catalogs into Price Spectre. Every listing you import inherits the template configured on this page at the moment of the import.
- Errors & Troubleshooting — the first place to check if your new defaults are producing unexpected errors on individual listings.
- Reprice History — the log of every price change Price Spectre has made, useful for verifying that a default change produced the effect you expected.
This guide covers Price Spectre's React-based interface. For the latest feature updates and release notes, visit the News section on the Price Spectre website.