
Shortcuts & Power-User Workflows
The longer you use Price Spectre, the more time you spend repeating the same handful of actions: enabling repricing on every newly imported listing, adding a competitor's username to your exclude list across the whole catalog, jumping back to the same filtered view of your inventory you were on yesterday, or nudging a single item's floor up by a dollar without leaving the search results. Price Spectre groups those high-volume actions into a few features that, once you know them, can save hours a week — the Shortcuts page for catalog-wide bulk changes, inline edits inside the Price Spectre search results, shareable filtered URLs, and a small set of keyboard conveniences scattered through the app.
This guide is for users who already know the basics of the Tutorial, have a working Reprice History read on what their listings are doing, and want to stop touching listings one at a time. It covers what each power-user surface is, when to reach for it, and the gotchas that show up only after you've tried to use it on a real catalog.
Table of Contents
- When to Reach for Each Tool
- The Shortcuts Page
- Inline Edits in the Price Spectre Search Results
- Sorting and Filtering Power Moves
- Saving and Sharing Views Through the URL
- Keyboard Conveniences
- Recommended Power-User Workflows
- Tips and Best Practices
- Frequently Asked Questions
- Related Guides
When to Reach for Each Tool
Three places in Price Spectre let you change many listings at once, and each is built for a different shape of work. Picking the right one keeps you out of the weeds.
| You want to... | Use | Why |
|---|---|---|
| Turn repricing on or off for an entire category, or for your whole catalog. | Shortcuts page (Tools → Shortcuts) |
One click affects every matching listing; no row-by-row toggling. |
| Add or remove a competitor's seller name from your include / exclude / exempt lists across every listing. | Shortcuts page, Bulk add/remove sellers section | Editing one listing's filters and replicating it manually is the slowest possible way to do this. |
| Change a single listing's floor, ceiling, or algorithm. | Inline edit on the Price Spectre search results | Avoid opening the listing's detail view for trivial edits. |
| Push the same algorithm or floor/ceiling change to dozens of listings that share a property. | Import / Export (CSV round-trip) — see the Import & Export Guide | The Shortcuts page handles enable/disable and seller lists; everything else flows through CSV. |
| Re-open the exact view you were on yesterday — same search term, same status filters, same page. | Saved URL (browser bookmark) of the Price Spectre tool | The Price Spectre tool encodes its filters in the URL so a bookmark restores the view. |
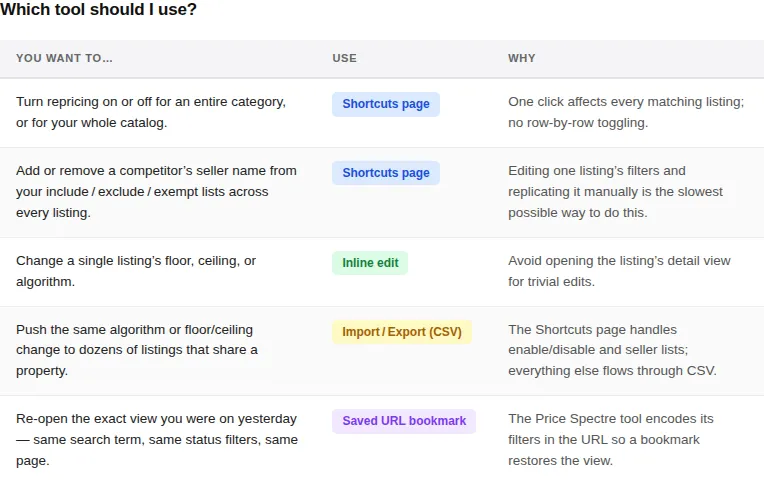
Tip: The Shortcuts page is the fastest tool for the narrow set of operations it supports — it does not let you change algorithms, floors, ceilings, or any per-listing setting beyond enabling/disabling and seller lists. For everything else, plan on a CSV round-trip through Import & Export.
The Shortcuts Page
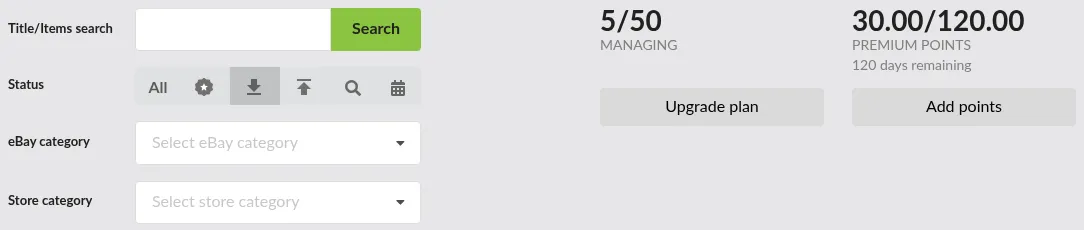
The Shortcuts page consolidates the bulk actions that high-volume sellers run most often: turning repricing on or off for many listings at once, and adding or removing seller names from the include, exclude, and exempt lists that every listing's search shares. It also gives you a top-level read on how many of your listings are actively managed and how many of your billing-plan slots are still available.
Finding the Shortcuts Page
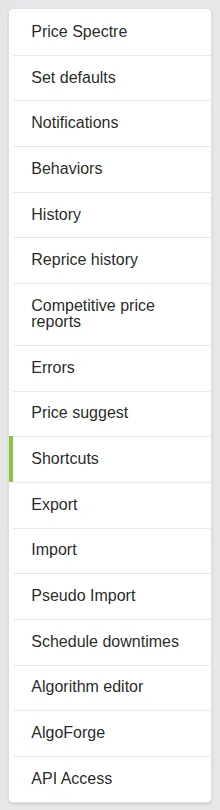
From the top navigation, click Tools and choose Shortcuts from the side menu.
The page loads with your current account-wide totals and category list already populated. If your eBay account is not linked or its authorization has lapsed, the page replaces the controls with a prompt to link it — follow that link to Account > Link/Unlink and re-authorize, then return to Tools > Shortcuts.

Reading the Account Stats Strip
Across the top of the page is a strip of four totals that describe your account at a glance:
- Billing plan — the maximum number of listings your current plan allows you to actively reprice. Change this in Account > Billing Plan.
- All Listings — the total number of listings Price Spectre is aware of for the linked account, whether or not they are being repriced.
- Managed — how many of those listings currently have repricing enabled. This counts toward your billing plan's limit.
- Left — how many more listings you can enable before reaching your plan's limit. When this number is small, the value turns red as a visible warning.

If Managed has caught up to Billing plan, an inline notification appears reminding you that you have hit the cap. The Manage All button below is disabled until you either disable some listings or upgrade the plan.
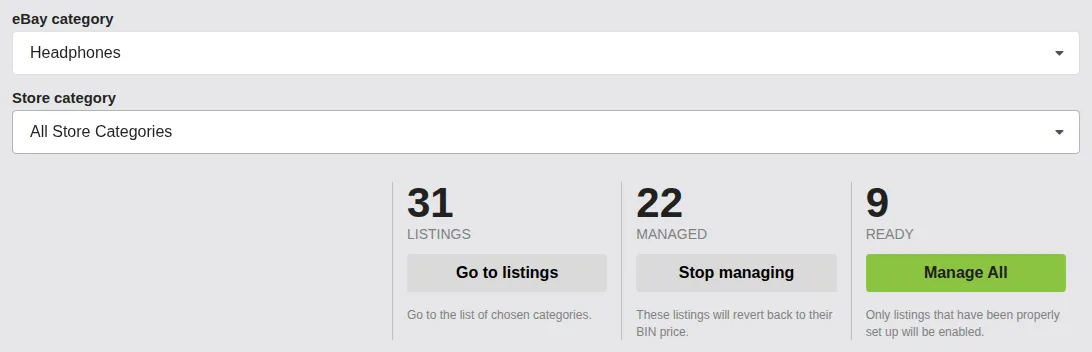
Scoping Bulk Actions With Categories
By default, the bulk-manage controls below the stats strip act on every listing in the linked account. To narrow them down, pick an eBay category and/or a Store category from the two dropdowns above the action row. The page is designed so that:
- Selecting All Categories in either dropdown removes that constraint.
- Both dropdowns combine with AND semantics — if you pick Collectibles in the eBay dropdown and Vintage Sports Cards in the Store dropdown, the action only touches listings that match both.
- The numbers in the action row (Listings, Managed, Ready) refresh to reflect the current scope so you can see how many items will be affected before you click anything.
Tip: Always confirm the scope numbers update before clicking Manage All or Stop managing. The buttons act on the currently displayed scope, not on the dropdowns the moment they are clicked, but if you change the dropdowns and immediately click without waiting for the counts to refresh, you may not be acting on the scope you expect.
Bulk Manage and Stop Managing
The middle row of the page has three cells, each with a count and a button:
- Listings — how many listings match the current category scope. The button Go to listings jumps you to the Price Spectre tool with the same category filters already applied — useful when you want to sanity-check exactly which items are in scope before running a bulk action.
- Managed — how many of those scoped listings currently have repricing enabled. The button Stop managing disables repricing on all of them in one step. The listings stay in your account; their managed switch is simply turned off, and they will revert to their original Buy It Now price on eBay over the next reprice cycle.
- Ready — how many of those scoped listings are eligible to be enabled but currently are not. "Ready" means Price Spectre has the floor and the other minimum settings it needs to safely reprice the listing. The button Manage All turns repricing on for all of them at once.

The actions are not destructive — disabling repricing does not delete the listing's settings, and enabling repricing does not change any per-listing values like floor, ceiling, or algorithm. They only flip the "Managed" switch on each affected listing. To change what those listings reprice toward, configure your defaults on the Set Defaults page (see the Account & Listing Defaults Guide) before running Manage All, or edit per-listing values inline as described in the next section.
Note: Manage All respects your billing plan's remaining capacity. If your current scope contains more Ready listings than the Left number on the stats strip, the button is disabled — Price Spectre will not pick a subset of your listings to enable on your behalf, since deciding which ones to manage is yours to make. To proceed, either upgrade your plan to fit the full scope or narrow the category dropdowns until Ready is at or below Left.
Bulk Add or Remove Sellers
The lower half of the page is dedicated to seller-list management. Every listing in your account shares the same set of include, exclude, and (optionally) exempt seller lists, but those lists are stored per-listing — meaning that adding a seller to one listing does not add it to the others. The Bulk add/remove sellers section is the supported way to update all of them at once.
There are up to three input boxes:
- Include sellers — sellers you only want to compare against. If non-empty, Price Spectre ignores everyone else when it searches for competitors.
- Exclude sellers — sellers you want to ignore. Their listings are dropped from the competitor set even if they would otherwise match.
- Exempt sellers — a premium feature that is only present when the Exempt sellers option is enabled on the Behaviors page. An exempt seller is one whose listings are allowed to bypass certain search filters — for example, minimum or maximum feedback or Top-Rated Seller status — so they remain in your competitor set even when those filters would otherwise exclude them. See the Behaviors page for context on enabling this option.
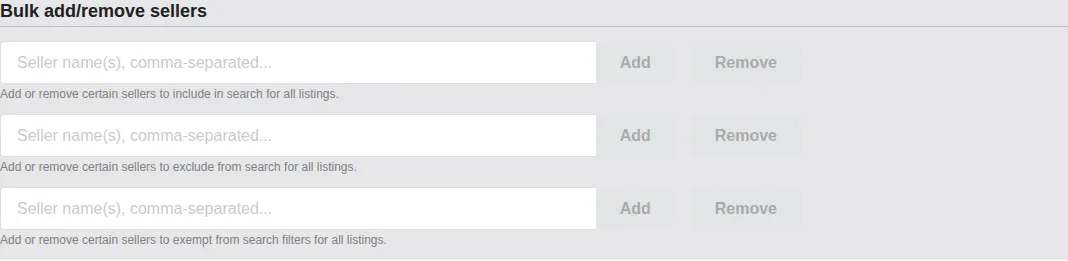
For each box, type one or more eBay seller usernames separated by commas or spaces, then click Add to merge them into the corresponding list on every listing in your account, or Remove to take them out of every listing. The input does not clear until the action succeeds, so if a request fails you can retry without re-typing.
A few rules to keep in mind:
- The action runs across the entire account, not the currently selected category scope. The category dropdowns above only affect the Listings, Managed, and Ready numbers and the bulk-manage buttons; they do not limit seller-list changes.
- Adding a seller that is already on a listing's list is a no-op for that listing — there are no duplicates to clean up.
- Removing a seller that is not on a listing's list is also a no-op. You can safely run Remove as a precaution after spotting a username you are not sure you ever added.
- Usernames are matched case-insensitively, the same way eBay treats them.
Tip: Treat the Add and Remove buttons as idempotent. If you are not sure whether a username made it into your lists last time, running Add again is safe; running Remove for usernames you no longer want is safe even if some listings never had them.
Going to the Filtered Listings View
The Go to listings button on the Listings cell is a small but high-leverage shortcut: it takes you to the Price Spectre tool with the same category dropdowns already applied as filters. It is the fastest way to go from a top-level "I want to do something to this category" decision to seeing the actual rows you are about to act on.
The button is also useful when you want to spot-check what is in a category before deciding what to do next. From the filtered listings view you can see the actual items, sort them, and use the inline edits described below to fix individual rows. For bulk per-listing settings changes — floor, ceiling, algorithm, or search filters — see the Import & Export Guide for the supported CSV round-trip workflow.

Inline Edits in the Price Spectre Search Results
The Price Spectre tool's search results view (Tools → Price Spectre) is more than a read-only list — most of the columns are editable in place, so you can fix one listing's floor, switch its algorithm, or toggle its managed state without leaving the page or opening a separate edit dialog. Inline editing is the right move for one-off corrections; for batch edits, prefer Import & Export or the Shortcuts page.
Per-Listing On/Off Toggle
Each row has a Managed toggle that turns repricing on or off for that single listing. Flipping it has the same effect as Manage All or Stop managing on the Shortcuts page, just narrowed to one item. Use it when you want to take a single listing out of the rotation temporarily — for example, while you investigate a pricing question — without changing anything else.

Each listing also displays a small status dot next to it. A green dot means the listing has every value Price Spectre needs to reprice safely and is ready to be managed; a red dot means a required setting (most often a floor) is missing. If you see a red dot, fill in the missing value inline as described next, and the dot will turn green.
Editing Floor and Ceiling in Place
The Floor price and Ceiling price columns are inputs, not labels. Click into either one and type a new value. The new value is not saved by simply tabbing or clicking away — see Confirming and Discarding Changes below for how to persist it. Edits are validated, so a non-numeric value or a floor that is higher than the ceiling is rejected before it is saved, with an inline error explaining why.

Note: Inline floor and ceiling edits change only the listing you are editing. To roll a new floor or ceiling out across many listings, change your defaults on Set Defaults and choose to apply them to existing listings (see the Account & Listing Defaults Guide), or do a CSV round-trip through Import & Export.
Switching the Algorithm Inline
The Algorithm column is a dropdown for each row. Open it to pick a different algorithm — built-in or one of yours from the Algorithm Editor — and the change is saved against that listing alone. The next reprice uses the new algorithm with the listing's existing floor, ceiling, and search filters; no other settings are touched.

If you do not see a custom algorithm you expect to be there, confirm it has been saved in the Algorithm Editor. Drafts that have never been saved do not appear in the dropdown.
Confirming and Discarding Changes
Inline edits are not persisted when the input loses focus. To save your changes, you must do one of three things:
- Press Enter in any focused field. Pressing Enter saves every pending edit on the current page at once — floors, ceilings, and algorithm changes across every row you touched, all in a single batch.
- Click the Save button at the page level. This is equivalent to pressing Enter — it commits every pending edit on the page in one batch.
- Toggle the Managed switch on a row. This persists the changes on that specific row only (along with the new managed state). Pending edits on other rows of the same page stay pending until you press Enter, click Save, or toggle their own Managed switches.
Because Enter and Save commit the whole page at once, it is good practice to verify your edits across the visible page before pressing either one. If a save fails — most often because of a validation error or a transient network issue — the affected row shows an inline notification describing what went wrong so you can fix and re-save.

Tip: When you have a long list of small per-listing fixes to make, leave the Reprice History tab open in another browser tab. After your inline edits trigger their next reprice, you can verify the new behavior on the Reprice History view without flipping back and forth between settings and logs.
Sorting and Filtering Power Moves
The Price Spectre search results carry a surprising amount of power if you treat them as a workspace rather than a catalog. The same combination of column sorts, status-flag filters, and category scoping can answer most "which listings need attention right now?" questions without leaving the page.
Sorting Columns
Click any sortable column header to sort the current results by that column. Click the same header a second time to reverse the direction; click a different header to switch the sort key. The sort order is honored across pages, so navigating to page 2 continues the same ordering.
The columns most useful for power-user triage are:
- Floor price and Ceiling price — sort ascending to find the listings closest to either bound.
- Current price — pair with a status-flag filter to see how the listings that hit floor or ceiling are distributed.
- Start date — sort descending to put your newest listings at the top, useful right after a fresh import.
- Algorithm — group listings by which algorithm they currently use; helpful when retiring an old algorithm.

Tip: If you sort by a column whose values are very similar across many rows (for example, "Algorithm"), Price Spectre falls back to a stable secondary order so identical rows do not jump around between page loads.
Status-Flag Filters
Above the search results is a row of status-flag toggles — Lowest price, Floor reached, Ceiling reached, No competitors found, and Scheduled downtime. Each toggle filters the results to listings whose most recent reprice ended in that state. Multiple toggles can be active at once and combine with AND semantics — toggling Floor reached and Ceiling reached at the same time only shows listings where both flags are set on the same reprice (in practice, listings whose floor and ceiling are equal, which is occasionally useful as a way to find pinned-price items but more often surfaces a configuration mistake).
For most "what needs attention?" work, run each flag as its own pass: toggle Floor reached alone to review one category of stuck listings, then switch to Ceiling reached alone to review the other.
The All button next to the toggles clears every status-flag filter at once and is the fastest way to get back to a clean view.
Listings stuck at Floor reached for days are candidates for a lower floor or a different algorithm; listings at No competitors found may have a search filter that is too narrow.
Combining Categories with Status Flags
The eBay category and Store category dropdowns inside the Price Spectre tool's search interface compose with the status-flag toggles. The combination is the lever that turns the search results into a triage queue: pick a category, turn on the status flag you care about, and the page narrows to the exact subset of listings that match both.
For example, to find all your Collectibles → Coins listings that hit the floor on their last reprice, pick that path in the eBay category dropdown and toggle Floor reached. The result count refreshes immediately and the page redraws to show only those rows.
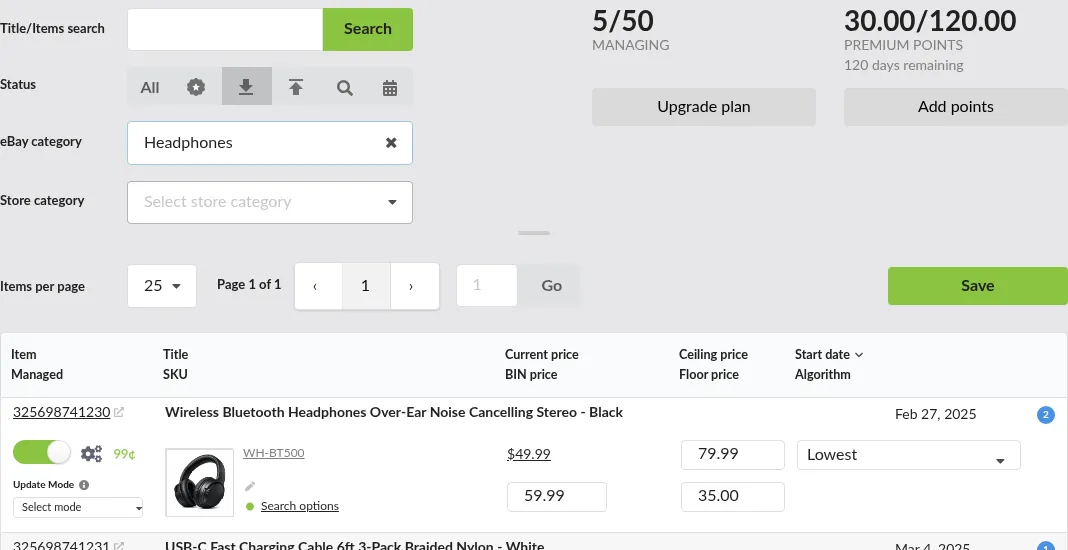
Page Size and Pagination
The pagination controls at the bottom of the results let you change how many rows are shown per page. Larger page sizes make sweeping inline edits faster (fewer page transitions) but slow the page down as totals grow. A page size of 50 is a reasonable default for desktop sessions; on mobile, 10 is preselected for performance.
The page-size selector and the current page number are remembered across navigation within the session, so jumping to a listing's detail and clicking back returns you to the page you were on.
Tip: When using inline edits to fix a long list of items, pick a page size you can comfortably scan in one screen. It is easier to confirm every change took before moving on than to scroll back and forth.
Saving and Sharing Views Through the URL
The Price Spectre tool encodes its current view — search term, status flags, categories, sort, page size, and page number — into the URL. That single design decision makes the page bookmarkable and shareable: any URL you copy from your address bar reproduces the same view when opened later or by someone else with access to the account.
How the URL Captures Your View
As you change the search box, toggle status flags, pick categories, or paginate, the URL silently updates to reflect the new state. You do not need to hit a "Save view" button — the address bar always represents the current view.

Removing or editing the parameters by hand is fully supported. If you delete the search term from the URL and reload, the view comes back without that filter. If you copy a URL with a particular page number, opening it lands you on that page directly.
Bookmarking a Filtered View
Once you have set up a view you return to often — for example, "All managed listings in my Sneakers store category, sorted by Floor price ascending, page size 50" — bookmark the page in your browser. Opening the bookmark restores the exact view, including the sort and the page size. Browsers vary in how they handle bookmarks, but every modern browser preserves the full URL including the parameters.
A few practical bookmarks worth saving:
- Floor / Ceiling triage —
Tools → Price Spectrewith Floor reached and Ceiling reached toggled on. This is your daily attention queue. - Recently imported —
Tools → Price Spectresorted by Start date descending. Useful right after a Pseudo Import or CSV import. - By store category — one bookmark per store category you actively manage, so a sub-team can land directly on their slice of the catalog.
Sharing a View With a Manager or Teammate
Because the URL captures the full view, copying it from your address bar and pasting it into a chat or email lets a manager or teammate land on exactly the same page you are looking at — provided they have access to your account, either directly or through the manager-access flow described in the Manager Access and Manager Dashboard guides.
This is the recommended way to escalate a question. Instead of describing "the listing that hit ceiling around 9am yesterday," send the URL of the Reprice History page filtered to that item. The other person opens the link, sees the same data, and there is no ambiguity about which listing or which view you mean.
Note: URLs can contain identifying information about your account scope (for example, category IDs). Treat them like internal links — fine to share with managers, teammates, and Price Spectre support, but not appropriate to post publicly.
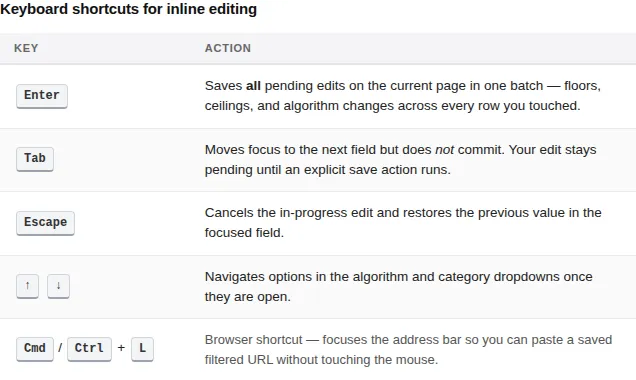
Keyboard Conveniences
Price Spectre is not a fully keyboard-driven application, but a handful of keyboard behaviors are worth knowing because they show up in the places you spend the most time.
- Search box — Enter runs the search. Inside the Title/Items search box on the Price Spectre tool, pressing Enter is equivalent to clicking the Search button.
- Inline edits — Enter commits all pending edits on the current page in one batch. The page-level Save button does the same thing. The per-row Managed toggle also persists pending edits, but only for the row whose toggle was flipped. Tab moves focus to the next field but does not commit — your edit stays pending until one of the explicit save actions runs.
- Inline edits — Escape cancels the in-progress edit and restores the previous value in the focused field. Use it any time you started typing into the wrong field, before pressing Enter.
- Dropdowns — keyboard navigation works in the algorithm dropdown and the category dropdowns: open with Enter or Space, move with the arrow keys, confirm with Enter.
- Browser shortcuts are the unsung power-user feature. Cmd/Ctrl + L focuses the address bar so you can paste a saved URL. Cmd/Ctrl + click on a listing's item number opens the related view in a new tab — useful for keeping the search results open while you investigate one item.
Tip: If a keystroke does not seem to be doing what you expect, check that focus is in the input you think it is. Clicking elsewhere on the page (for example, a row's title link) moves focus away from the inline editor and the next keypress goes to the browser, not Price Spectre.
Recommended Power-User Workflows
The features above are most useful when combined into repeatable routines. The four workflows below cover the situations that come up most often once a catalog grows past a few hundred listings.
Onboarding a Newly Linked eBay Account
When you have just linked a new eBay account and Price Spectre has finished pulling its listings in, follow this sequence to get the catalog into a managed state quickly.
- Open Tools → Set Defaults and confirm your default floor formula, algorithm, and search filters reflect what you want every new listing to start with. See the Account & Listing Defaults Guide.
- Open Tools → Shortcuts. Use the eBay and Store category dropdowns to scope to the part of the catalog you want to enable first if it lives in its own category.
- Confirm the Ready count looks reasonable for the number of listings in scope. If it is much smaller than expected, some listings are missing the values they need to reprice — fix them per-listing inline or run a CSV round-trip through Import & Export to set the missing values in bulk.
- Click Manage All to enable repricing on all the ready listings in scope. If Ready is greater than Left, narrow the scope or upgrade your plan first — the button is disabled until the scope fits within your remaining capacity.
- Open Tools → Price Spectre, sort by Start date descending, and spot-check the first page of newly imported rows for surprises (an unexpectedly low floor, a wrong algorithm).
- After the next reprice cycle, check Tools → Reprice History for the new items. See the Reprice History Guide for the columns and flags to watch for.
Reacting to a Problem Competitor
When a competing seller is dragging your prices around — repeatedly undercutting in a way that pushes your listings to their floor — the fastest mitigation is to exclude that seller from the search across every listing.
- Confirm the username from the Reprice Record view of an affected listing's recent reprice. (See the Reprice History Guide.)
- Open Tools → Shortcuts.
- In the Bulk add/remove sellers section, paste the username into the Exclude sellers box and click Add.
- Optionally trigger a manual reprice on a representative listing or wait for the next automatic cycle, then verify on Reprice History that the seller is no longer in the competitor set for new reprices.
- To reverse the change later, paste the same username into the same box and click Remove.
Pausing a Category for a Promotion
To run a promotion or hand-priced sale on one category without Price Spectre overwriting your price changes, you have two options:
Option A — pause from inside Price Spectre. This is the cleanest way to pause repricing for a category you control end-to-end:
- Open Tools → Shortcuts and pick the eBay or Store category for the promotion.
- Confirm the Managed count reflects the listings you want to pause.
- Click Stop managing to disable repricing for the entire scope.
- Run your promotion. While paused, listings keep whatever price you set manually on eBay; Price Spectre will not touch them.
- When the promotion ends, return to Tools → Shortcuts with the same category scope and click Manage All to bring repricing back. The listings keep their per-listing settings (floor, ceiling, algorithm) — only the Managed switch was changed.
Option B — let eBay's promotion block price changes. When you set up a promotion on eBay, eBay itself can block price changes on the participating listings for the duration of the promotion. You do not need to pause anything in Price Spectre. The trade-off is that Price Spectre will still attempt to reprice on its normal schedule and will receive failure responses from eBay for each blocked attempt — those show up as errors on Tools → Errors and as failure entries in your records. This is normal and expected for the duration of the promotion; the failures clear themselves once eBay stops blocking the listings.
Tip: If you only need to pause a small number of listings, the per-row Managed toggle in the Price Spectre search results is faster than visiting Shortcuts. The Shortcuts route is best when the pause covers many listings at once.
Daily Sweep of Listings That Need Attention
A short daily routine catches problems before they snowball. Because the status-flag toggles use AND semantics, each flag is its own pass:
- Open the bookmarked Price Spectre view with only Floor reached toggled on. Skim the list — listings that have been stuck at the floor for several days deserve a closer look, either because the floor is too high for the current market or because the search filters are letting in unusually cheap competitors.
- Switch to a view with only Ceiling reached toggled on, and do the same review. Stuck-at-ceiling items are usually a sign that the ceiling is too low or that the algorithm is consistently outbidding the market.
- For each problem listing in either pass, click into its Reprice Record to see the competitor snapshot.
- Adjust the floor, ceiling, or algorithm inline in the search results — remembering to press Enter or click Save to persist — or open the Algorithm Editor if the algorithm itself needs to change.
- Switch to a view with only No competitors found toggled on and review that list as well — listings here are repricing against an empty competitor set, often because of an over-restrictive search filter.
- Wrap up by checking Tools → Errors for any listings that surfaced a sync or token error overnight (see the Errors & Troubleshooting Guide).
Saving each of these views as its own browser bookmark makes the sweep a few clicks instead of a setup exercise. The whole routine typically takes under fifteen minutes once the bookmarks are in place.
Tips and Best Practices
- Pick the right tool for the change. Shortcuts handles enable/disable and seller lists. Inline edits handle one-off per-listing tweaks. CSV round-trips through Import & Export handle everything else. Trying to use Shortcuts for what should be a CSV change — or the reverse — is the most common cause of slow afternoons.
- Run actions on the smallest scope that does the job. When using Shortcuts, narrow the category dropdowns first and verify the count. A misaimed bulk action across the whole catalog can be undone, but undoing it takes longer than aiming carefully the first time.
- Bookmark before you tweak. Save your common Price Spectre views as browser bookmarks so a stray category change does not cost you the URL you wanted to share.
- Idempotent seller updates. Treat the Add and Remove buttons in the seller-list section as safe to re-run. They are, and re-running them is often the fastest way to make sure a change took.
- Verify with Reprice History, not the settings screen. A floor or algorithm change is only meaningful once a reprice has run with it. Cross-check on the Reprice History view a cycle or two after the edit.
- Keep the Reprice History tab open during edits. Power-user sessions tend to bounce between settings and logs. Two browser tabs make that round-trip painless.
Frequently Asked Questions
Does Stop managing on the Shortcuts page delete my listings? No. Stop managing only flips the Managed switch off on every listing in the current scope. Floor, ceiling, algorithm, and seller lists are preserved, and you can turn repricing back on with Manage All later.
If I run Manage All but the scope contains more listings than my plan allows, what happens? The Manage All button is disabled and the action does not run. Price Spectre will not pick a subset of your listings to enable on your behalf — deciding which listings to manage is a decision you keep, not one the tool makes for you. To proceed, narrow the category dropdowns until Ready is at or below the Left number on the stats strip, or upgrade your plan to fit the full scope.
Why is the Manage All button greyed out even though I have Ready listings? The most common cause is that the Ready count in scope exceeds the Left capacity from your billing plan, as described above. The button re-enables once you narrow the scope, raise the plan, or disable enough other listings to make room. Less commonly, the page's prerequisites (like a linked eBay account) are not met; the message at the top of the page describes what to fix.
Can I scope the bulk seller-list update to a category? No. The Bulk add/remove sellers section always acts on every listing in the linked account. The category dropdowns above it only narrow the bulk-manage row. To update sellers for only a subset of listings, do that work through Import & Export.
Will inline editing a floor or ceiling apply to similar listings? No. Inline edits only change the single listing you are editing. To roll a value out across multiple listings, use the Set Defaults page (with the option to apply to existing listings) or a CSV round-trip.
Why don't my filter changes show up when I share my URL with a teammate? Most likely they are signed into a different Price Spectre account, or signed in but viewing a different linked eBay account. URLs include the filter state but not the account context — the recipient must already be in the right account, or have it accessible via the manager-access flow, before the URL will resolve to the same view.
Can I undo a Shortcuts bulk action? There is no single "undo" button, but the actions are reversible. To undo a Manage All, click Stop managing with the same category scope. To undo a seller list Add, run Remove for the same usernames. The listings affected are easy to identify because the relevant counts on the stats strip move in the opposite direction.
Related Guides
- Tutorial — for new users who have not yet linked an eBay account or set their first floor and ceiling.
- Account & Listing Defaults — how to configure the values that every new listing inherits, so the Manage All button on Shortcuts has a sensible target state.
- Reprice History — how to read the Reprice History, Reprice Record, and Price History views to confirm your bulk changes had the intended effect.
- Errors & Troubleshooting — what to do when a listing shows up on the Errors page and Shortcuts cannot enable it.
- Import & Export — for everything Shortcuts cannot do directly: bulk floor, ceiling, algorithm, and per-listing search-filter edits.
- Algorithm Editor — when an inline algorithm switch is not enough and the algorithm itself needs to change.
- Manager Access and Manager Dashboard — for sharing filtered URLs with managers or teammates.